

Collecting payments with React Native & RevenueCat (Part 4): Building a Paywall screen

We'll add a React Provider wrapping the entire app, granting us easy access to various actions and information, such as purchasing a subscription, obtaining details about our offerings, and more!
SpiroKit for SaaS
In case you want to save weeks of painful work & research on your next React Native app, checkout SpiroKit for SaaS. It's a starter template that comes with Purchases, Push Notifications, Authentication, Analytics, Error Reporting and more. It also includes a Notion template to guide you through the entire process. If you get a licence, you won't need to follow the rest of this guide ;)
Building a development client
Before we can begin working on the app, we need to run it locally to test our changes. Since react-native-purchases is a native package, we require a development build for our app. Execute the following command to obtain a dev-client with EAS.
# Replace platform based on your needs
eas build --platform [ios|android] --profile development
Once the development build is ready, you'll need to install it on an actual device, as the RevenueCat package cannot be tested on a simulator.
Adding a Purchases provider to your app
We could drop all the necessary logic to retrieve our offerings information directly into a component. However, I believe it would be even better to have a provider with all this logic encapsulated, wrapping the entire app, so you can easily access the information from any component. Let's begin by creating a few files:
mkdir context
touch context/PurchasesProvider.tsx
touch context/PurchasesContext.tsx
Copy & paste the following code:
// context/PurchasesContext.tsx
import { createContext } from "react";
import {
  CustomerInfo,
  MakePurchaseResult,
  PurchasesOffering,
  PurchasesPackage,
  PurchasesStoreTransaction,
} from "react-native-purchases";

export type PurchasesContextProps = {
  currentOffering: PurchasesOffering | null;
  purchasePackage: (
    packageToPurchase: PurchasesPackage
  ) => Promise<MakePurchaseResult>;
  customerInfo?: CustomerInfo;
  isSubscribed: boolean;
  getNonSubscriptionPurchase: (
    identifier: string
  ) => Promise<PurchasesStoreTransaction | null | undefined>;
};

const PurchasesContext = createContext<PurchasesContextProps | null>(null);

export default PurchasesContext;
// context/PurchasesProvider.tsx
import React, { useEffect, useState } from "react";
import PurchasesContext from "./PurchasesContext";
import Purchases, {
  CustomerInfo,
  LOG_LEVEL,
  PurchasesOffering,
  PurchasesPackage,
} from "react-native-purchases";
import { Platform } from "react-native";

type PurchasesProviderProps = {
  children: JSX.Element | JSX.Element[];
};

const androidApiKey = process.env.EXPO_PUBLIC_REVENUECAT_API_KEY_ANDROID!;
const iosApiKey = process.env.EXPO_PUBLIC_REVENUECAT_API_KEY_IOS!;

const PurchasesProvider: React.FC<PurchasesProviderProps> = ({ children }) => {
  const [initialized, setInitialized] = useState(false);
  const [offering, setOffering] = useState<PurchasesOffering | null>(null);
  const [isSubscribed, setIsSubscribed] = useState(false);
  const [customerInfo, setCustomerInfo] = useState<CustomerInfo>();

  const init = async () => {
    Purchases.configure({
      apiKey: Platform.OS === "android" ? androidApiKey : iosApiKey,
    });

    if (__DEV__) {
      Purchases.setLogLevel(LOG_LEVEL.DEBUG);
    }

    await getOfferings();

    // Add a listener to update the customerInfo state when the customer info changes, like when a user subscribes
    Purchases.addCustomerInfoUpdateListener((customerInfo) => {
      setCustomerInfo(customerInfo);
    });

    setInitialized(true);
  };

  /**
   * Fetch the current offerings from RevenueCat
   */
  const getOfferings = async () => {
    const offerings = await Purchases.getOfferings();
    const currentOffering = offerings.current;
    setOffering(currentOffering);
  };

  /**
   *
   * @param purchasedPackage The package to purchase
   * @returns The result of the purchase
   */
  const purchasePackage = async (purchasedPackage: PurchasesPackage) => {
    const result = await Purchases.purchasePackage(purchasedPackage);
    return result;
  };

  /**
   * Fetch the customer info from RevenueCat
   */
  const getCustomerInfo = async () => {
    const customerInfo = await Purchases.getCustomerInfo();
    setCustomerInfo(customerInfo);
  };

  /**
   * Check if the user is subscribed to any offering
   * @returns True if the user is subscribed to any offering
   */
  const checkIfUserIsSubscribed = async () => {
    if (!initialized || !customerInfo) return;
    const isPro = customerInfo.activeSubscriptions.length > 0;
    setIsSubscribed(isPro);
  };

  /**
   * Get the non-subscription purchase with the given identifier
   * @param identifier The identifier of the product to fetch
   * @returns The non-subscription purchase with the given identifier
   */
  const getNonSubscriptionPurchase = async (identifier: string) => {
    if (!initialized || !customerInfo) return null;

    const item = customerInfo.nonSubscriptionTransactions.find(
      (t) => t.productIdentifier === identifier
    );

    return item;
  };

  useEffect(() => {
    init();
    getCustomerInfo();
  }, []);

  useEffect(() => {
    // Check if the user is subscribed to any offering after the customer info changes
    checkIfUserIsSubscribed();
  }, [initialized, customerInfo]);

  // If the Purchases SDK is not initialized, return null
  if (!initialized) {
    return null;
  }

  return (
    <PurchasesContext.Provider
      value={{
        currentOffering: offering,
        purchasePackage,
        customerInfo,
        isSubscribed,
        getNonSubscriptionPurchase,
      }}
    >
      {children}
    </PurchasesContext.Provider>
  );
};

export default PurchasesProvider;
Using a custom hook for better developer experience
We'll need a custom hook to easily access all the exported members of our provider. Let's start by creating a new file for this.
mkdir hooks
touch hooks/usePurchases.tsx
Update the usePurchases.tsx with the following code:
// hooks/usePurchases.tsx
import React from "react";
import PurchasesContext, {
  PurchasesContextProps,
} from "@/context/PurchasesContext";

/**
 * Custom hook for managing purchases with RevenueCat.
 * @returns An object containing the following properties:
 *  - currentOffering - The current offering
 *  - purchasePackage - Purchase a package
 *  - customerInfo - The customer info
 *  - isSubscribed - Flag that indicates if the user is subscribed to any offering
 *  - getNonSubscriptionPurchase - Get the non-subscription purchase by identifier
 */
export const usePurchases = () =>
  React.useContext(PurchasesContext as React.Context<PurchasesContextProps>);
Wrapping the app with the new provider
Go to app/_layout.tsx and update the file to wrap the app with the PurchasesProvider.
// app/_layout.tsx

...
+ import PurchasesProvider from "@/context/PurchasesProvider";

...

export default function RootLayout() {
  ...
  return <RootLayoutNav />;
}

function RootLayoutNav() {
  const colorScheme = useColorScheme();

  return (
+   <PurchasesProvider>
      <ThemeProvider value={colorScheme === "dark" ? DarkTheme : DefaultTheme}>
        <Stack>
          <Stack.Screen name="(tabs)" options={{ headerShown: false }} />
          <Stack.Screen name="modal" options={{ presentation: "modal" }} />
+         <Stack.Screen
+           name="subscriptions-paywall"
+           options={{ headerShown: false }}
+         />
        </Stack>
      </ThemeProvider>
+   </PurchasesProvider>
  );
}
Adding a "Paywall" route to show our products
This is where the magic happens! We need to create a new route for our Paywall screen.
touch app/subscriptions-paywall.tsx
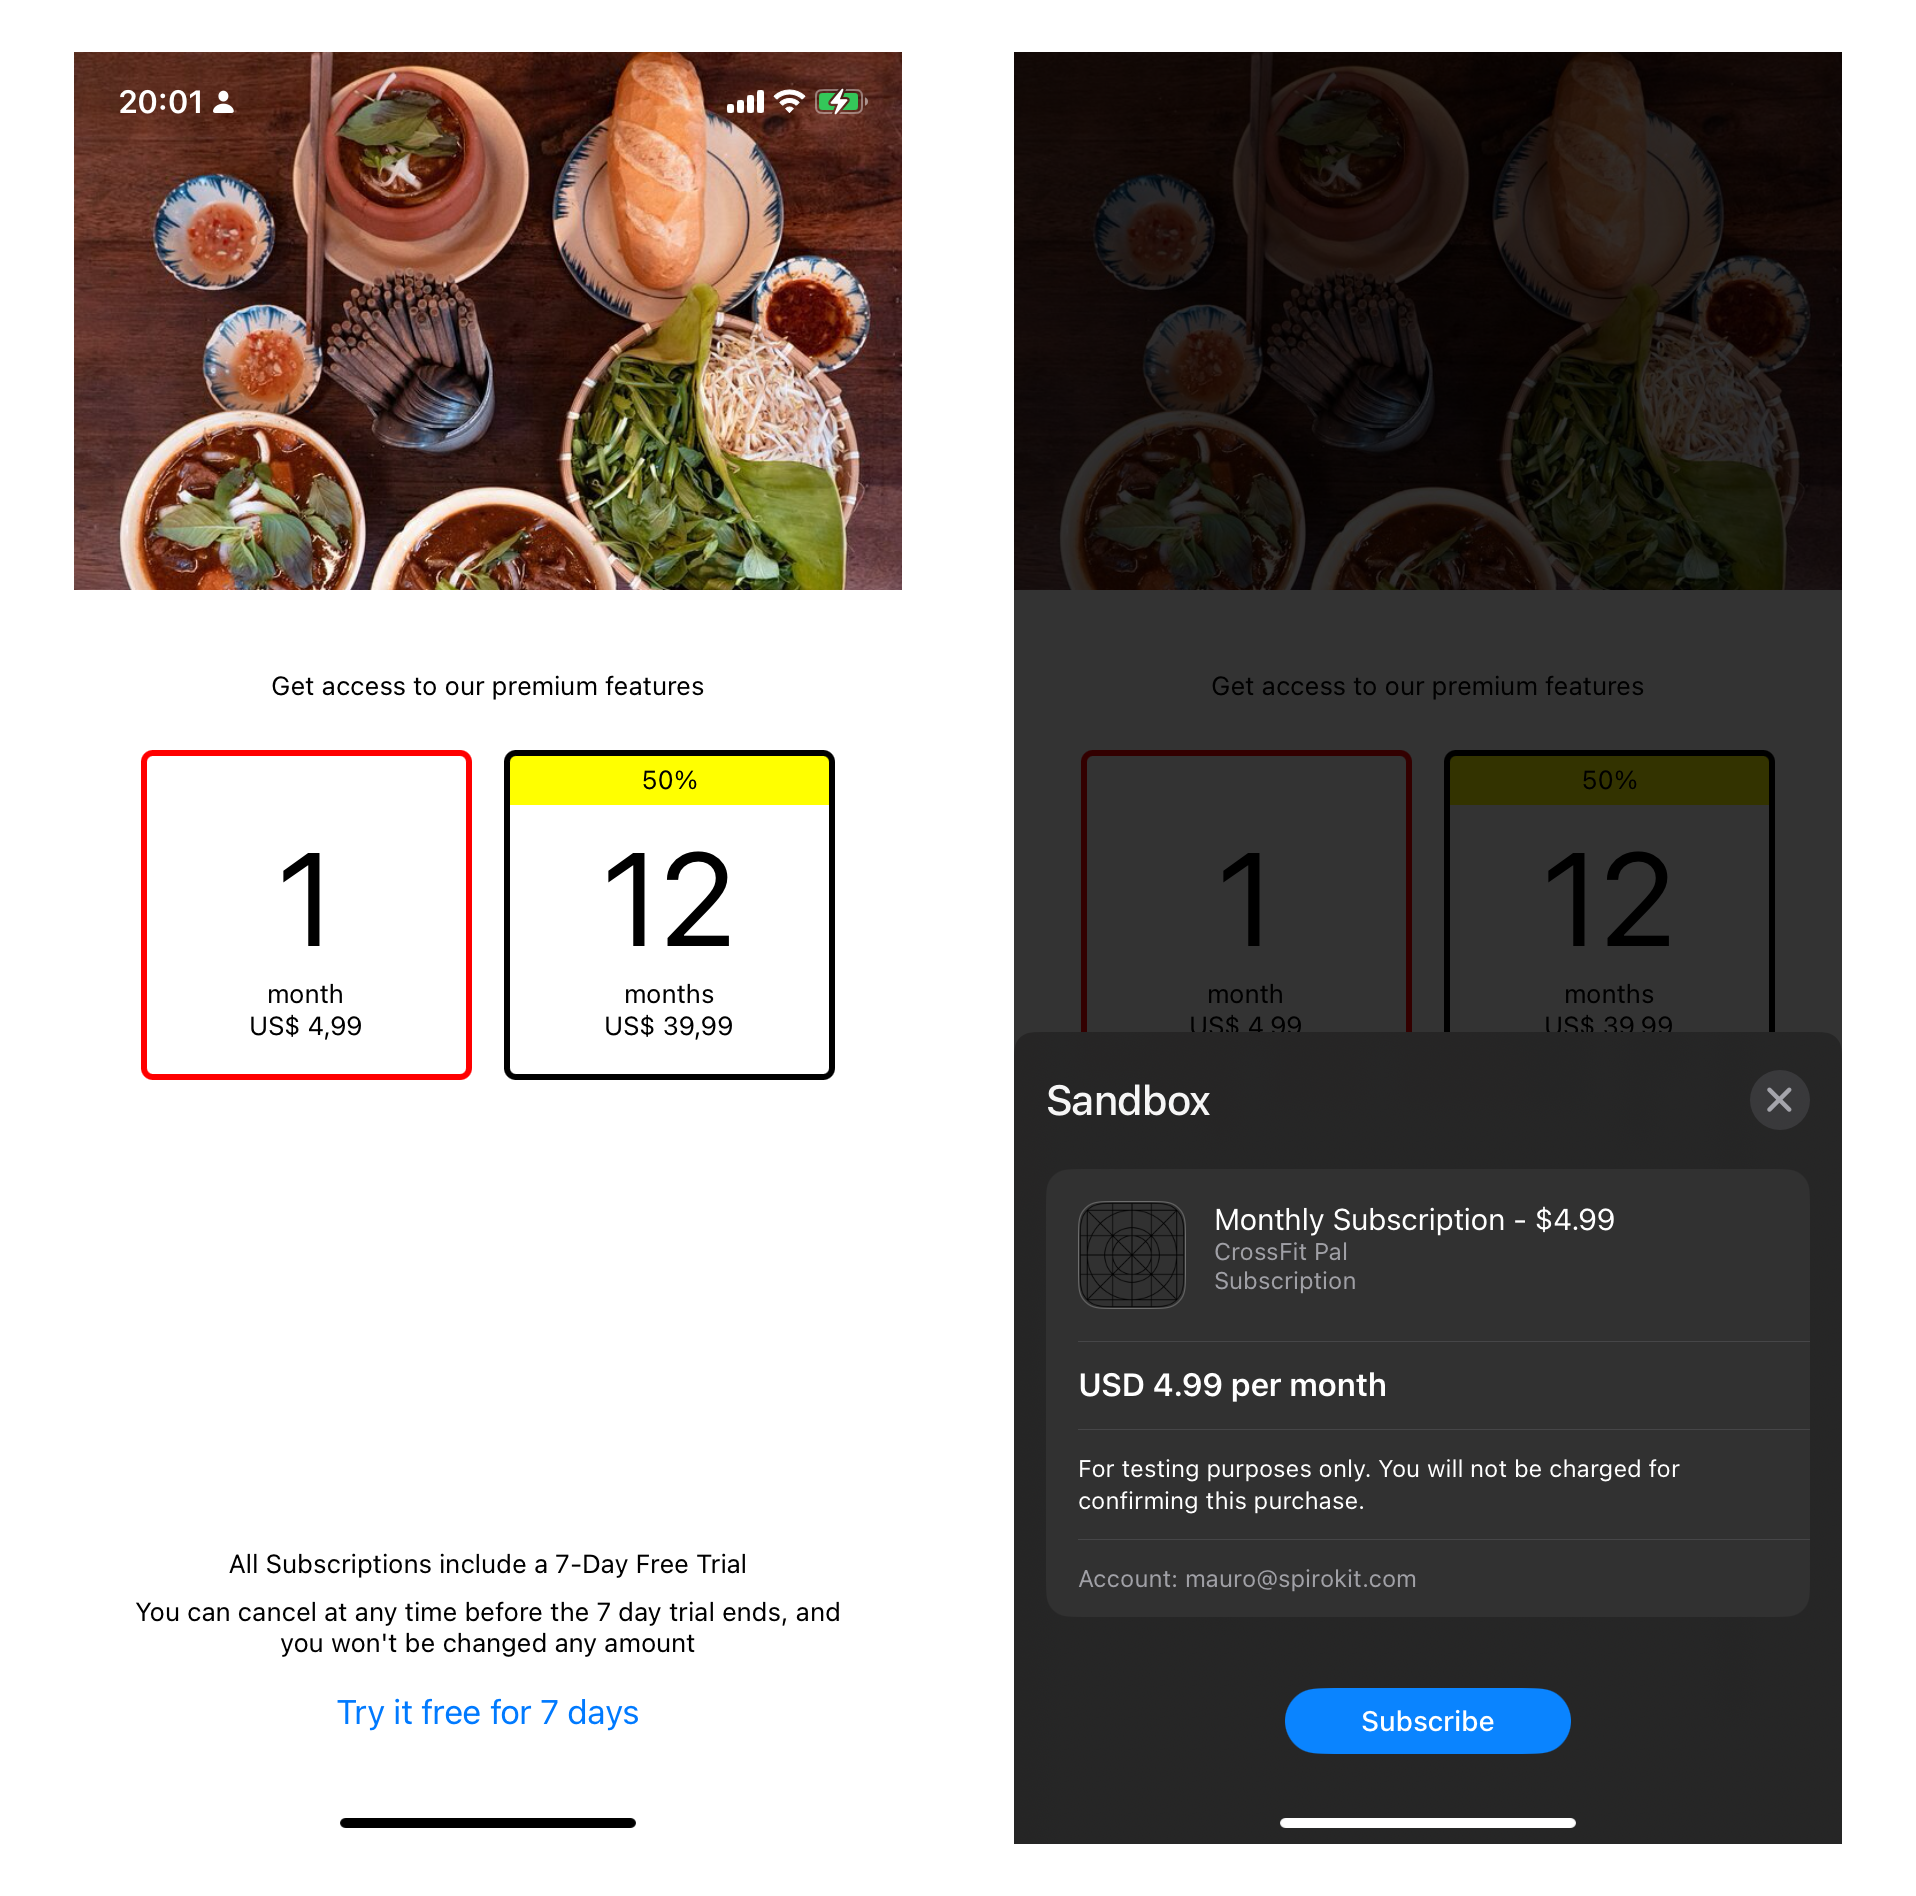
With the following code, we render a horizontal FlatList component that displays all available subscription options. Feel free to modify this to suit your needs.
Additionally, we use the offering metadata to enhance the information and display the number of months for each product. This is also optional, and you can remove it if desired.
//app/subscriptions-paywall.tsx

import { usePurchases } from "@/hooks/usePurchases";
import { router } from "expo-router";
import React, { useState } from "react";
import {
  Dimensions,
  Platform,
  View,
  Image,
  ScrollView,
  Text,
  Button,
  Pressable,
  FlatList,
} from "react-native";
import { PRODUCT_CATEGORY, PurchasesPackage } from "react-native-purchases";

const screenHeight = Dimensions.get("window").height;
const screenWidth = Dimensions.get("window").width;

const SubscriptionsPaywall = () => {
  const { currentOffering, purchasePackage } = usePurchases();

  // Filter out non-subscription products from RevenueCat
  const filteredPackages = currentOffering?.availablePackages.filter(
    (item) => item.product.productCategory === PRODUCT_CATEGORY.SUBSCRIPTION
  );

  const [selectedPackage, setSelectedPackage] =
    useState<PurchasesPackage | null>(filteredPackages?.[0] || null);

  const [isLoading, setIsLoading] = useState(false);

  const handleContinue = async () => {
    if (!selectedPackage) return;

    try {
      setIsLoading(true);
      await purchasePackage(selectedPackage);
      router.back();
    } catch (error) {
      console.log(error);
    } finally {
      setIsLoading(false);
    }
  };

  return (
    <View style={{ gap: 16, flex: 1, backgroundColor: "white" }}>
      <Image
        source={{
          uri: "https://i.imgur.com/qUZLBVT.jpg",
        }}
        height={screenHeight * 0.3}
        alt="Background image showing food"
        resizeMode="cover"
      ></Image>

      <ScrollView contentContainerStyle={{ flexGrow: 1 }}>
        <View style={{ flex: 1, alignItems: "center", gap: 24, padding: 24 }}>
          <Text style={{ textAlign: "center" }}>
            {`Get access to our premium features`}
          </Text>
          <PackagesCarousel
            packages={filteredPackages}
            onSelectPackage={(packageToSelect) =>
              setSelectedPackage(packageToSelect)
            }
            selectedPackage={selectedPackage}
            metadata={currentOffering?.metadata as PackageMetadata}
          ></PackagesCarousel>
        </View>
        <View style={{ padding: 24, gap: 8, marginBottom: 24 }}>
          <Text style={{ textAlign: "center" }}>
            {`All Subscriptions include a 7-Day Free Trial`}
          </Text>
          <Text style={{ textAlign: "center" }}>
            {`You can cancel at any time before the 7 day trial ends, and you won't be changed any amount`}
          </Text>
          <Button
            disabled={isLoading}
            title={isLoading ? "Processing..." : "Try it free for 7 days"}
            onPress={handleContinue}
          />
        </View>
      </ScrollView>
    </View>
  );
};

type Subscription = {
  identifier: string;
  cycles: number;
  discount?: string;
};

type PackageMetadata = {
  subscriptions: {
    ios: Subscription[];
    android: Subscription[];
  };
};

type PackagesCarouselProps = {
  onSelectPackage: (packageToSelect: PurchasesPackage) => void;
  packages?: PurchasesPackage[];
  metadata: PackageMetadata;
  selectedPackage: PurchasesPackage | null;
};

const PackagesCarousel: React.FC<PackagesCarouselProps> = (props) => {
  const { packages, onSelectPackage, selectedPackage, metadata } = props;
  const subscriptions =
    metadata.subscriptions[Platform.OS === "ios" ? "ios" : "android"];

  console.log("subscriptions", subscriptions);

  const RenderItem = (item: PurchasesPackage) => {
    if (!selectedPackage) return null;
    const isSelected = selectedPackage.identifier === item.identifier;
    const packageMetadata = subscriptions.find(
      (s) => s.identifier === item.product.identifier
    );

    console.log("packageMetadata", packageMetadata);

    if (!packageMetadata) return null;
    const discount = packageMetadata.discount;
    const amountOfMonths = packageMetadata.cycles;

    return (
      <Pressable
        onPress={() => {
          onSelectPackage(item);
        }}
      >
        <View
          style={{
            marginRight: 16,
            borderColor: isSelected ? "red" : "black",
            borderWidth: 3,
            borderRadius: 6,
            overflow: "hidden",
            minWidth: screenWidth * 0.4,
          }}
        >
          {discount && (
            <Text
              style={{
                position: "absolute",
                width: "100%",
                color: "black",
                textAlign: "center",
                padding: 4,
                backgroundColor: "yellow",
              }}
            >
              {discount}
            </Text>
          )}
          <View
            style={{
              marginTop: 16,
              padding: 16,
              alignItems: "center",
            }}
          >
            <Text
              style={{
                fontSize: 70,
              }}
            >
              {amountOfMonths}
            </Text>
            <Text>{amountOfMonths > 1 ? "months" : "month"}</Text>
            <Text>{item.product.priceString}</Text>
          </View>
        </View>
      </Pressable>
    );
  };

  if (!packages) return null;

  return (
    <FlatList
      contentContainerStyle={{
        paddingBottom: 4,
        marginRight: -16,
        overflow: "hidden",
      }}
      horizontal={true}
      data={packages}
      pagingEnabled={false}
      keyExtractor={(item) => item.identifier}
      renderItem={({ item }) => <RenderItem {...item}></RenderItem>}
    ></FlatList>
  );
};

export default SubscriptionsPaywall;
Finally, we need a way to navigate to our Paywall screen. Update the app/(tabs)/index.tsx like this:
// app/(tabs)/index.tsx

import { Button, StyleSheet } from "react-native";

import EditScreenInfo from "@/components/EditScreenInfo";
import { Text, View } from "@/components/Themed";
+ import { router } from "expo-router";

export default function TabOneScreen() {
  return (
    <View style={styles.container}>
      ...
+     <Button
+       title="Navigate to Paywall"
+       onPress={() => {
+         router.push("/subscriptions-paywall");
+       }}
+     />
    </View>
  );
}

const styles = StyleSheet.create({
  ...
});
Ready to test?
Run the following command to start your app using the development client:
npx expo start --dev-client
If everything went as expected, you'll see a home screen with a button to navigate to the Paywall route you created before.
Select any of the subscription options and confirm to purchase the package.
What's next?
With this solid foundation, you can now start working on your app to check customer information and grant or deny access to specific features based on their subscription status.
You can also create a dedicated screen to offer other products, such as a one-time purchase to remove ads. Explore the PurchasesProvider; it's filled with helpful methods.
Final words
I know this has been a long series, but I hope you find it useful (please let me know in the comments). To be honest, I chose to share all this information because I spent countless hours trying to understand all the different configurations involved in this process.
Moreover, These kinds of difficult tasks are the main reason so many apps fail before being released to the stores. Now, focus on your idea instead of how to add Payments 😉
Happy coding!
Comments
Join the discussionFirst of all thanks. I was hitting my head around for more than 4 days . I got complete solution now . You guided from where to start till the end thanks
Also can you make same blog tutorial for stripe with react native?


