Collecting payments with React Native & RevenueCat (Part 1): Project & Apps setup
Introduction
Creating a mobile app involves numerous challenges and time-consuming tasks that must be completed before we can release our app in the stores.
In-app purchases and subscriptions are especially difficult examples of this. They require completing multiple steps in various locations, such as the Google Cloud Console, Google Play Console, App Store Connect, and more!
RevenueCat to the rescue
RevenueCat is a powerful and reliable in-app purchase server that makes it easy to build, analyze, and grow your subscriber base whether you're just starting out or already have millions of customers. It comes with powerful features such as Entitlements, Products, Offerings, and more.
Even thought RevenueCat has an amazing documentation, it's easier to get lost while navigating through all the different articles. Besides, there are certain details about the process that are not covered in details.
Why should I read this long article?
The goal of this article is to provide a one-stop location with everything you need to know to go from zero to a working app that displays all your products and allow users to purchase items or subscribe to your app using both Apple & Google native payments.
I also included a practical example that explains how to setup:
A monthly subscription with a 7-days free trial.
An annual subscription with a 7-days free trial.
A one-time payment to remove Ads from the app.
Grab a cup of coffee. You'll need it!
SpiroKit for SaaS
In case you want to save weeks of painful hours of work & research on your next React Native app, checkout SpiroKit for SaaS. It's a starter template that comes with Purchases, Push Notifications, Authentication, Analytics, Error Reporting and more. It also includes a Notion template to guide you through the entire process
Account setup
Create a RevenueCat account and your first app
You'll need to create a RevenueCat account in order to proceed with the rest of the tutorial. If you already have a RevenueCat account, feel free to jump to the next section.
Otherwise, visit https://app.revenuecat.com/signup and create a new account.
During the signup process, you can choose to add your credit card later. RevenueCat won’t require you to enter your credit card until you have reached $2500/month in revenue.
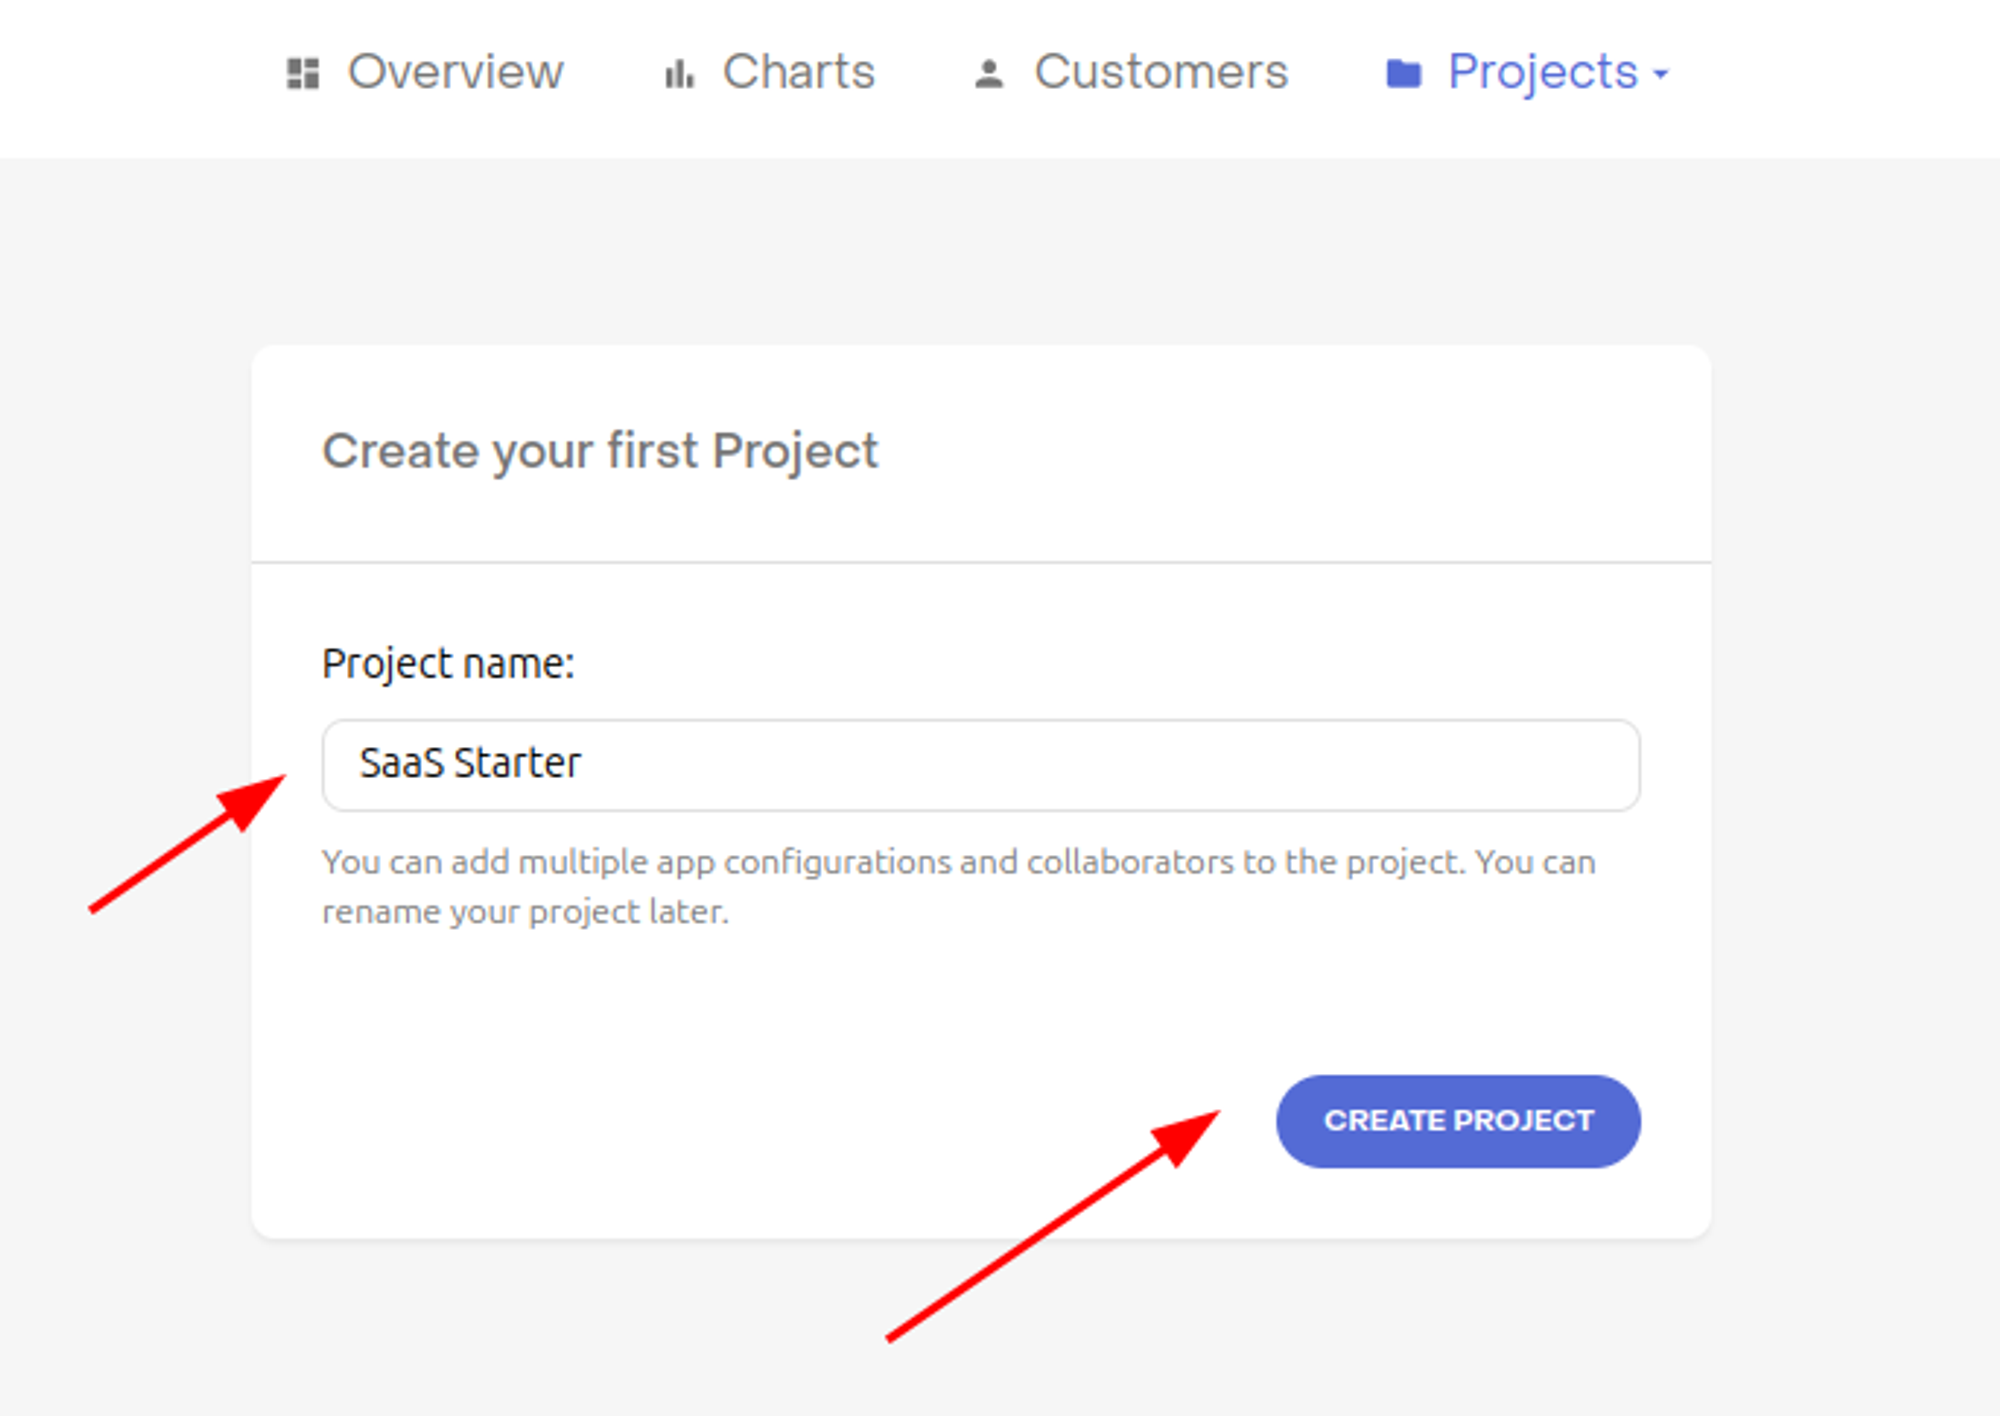
First app flow
You’ll be ask to create your first app. Choose a name and click on “Create Project” to confirm
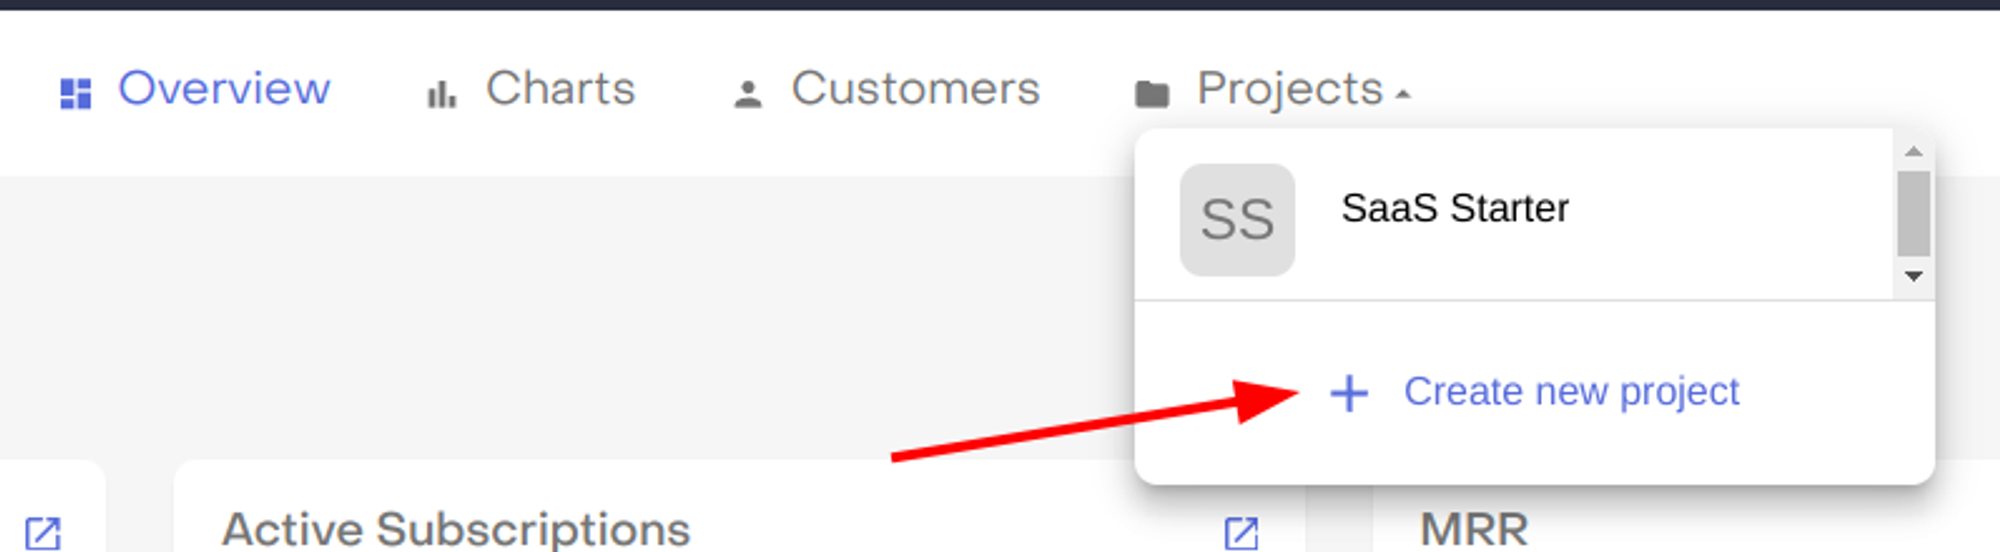
Existing customer flow
If you already have at least one app in RevenueCat, you’ll need to create a new project using the top navigation bar:
Creating a new React Native project
Let's start by creating a new Expo app
npx create-expo-app@latest --template tabs@50
Setup bundle identifier & package name
Before you can setup RevenueCat, you'll need to setup a bundle identifier for iOS, and a package name for Android. You can do that from the App.js file.
It's recommended to use the same identifier for both platforms for simplicity.
// App.json
{
  "expo": {
    ...
    "ios": {
      ...
+     "bundleIdentifier": "com.yourcompany.yourappname"
    },
    "android": {
      ...
+     "package": "com.yourcompany.yourappname"
    },
    ...
  }
}
Setup environment variables for RevenueCat platforms
You'll need to create a new .env file to include the API keys for both Android & iOS platforms on RevenueCat.
touch .env
//.env
EXPO_PUBLIC_REVENUECAT_API_KEY_ANDROID="[YOUR_EXPO_PUBLIC_REVENUECAT_API_KEY_ANDROID]"
EXPO_PUBLIC_REVENUECAT_API_KEY_IOS="[YOUR_EXPO_PUBLIC_REVENUECAT_API_KEY_IOS]"
We'll come back later to this file to replace the placeholder with the real API keys.
Adding missing dependencies
In order to use the RevenueCat SDK on your React Native app, you'll need to install the react-native-purchases by running the following command:
npx expo install react-native-purchases
Setting up your Android and iOS “Apps” or in RevenueCat
Creating your Play service credentials (Android)
In order for RevenueCat's servers to communicate with Google on your behalf, you need to provide a set of service credentials.
Note that this setup takes place on both the Google Play Console and the Google Cloud Console. Due to the nature of the process, there’s some switching back and forth between each console that can’t be helped, but each step will make clear which console you should be looking at.
Creating a project in Google Cloud Platform
Before we can use Google as a social provider in your Expo app, it is essential to create a project in Google Cloud Platform. To set up your project, follow these steps:
Click on the dropdown at the top left corner.
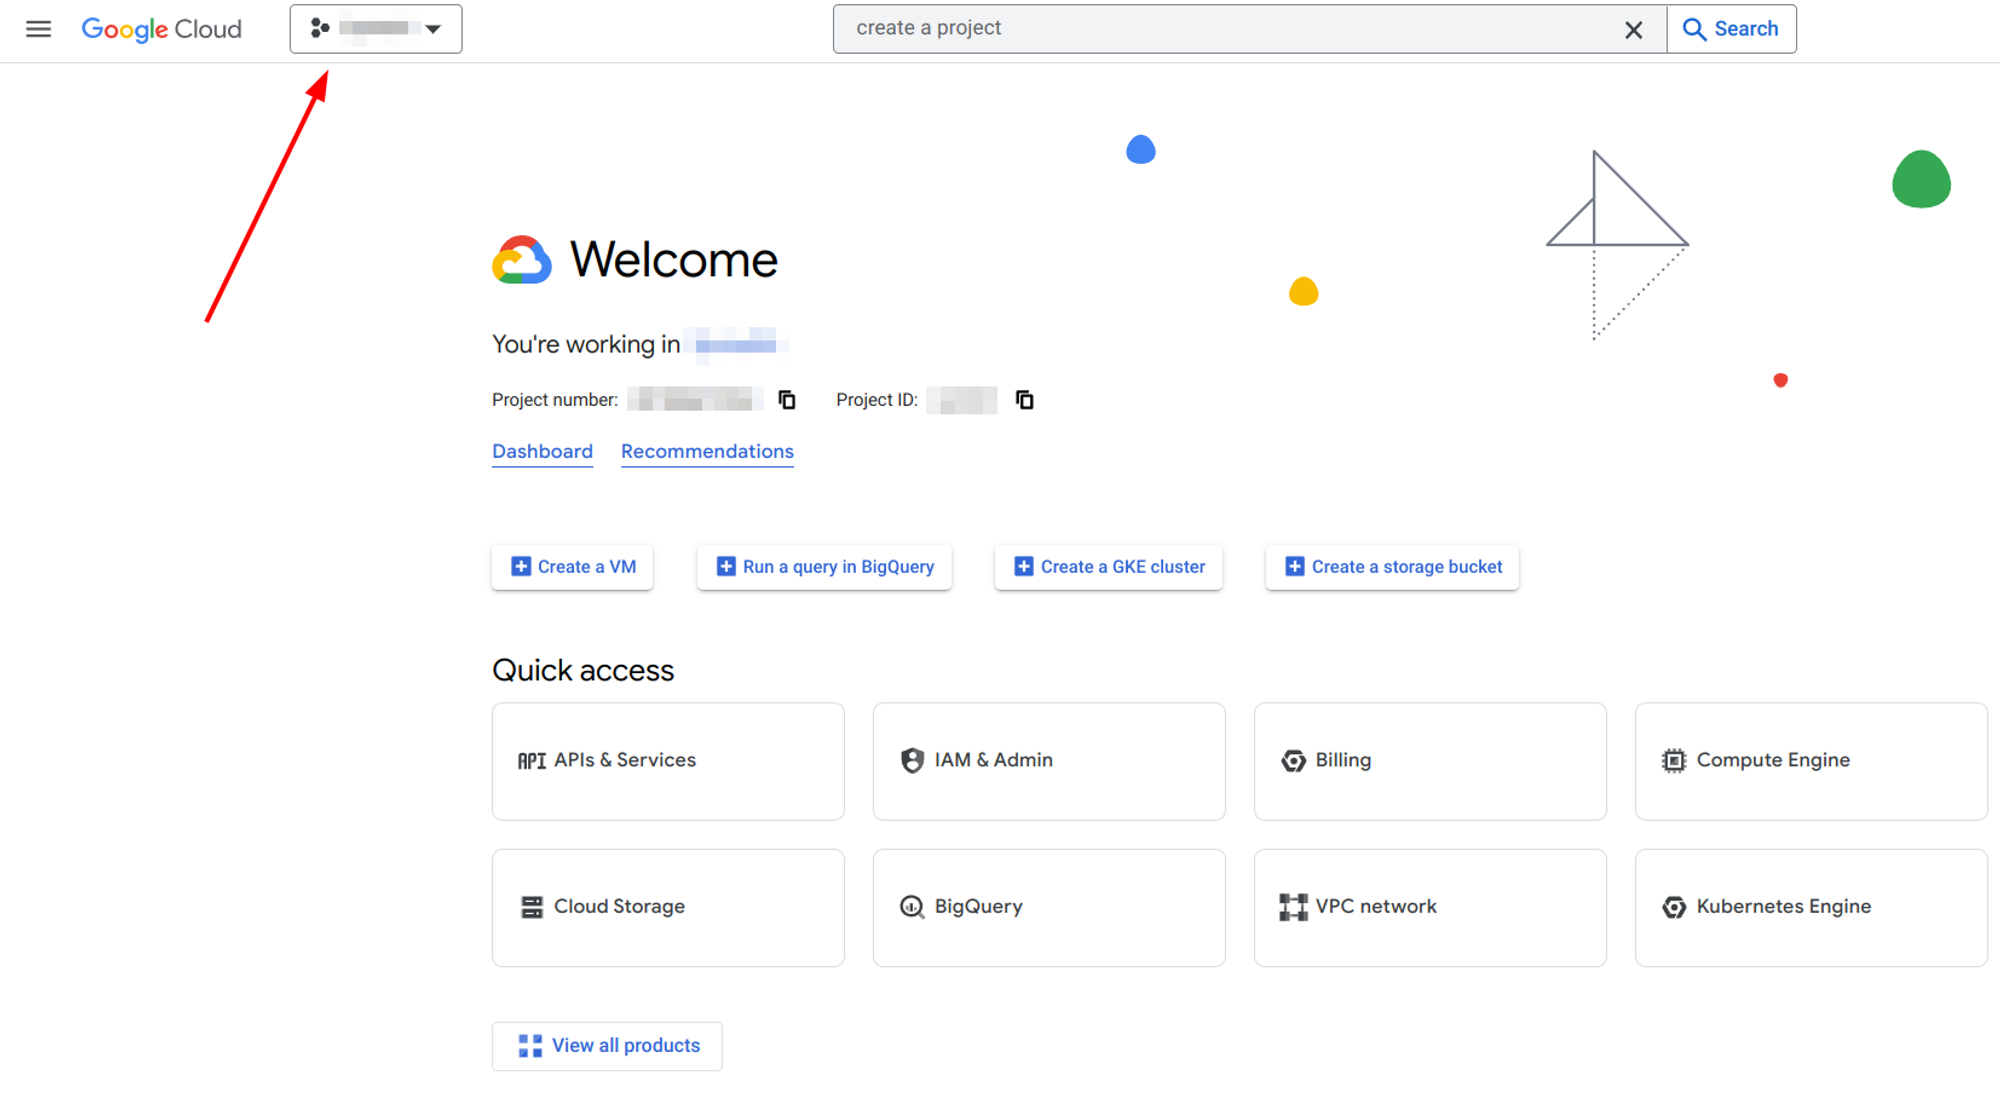
Click on "New Project" at the top right corner.
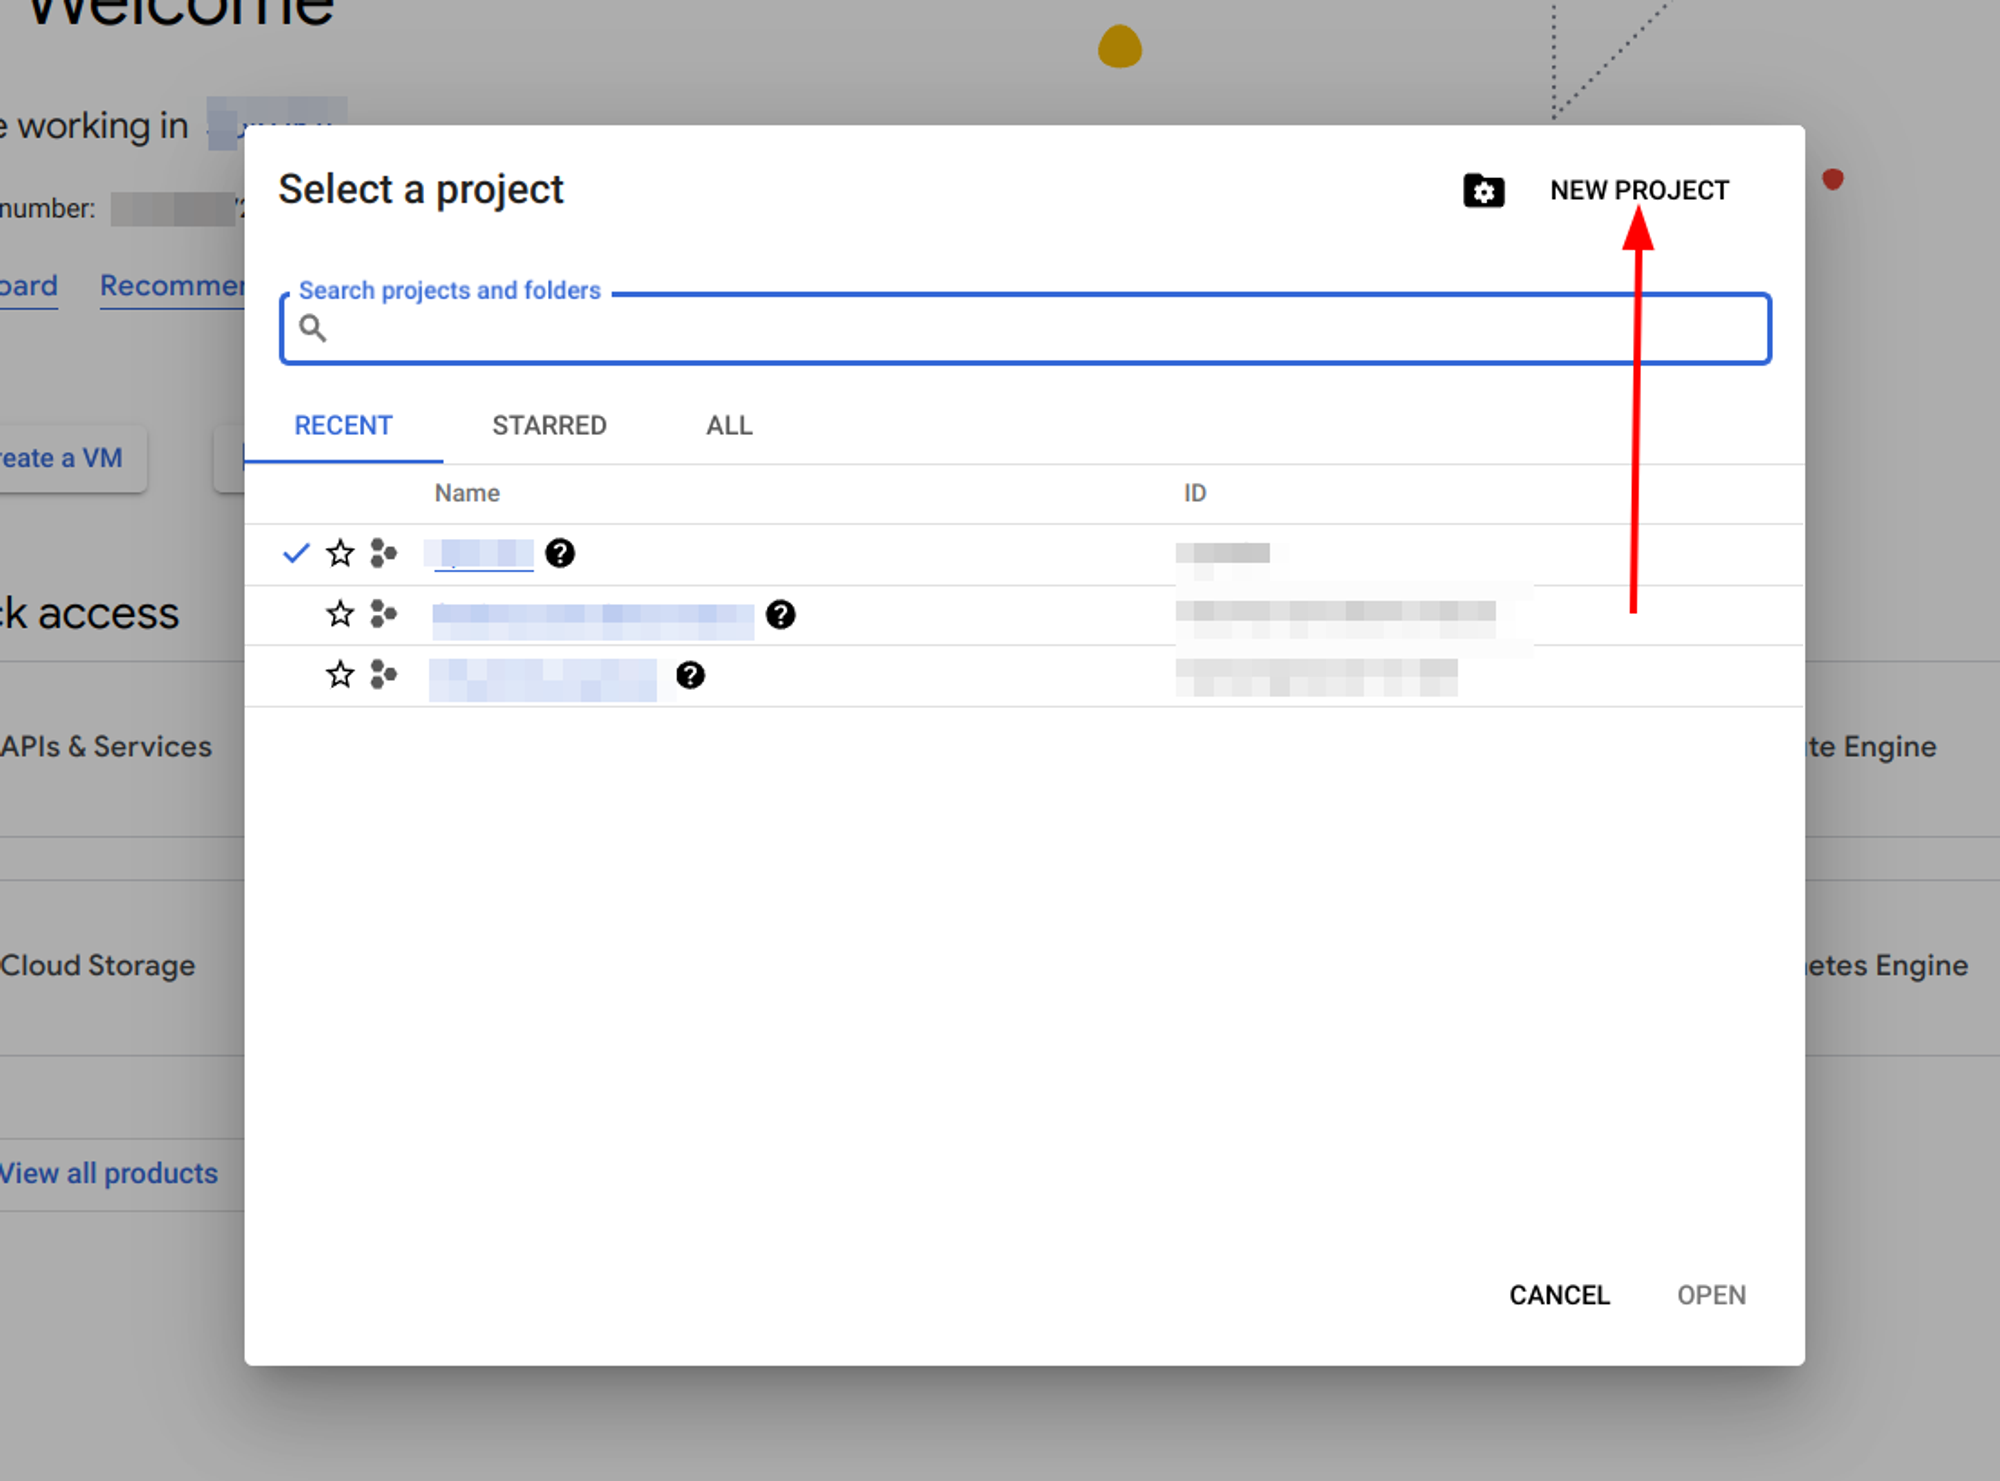
Fill in the form and click on "Create", and wait until the project is created. It could take a few seconds or even minutes.
Warning: Once you confirm this form, you won’t be able to change your project id.
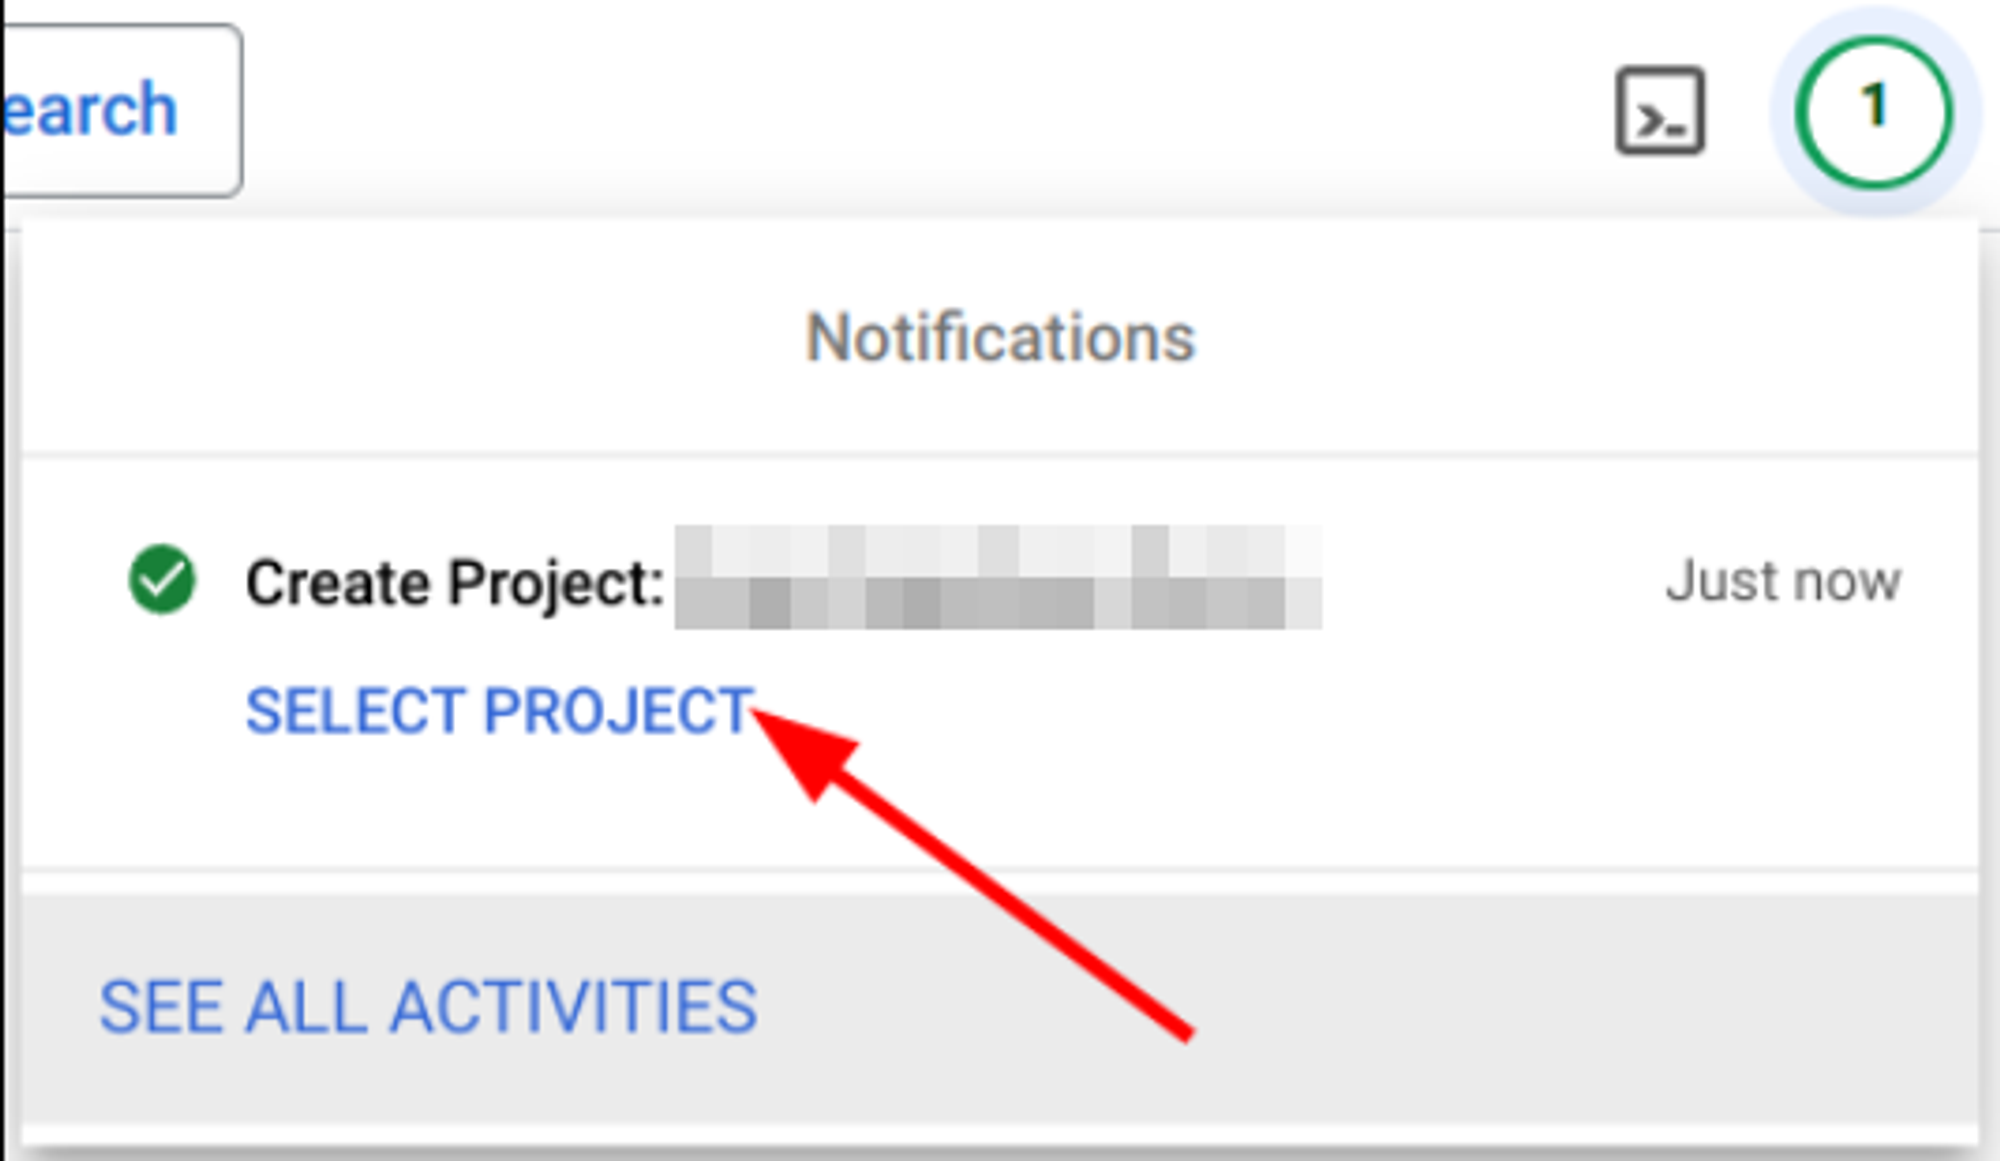
Once the project creation is finished, you receive a notification like in the image below. Click “Select project” to set your new project as active, and you’ll be redirected to your new project’s dashboard.
Enable the Google Developer and Reporting API (Google Cloud Console)
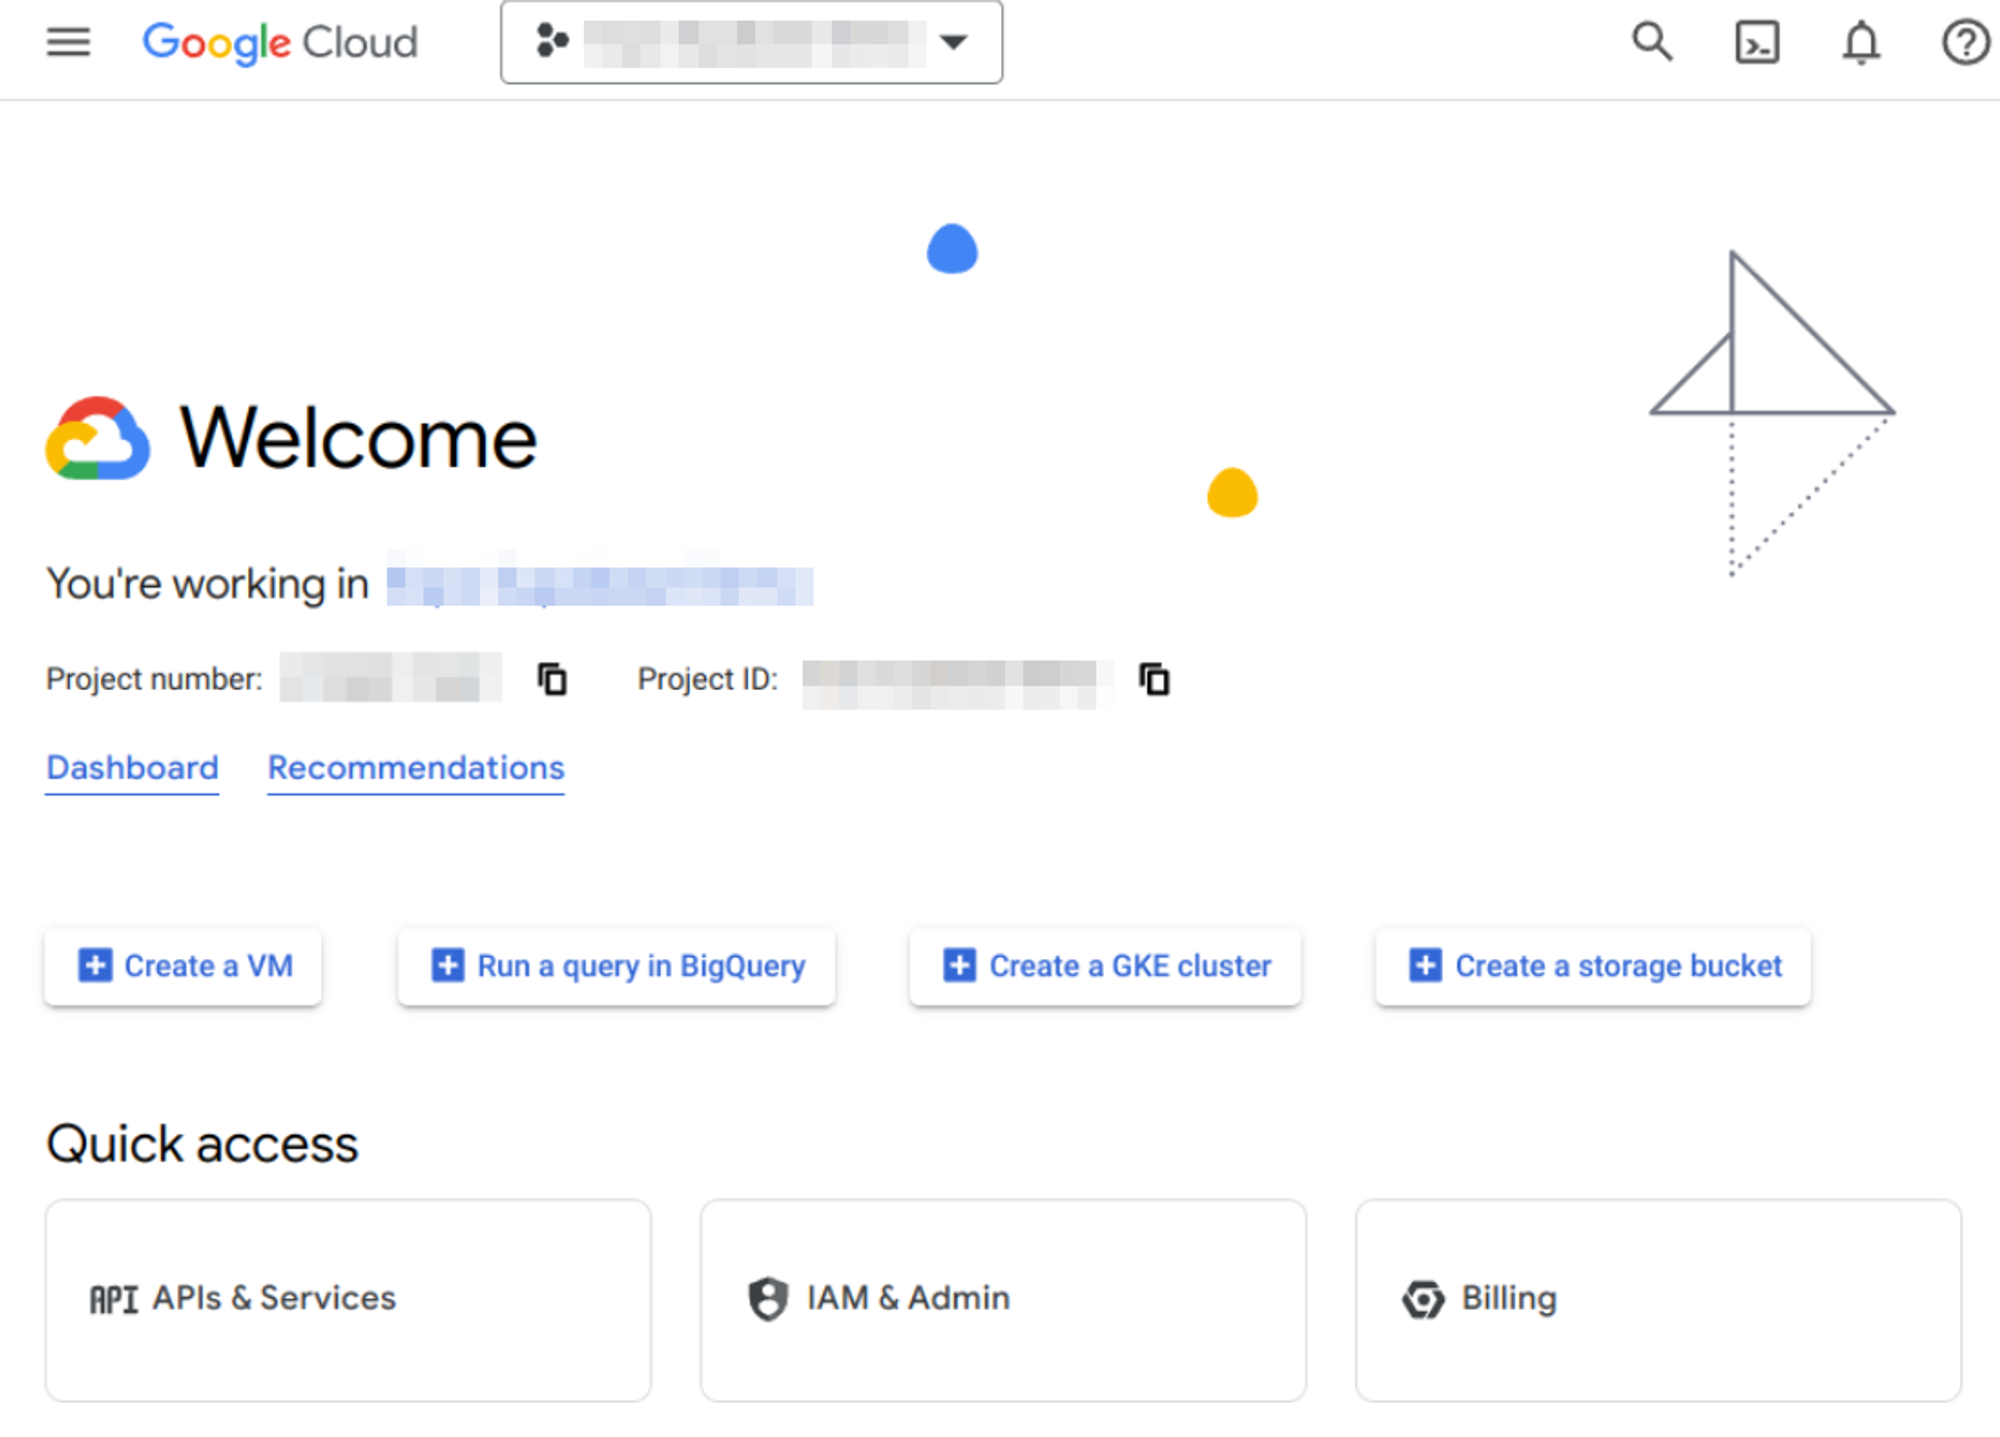
Visit your project dashboard in Google Cloud Console.
- Make sure to use the same project you created while following this guide
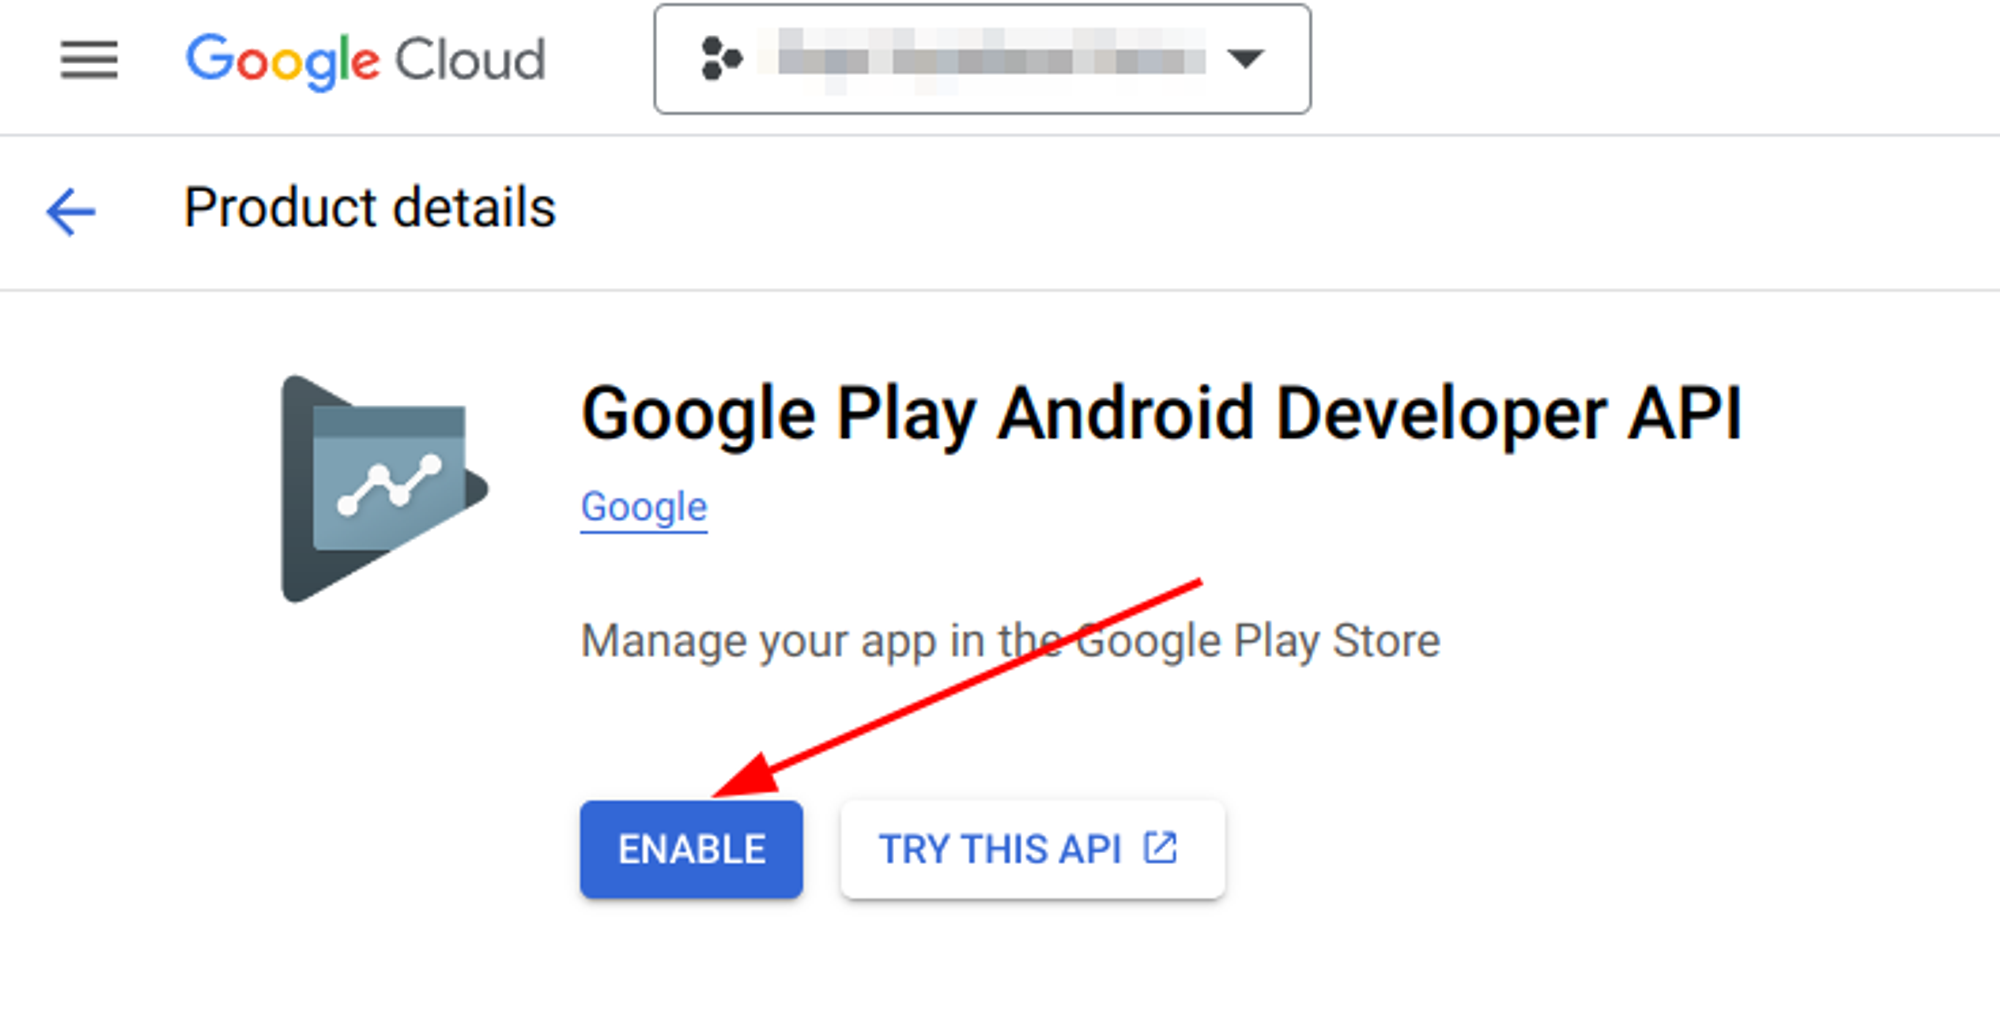
Search for “Google Play Android”, and select “Google Play Android Developer API”
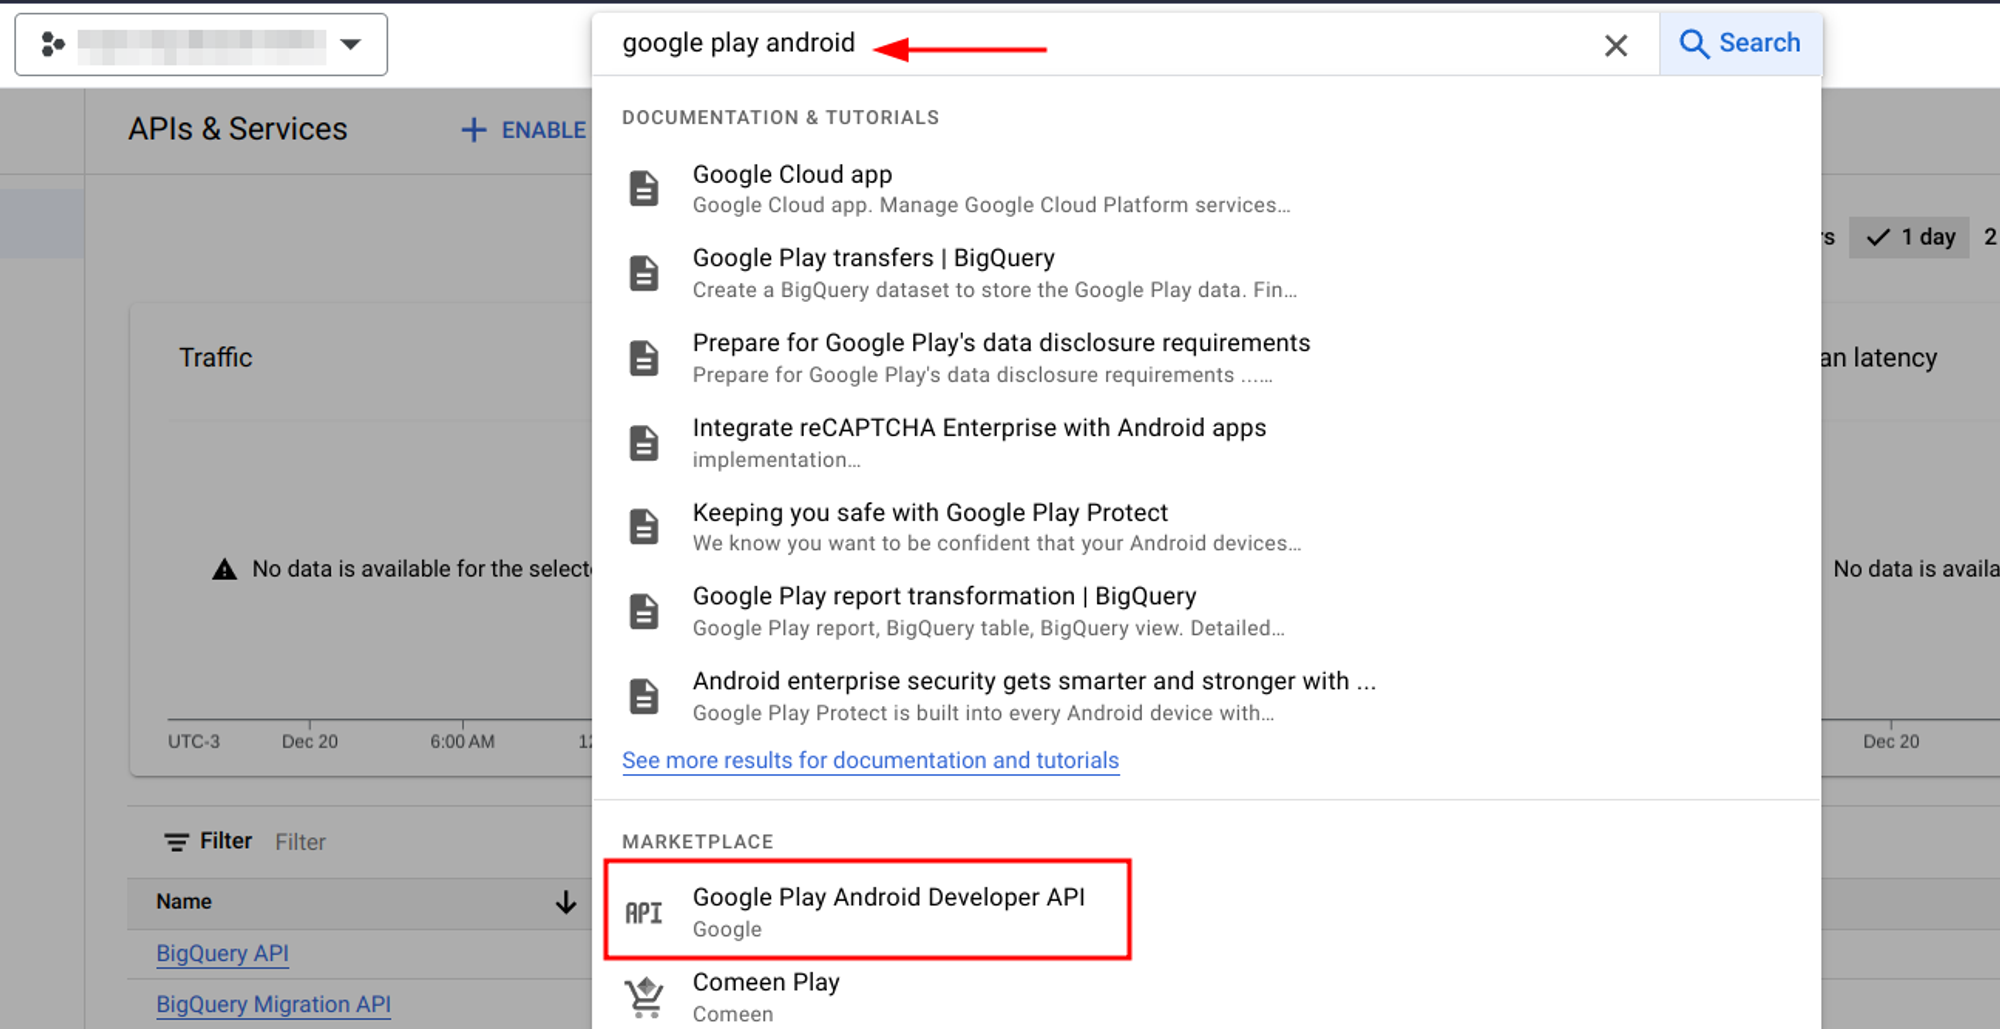
Click on “Enable”
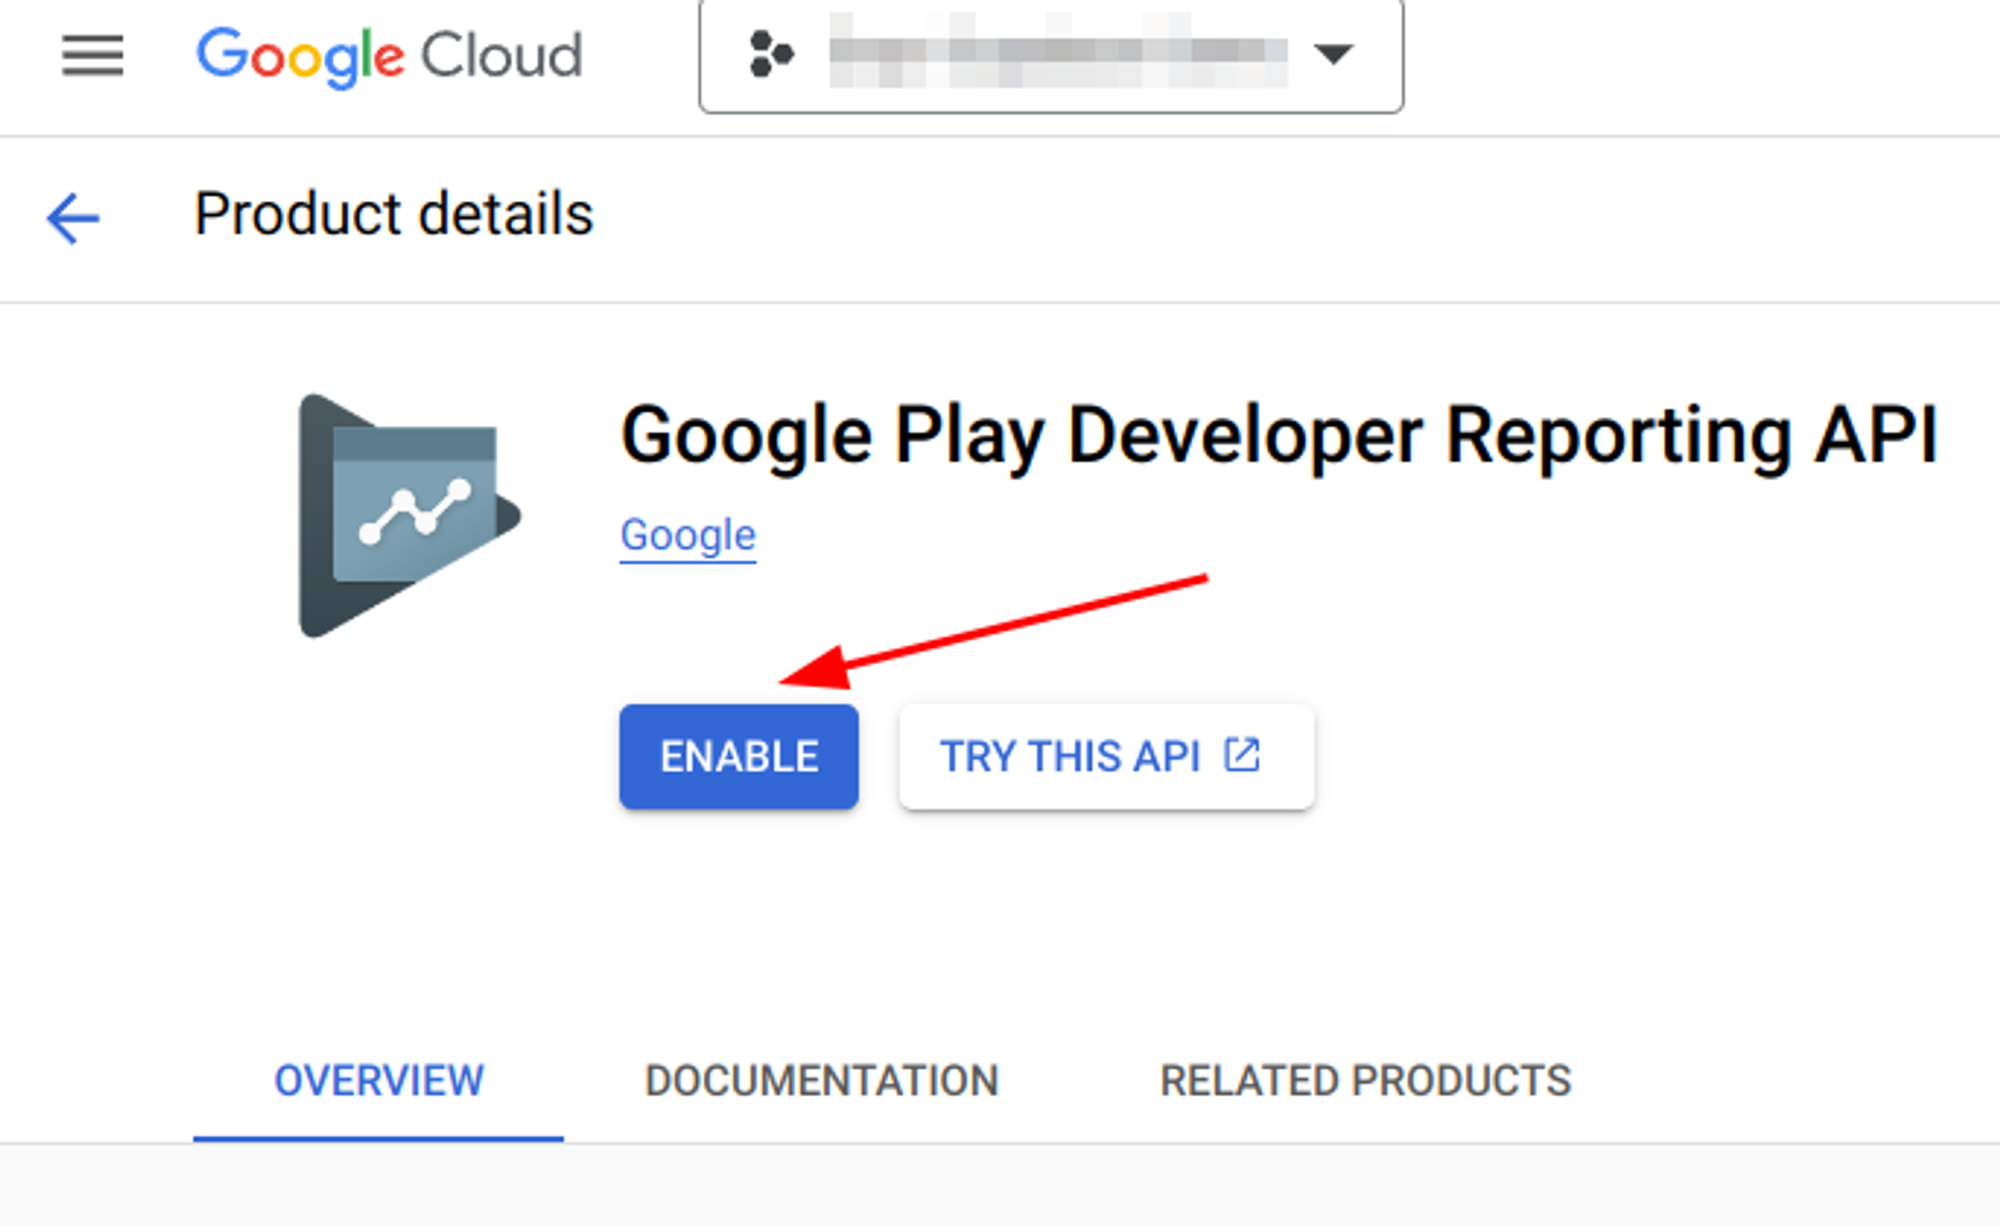
Once this is enabled, you will be redirected. Using the same search box, now search for “reporting api”, and select “Google Play Developer Reporting API”
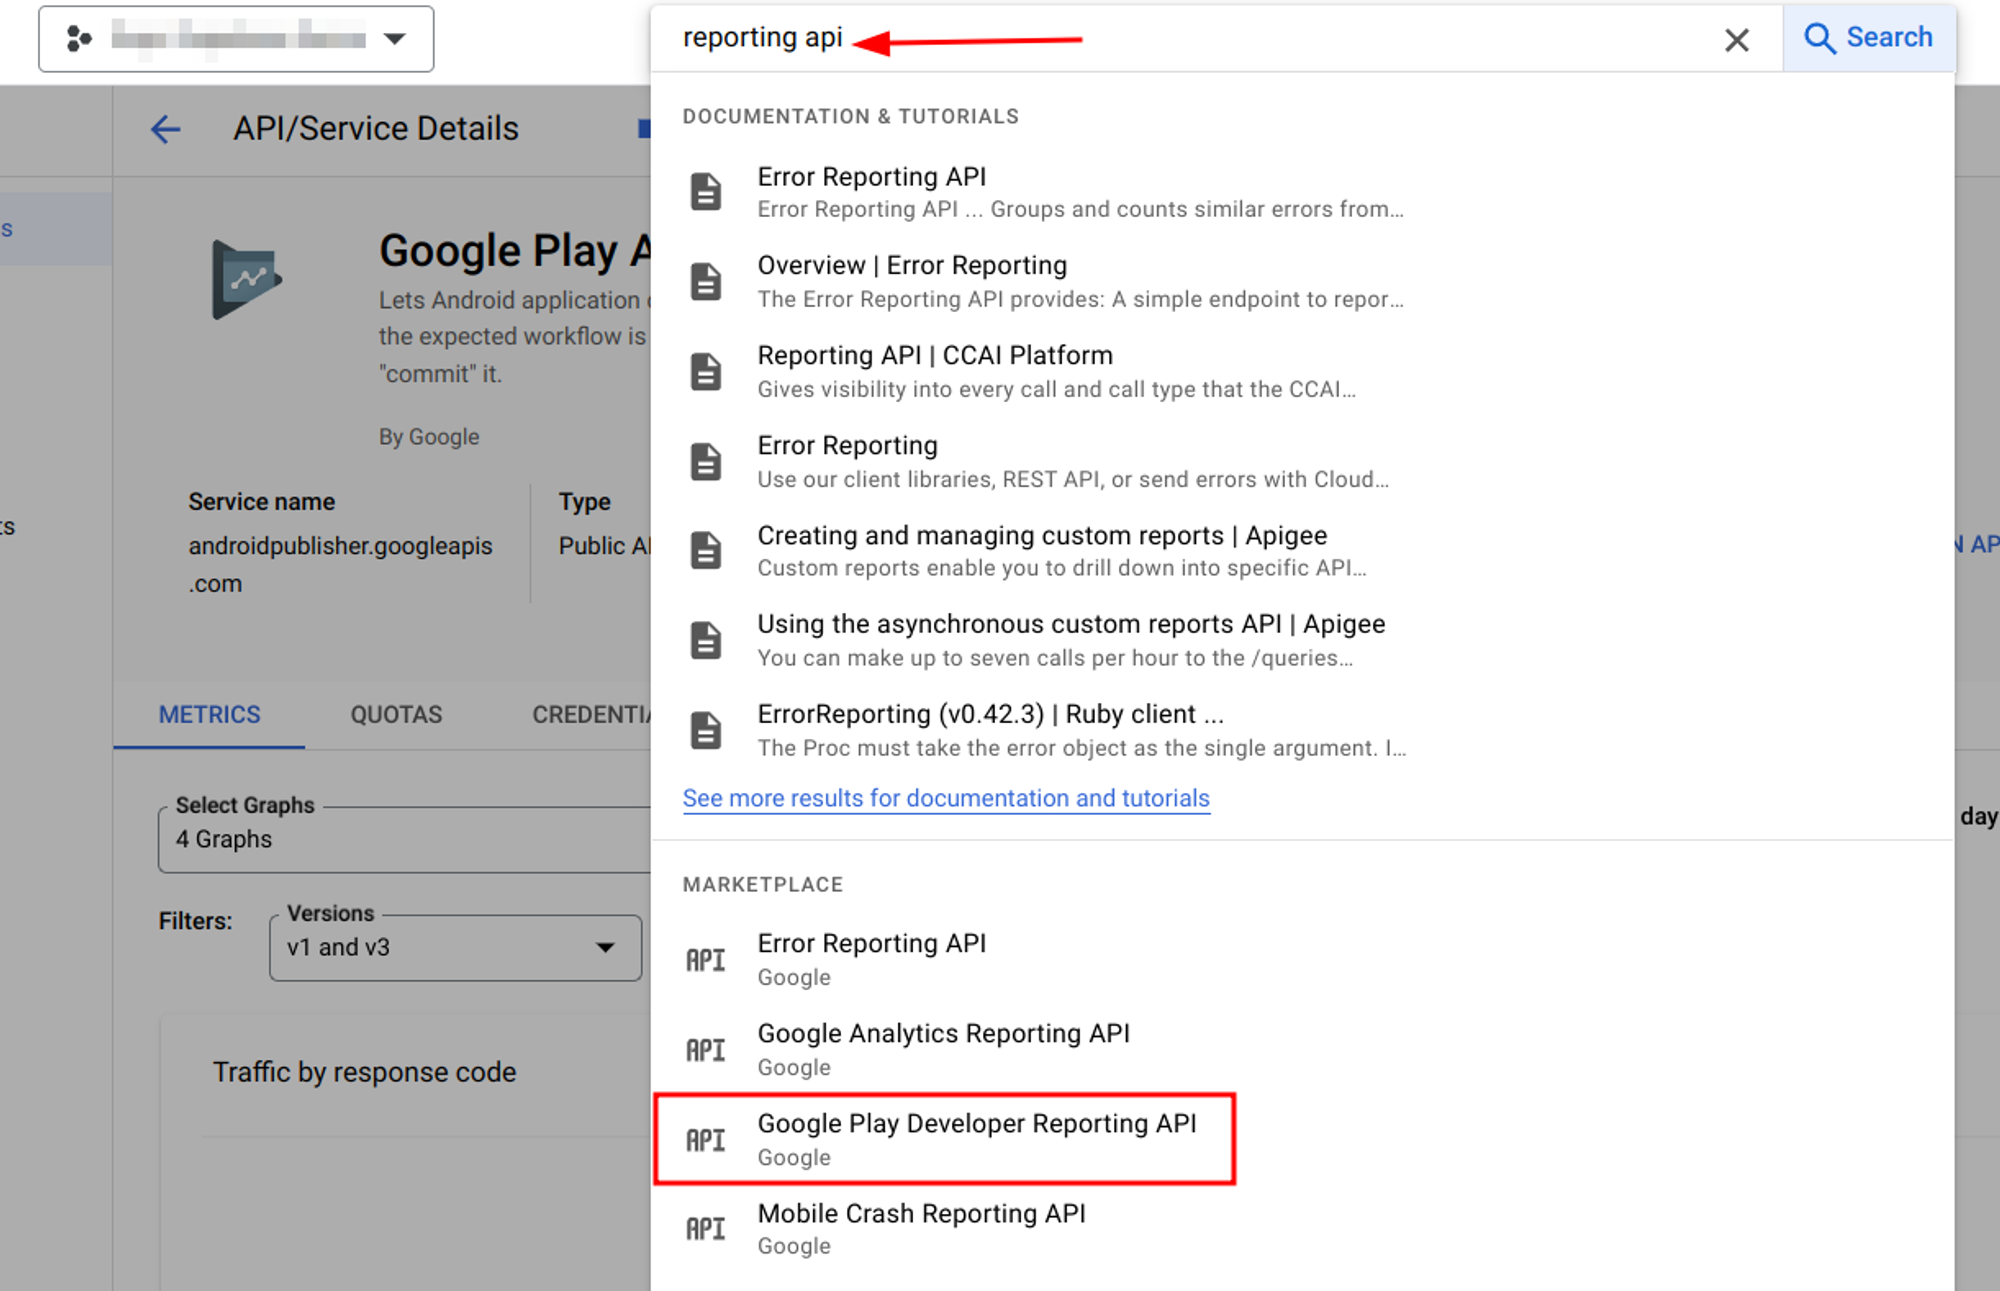
Click on “Enable”
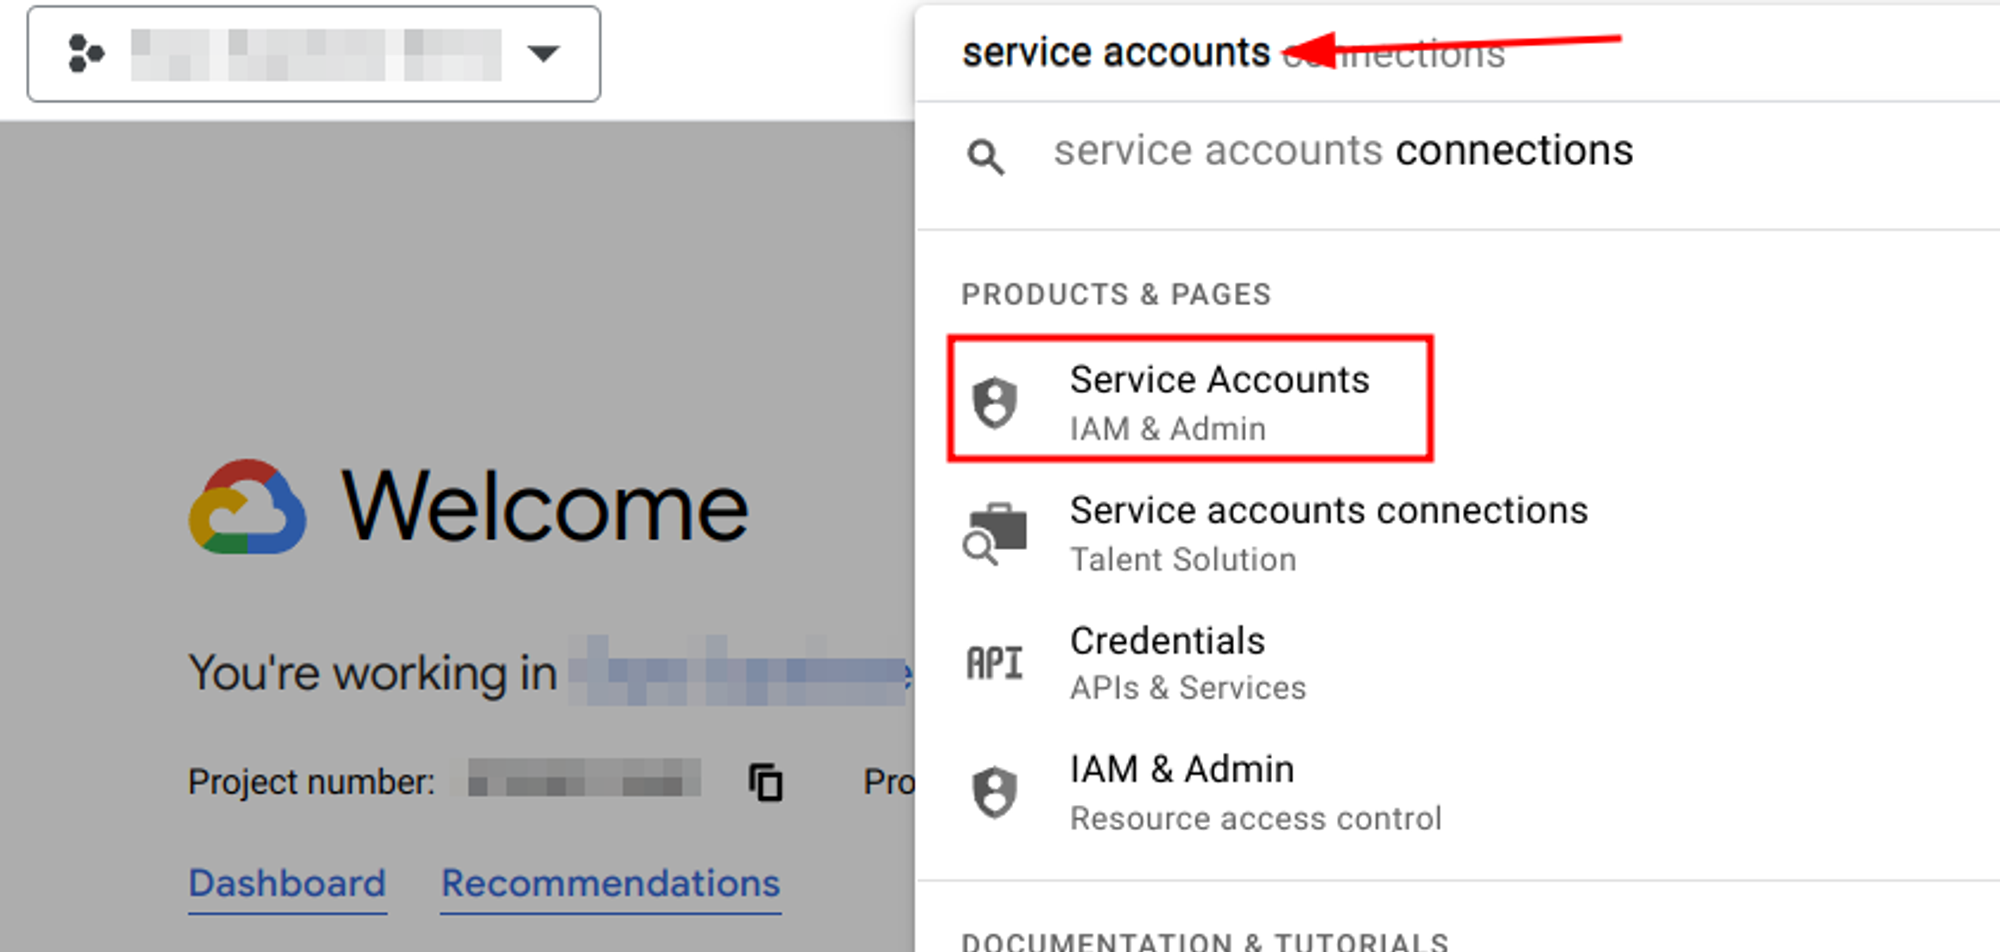
Create a Service Account (Google Cloud Console)
Using the same search bar we used before, now search for “service accounts” and choose “Service Accounts” from the result list. This is under the “IAM & Admin” section
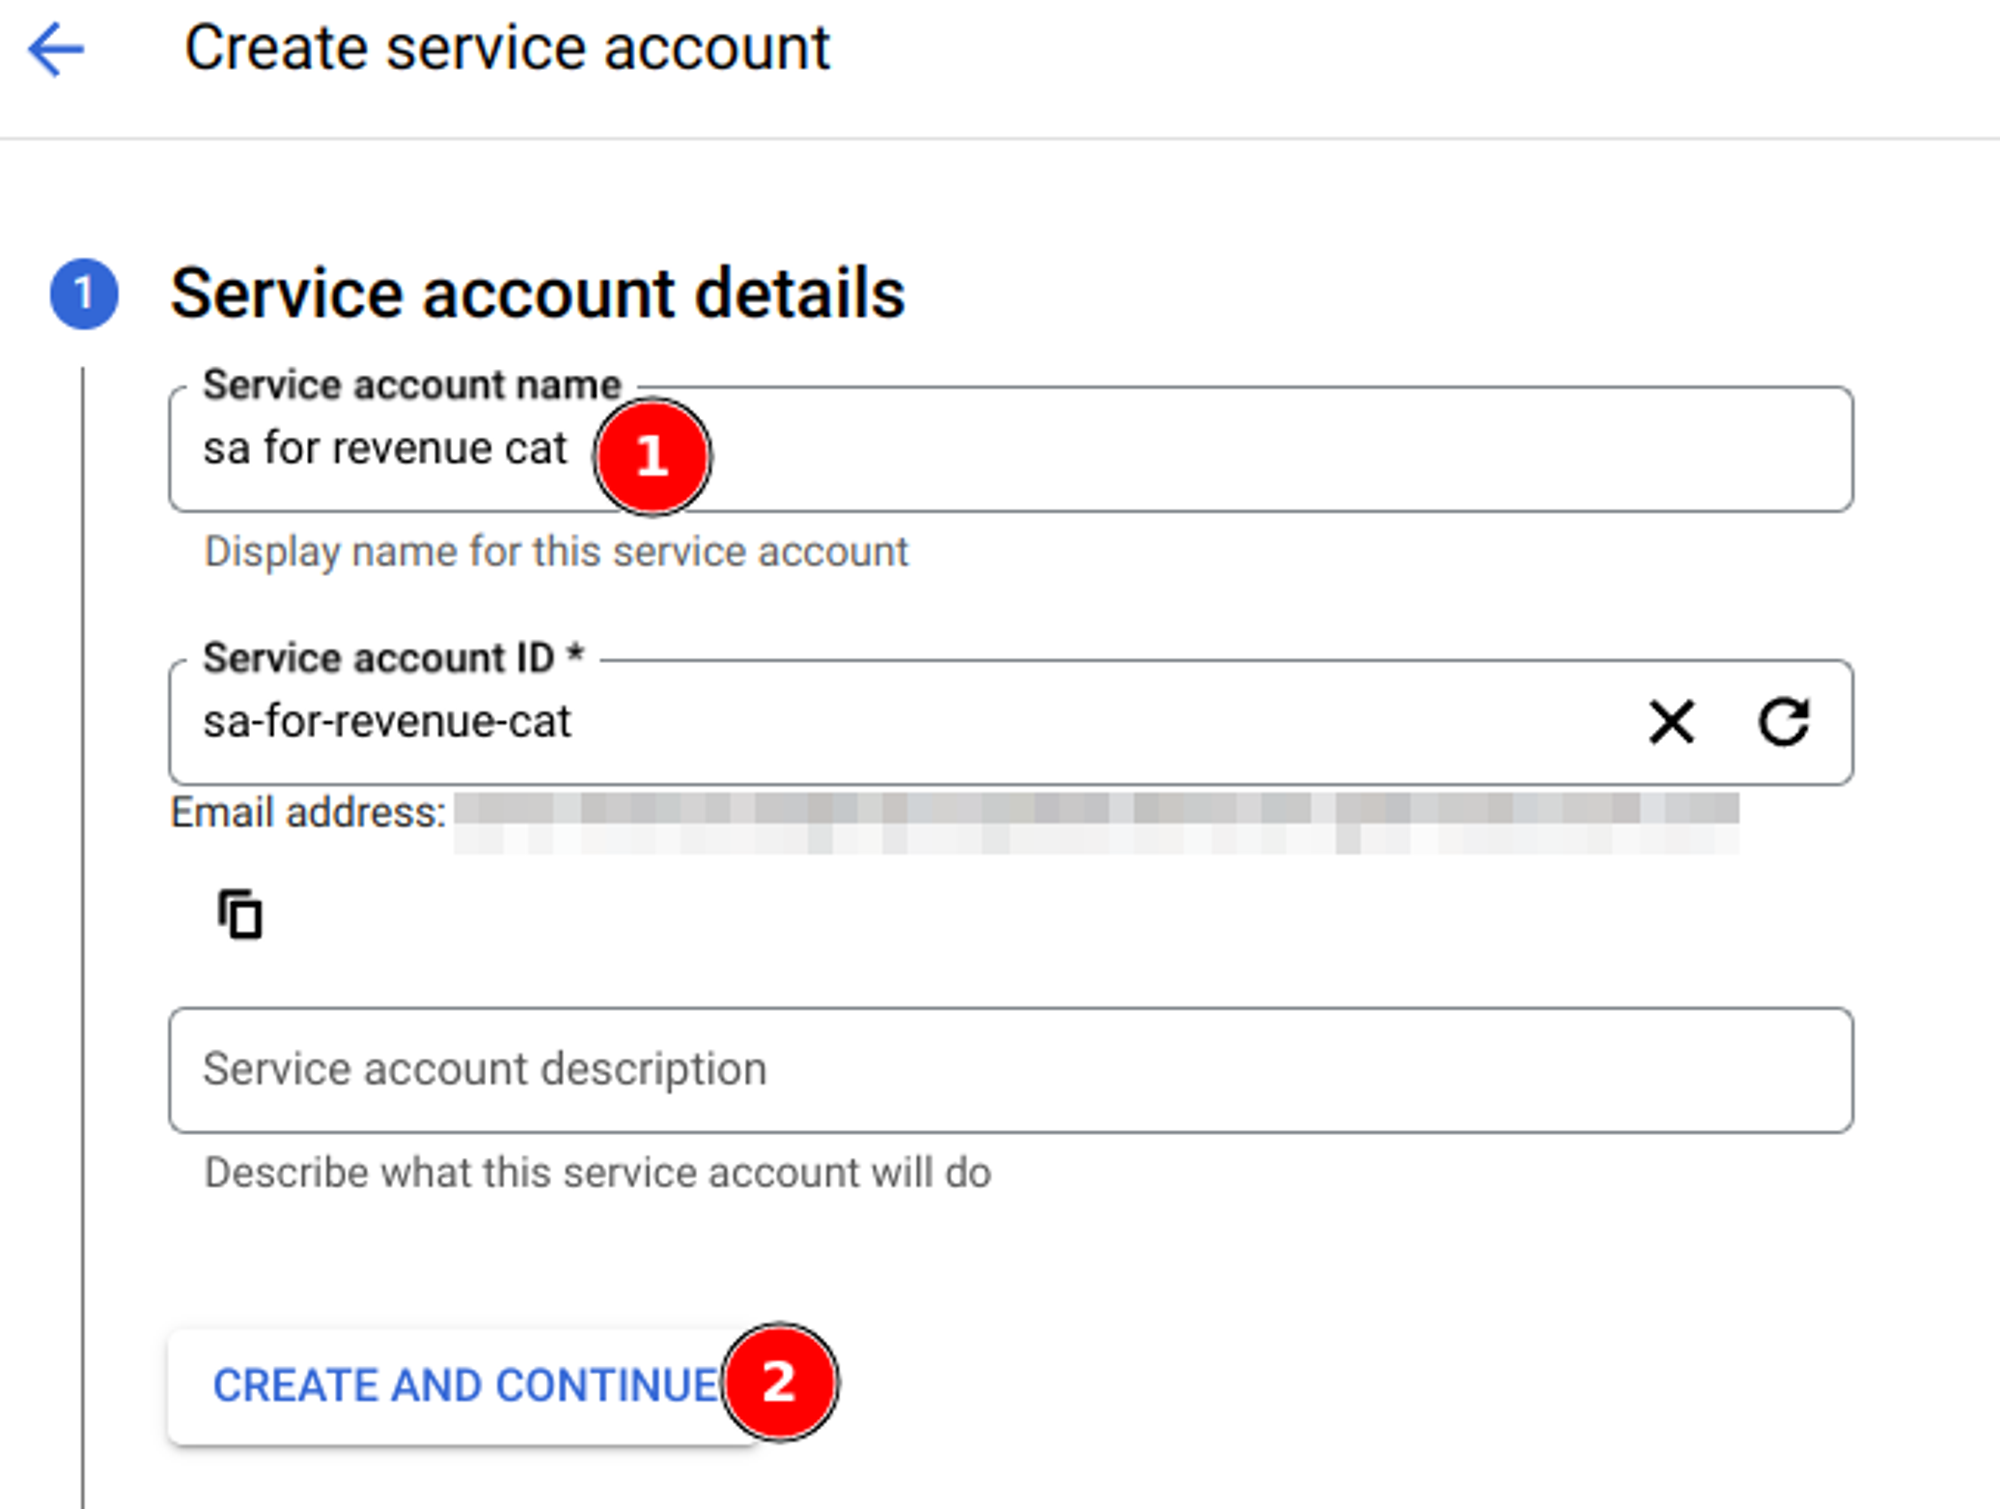
Click on “Create Service Account”
Choose a name for the account, like “sa for revenue cat”, and click “Create and continue”
On the step named 'Grant this service account access to project', you'll add two Roles:
Pub/Sub Admin - this enables Platform Server Notifications
Monitoring Viewer - this allows monitoring of the notification queue
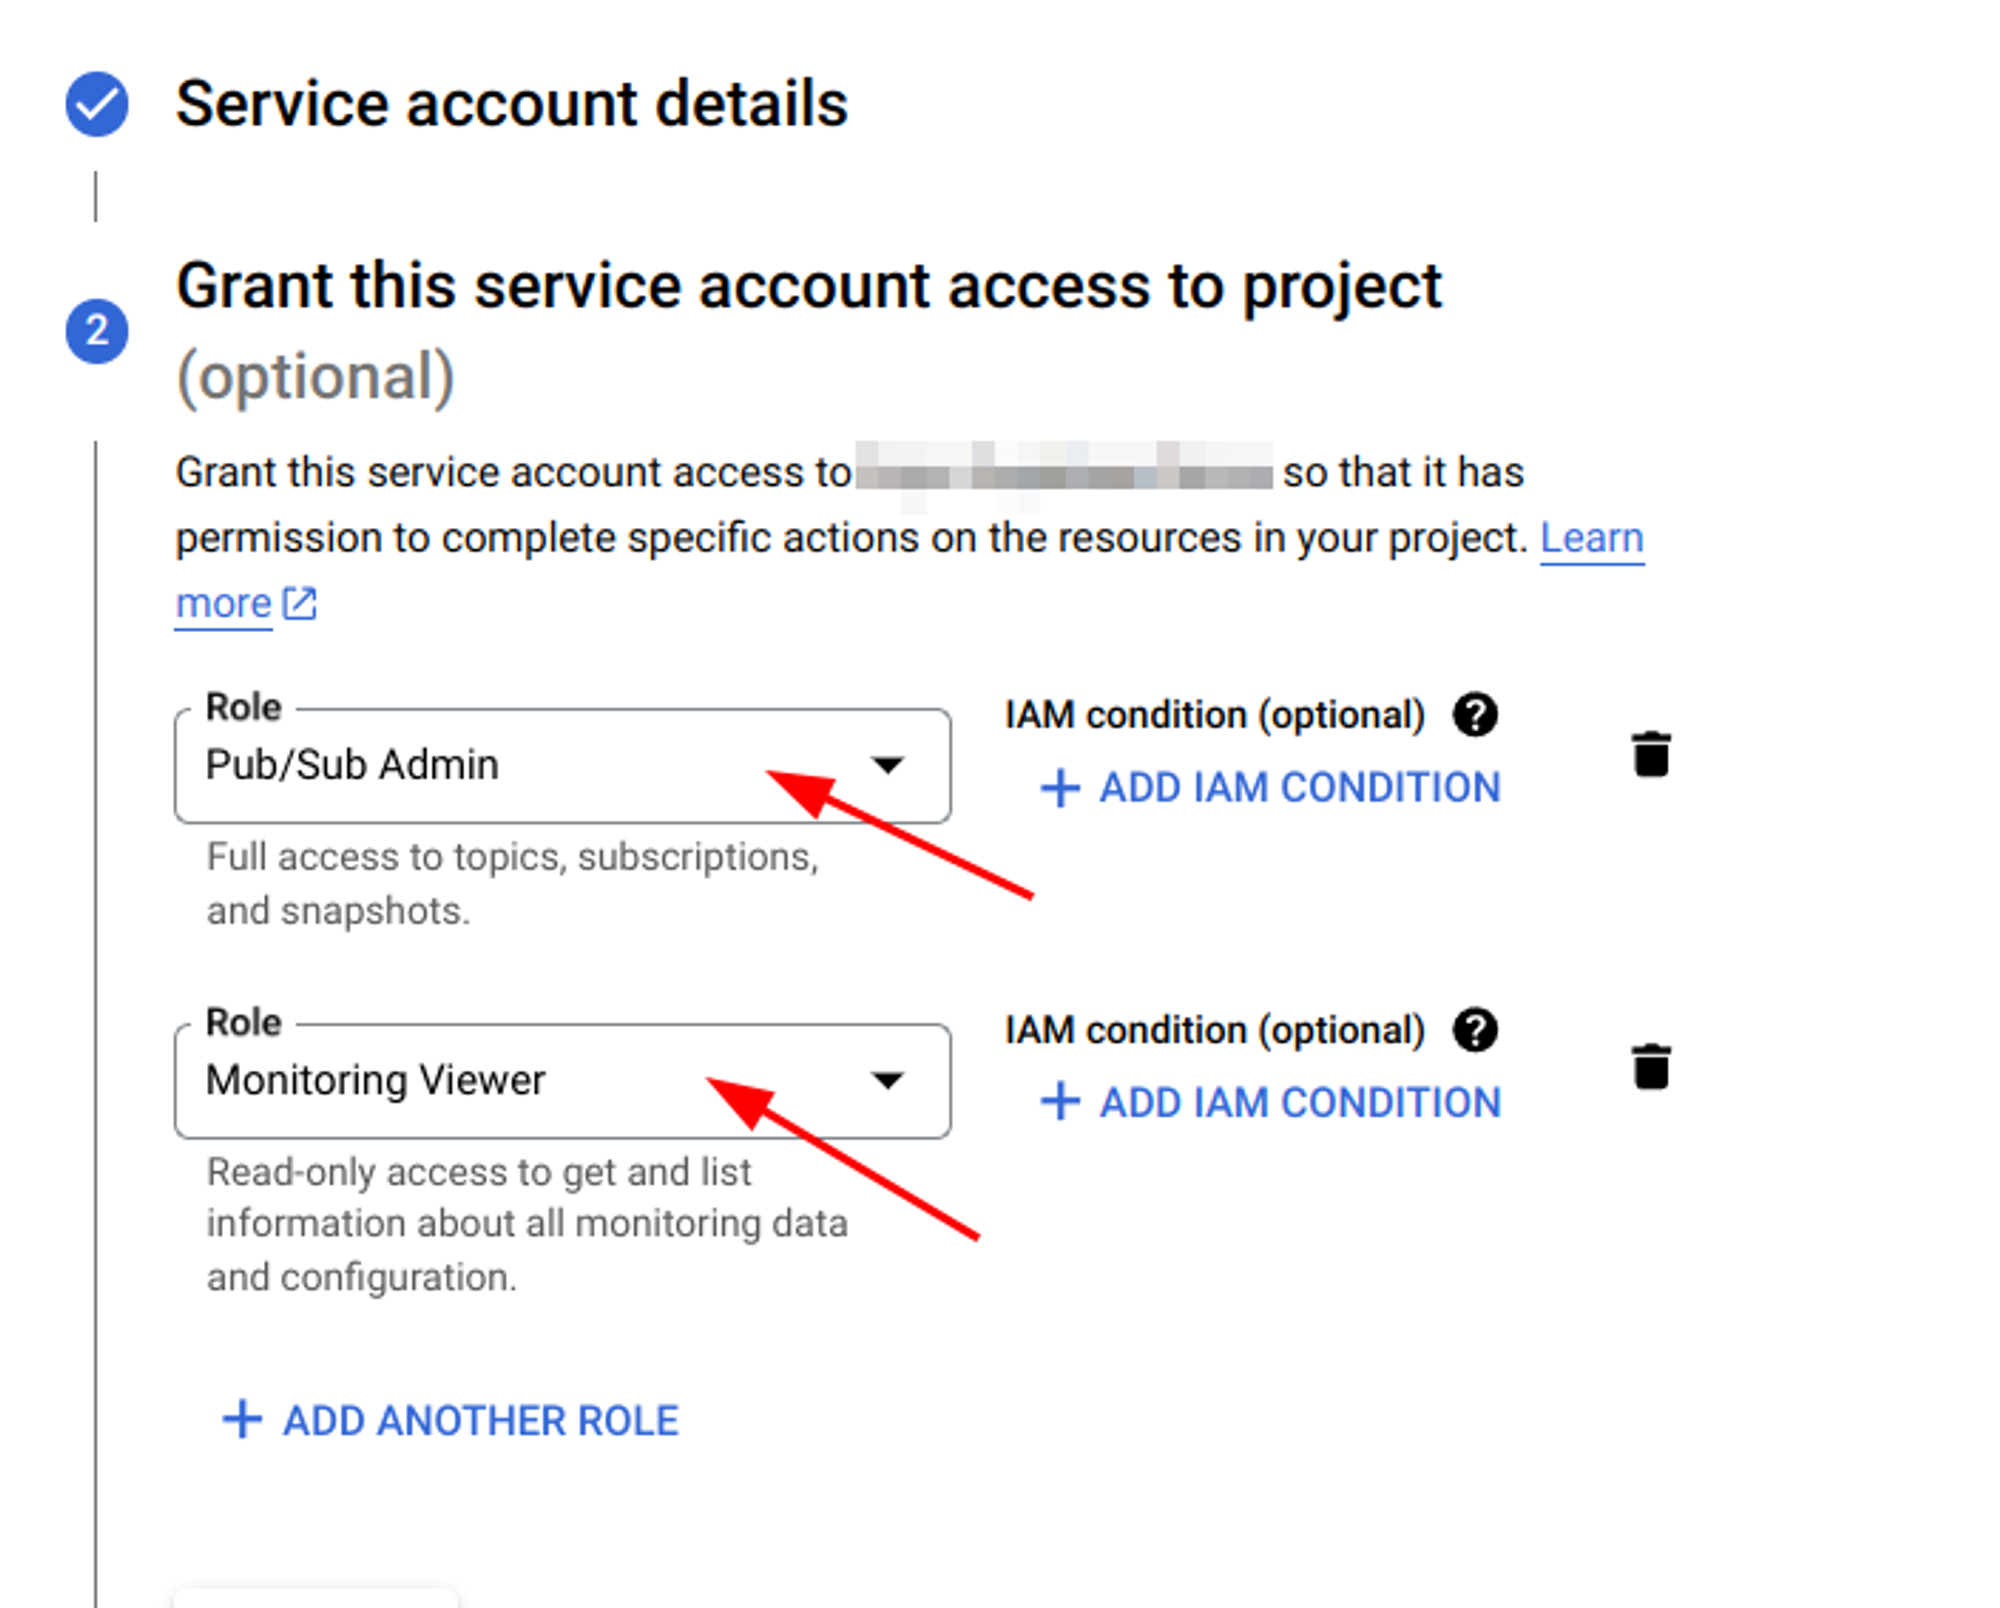
Click on “Done” to finish (the third step is not required)
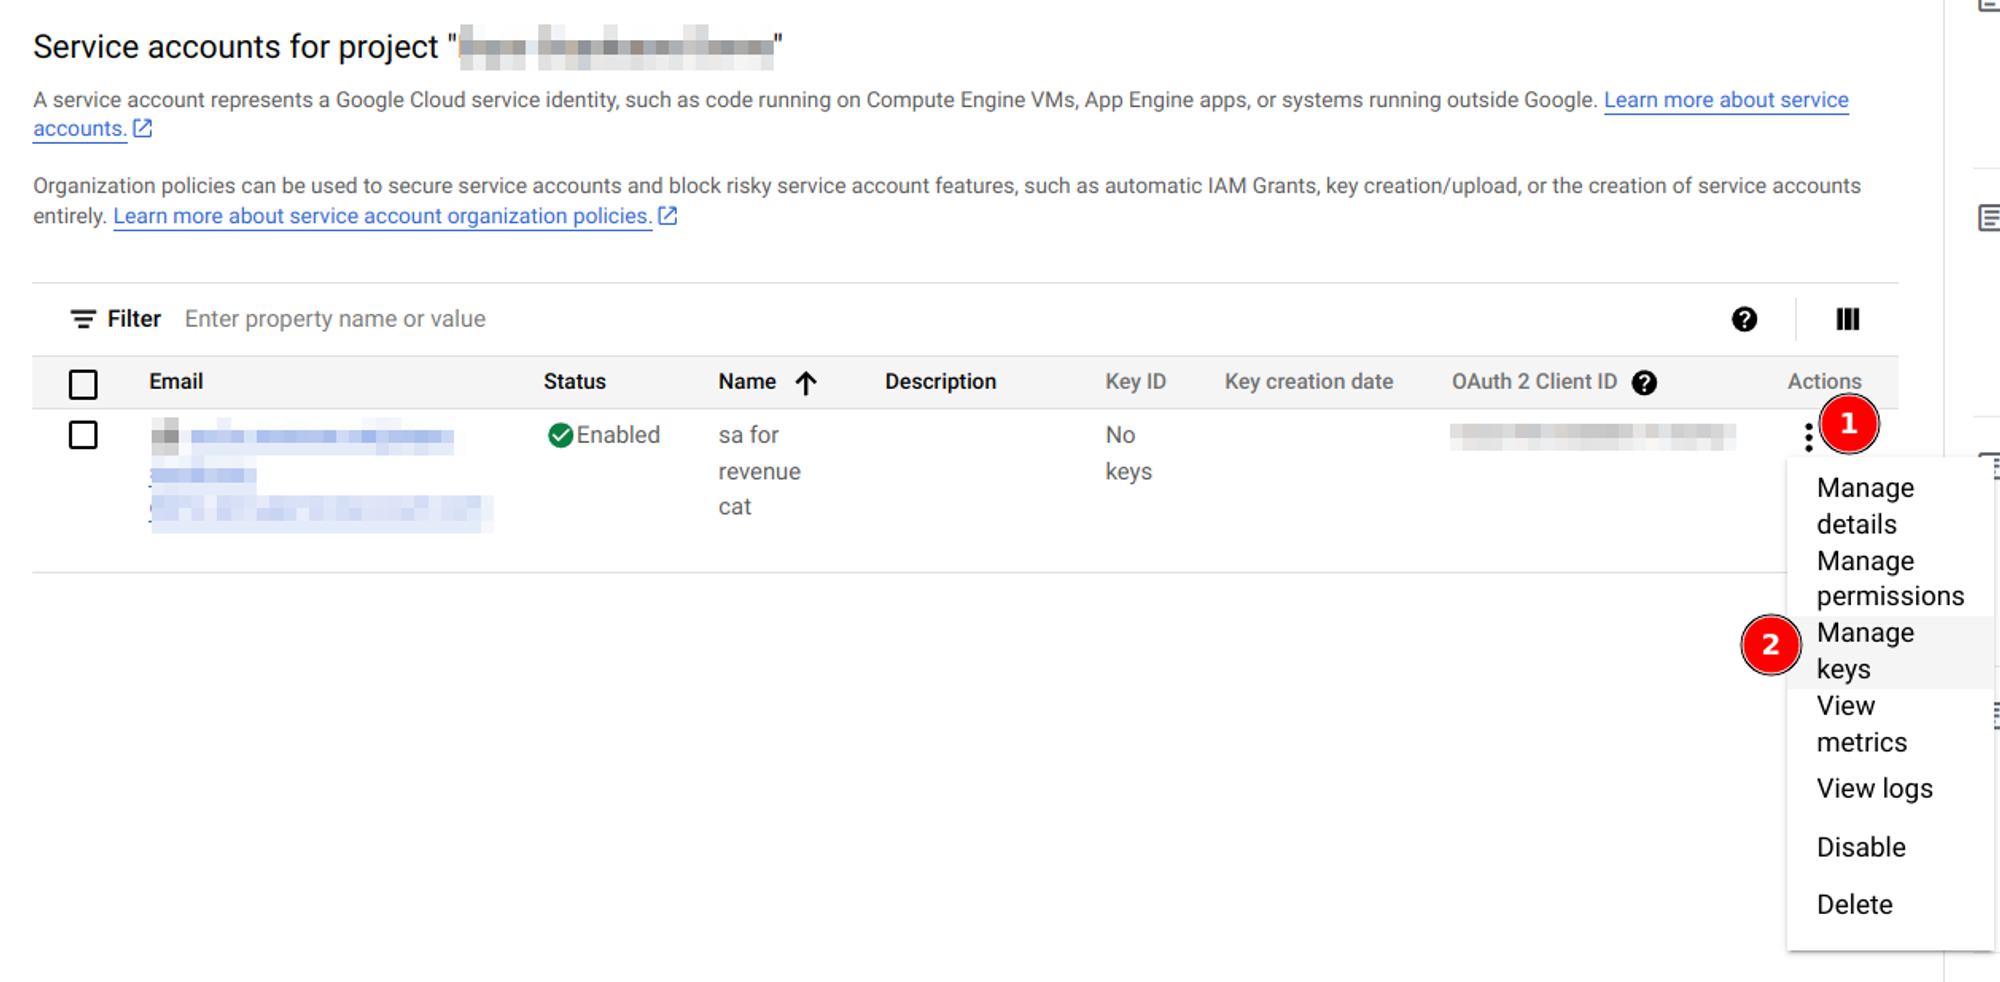
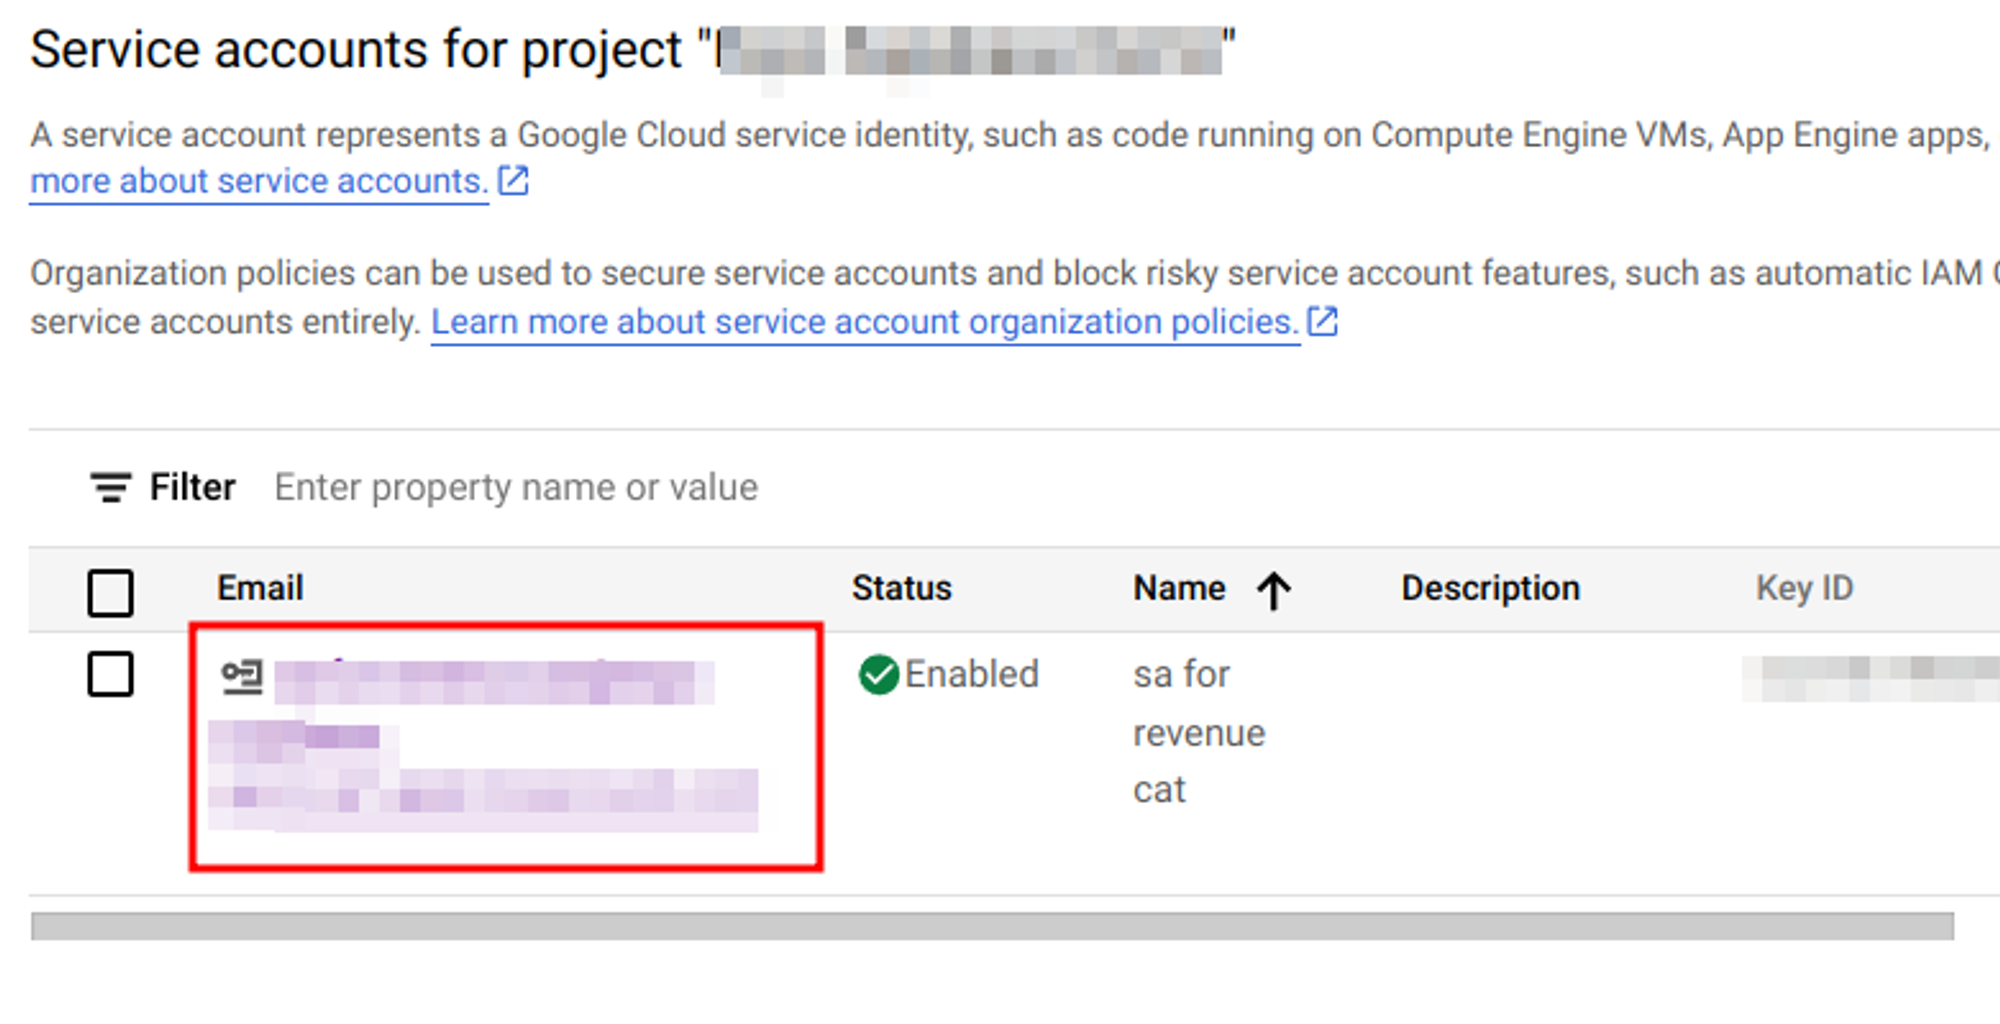
You’ll be redirected to the Service Accounts list. Now, you need to click on the Actions dropdown menu on the right, and select “Manage Keys”
Click on “Add key” → “Create new key”
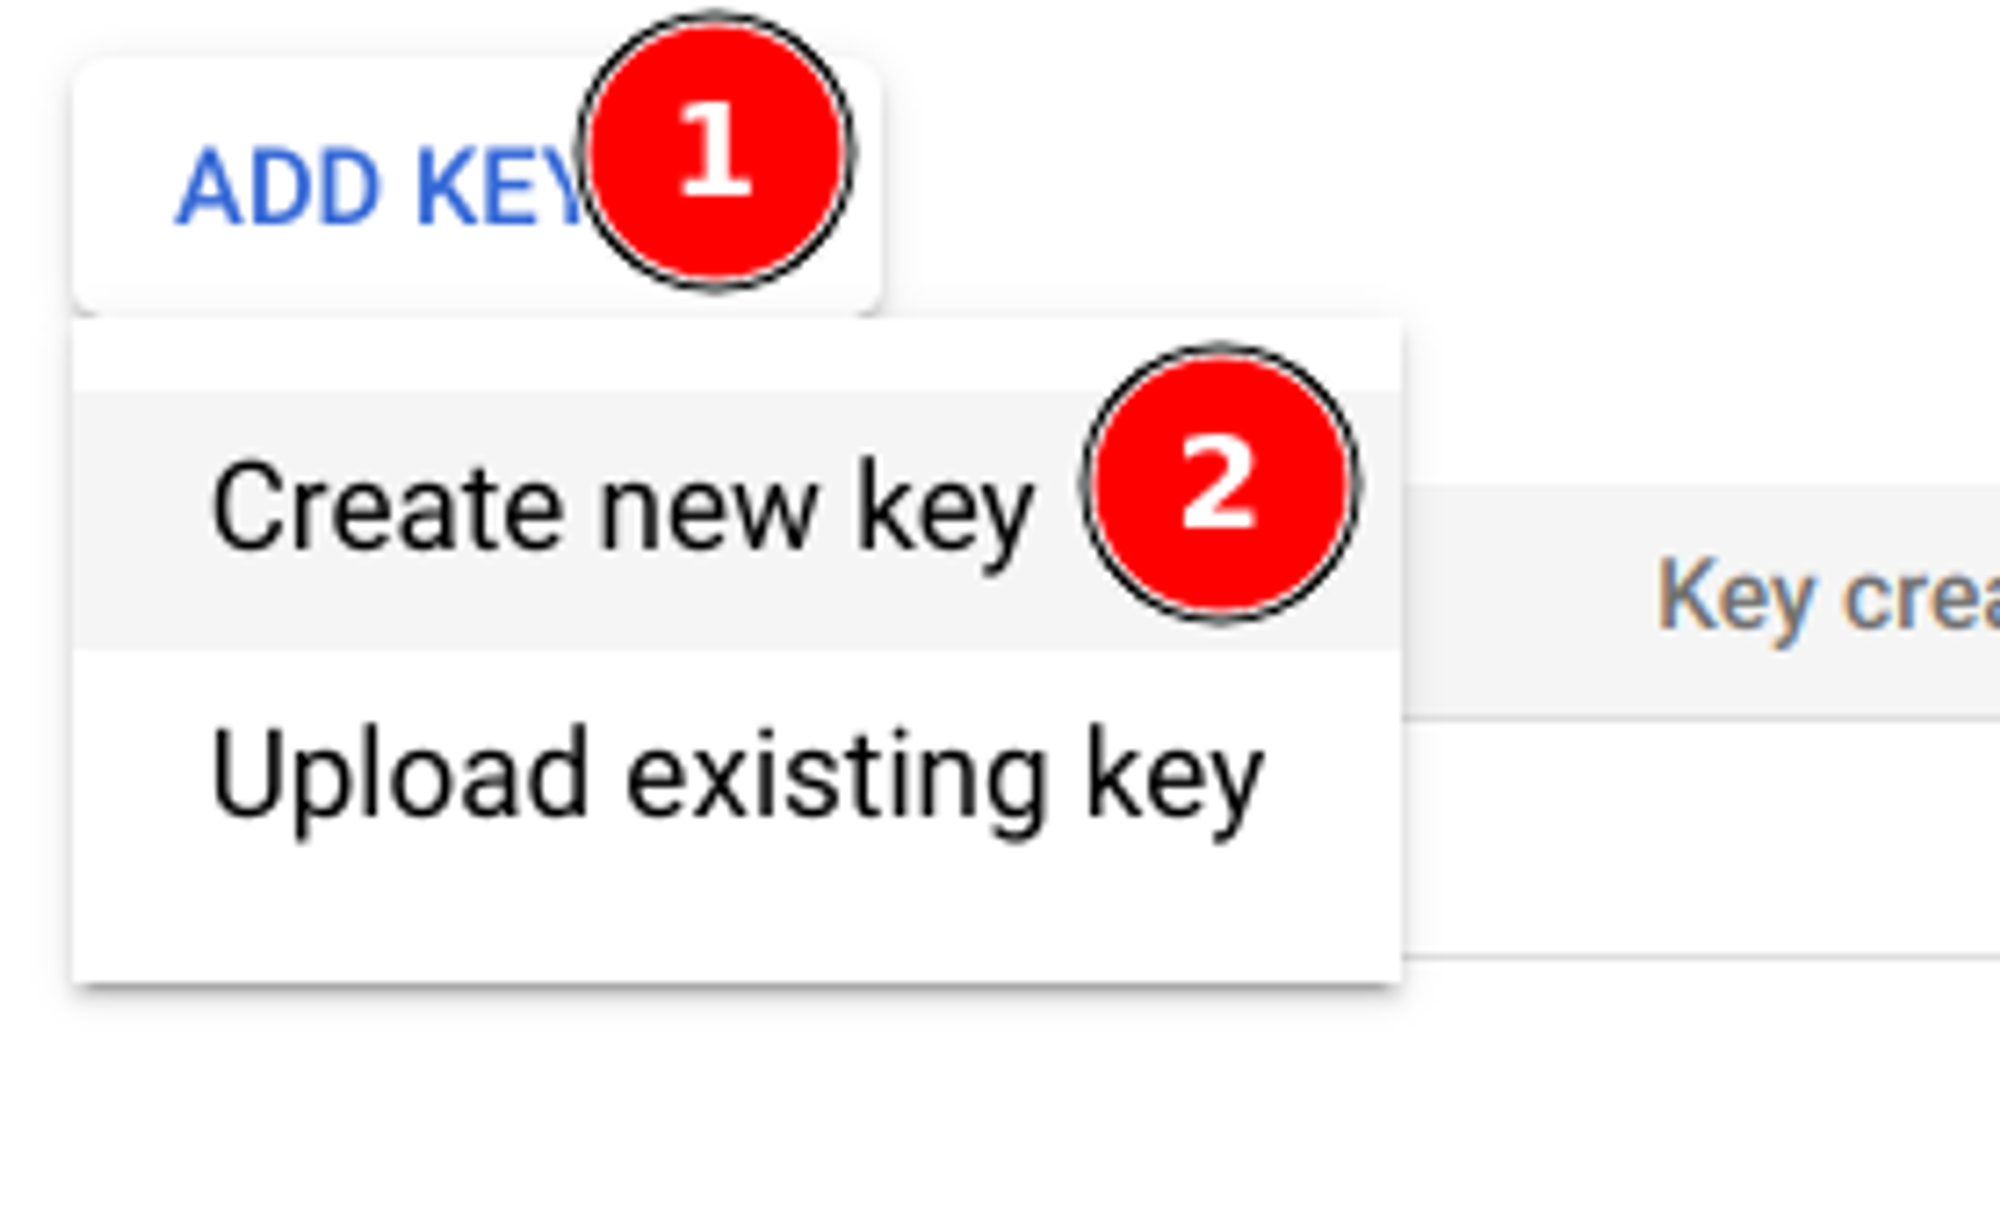
Select “JSON”, and click on “Create” to confirm. Make sure to store that file securely.
Finally, copy the email account associated with your new Service Account. You’ll need this email in the next step
Create a new app in Google Play Console
Before you can grant RevenueCat financial access to your app, you’ll need to create a new app in Google Play Console.
First, we need to login into Google Play Console. If you still don’t have a Google Play Console account, create a new one before proceeding.
In the right section, click on “Create app”
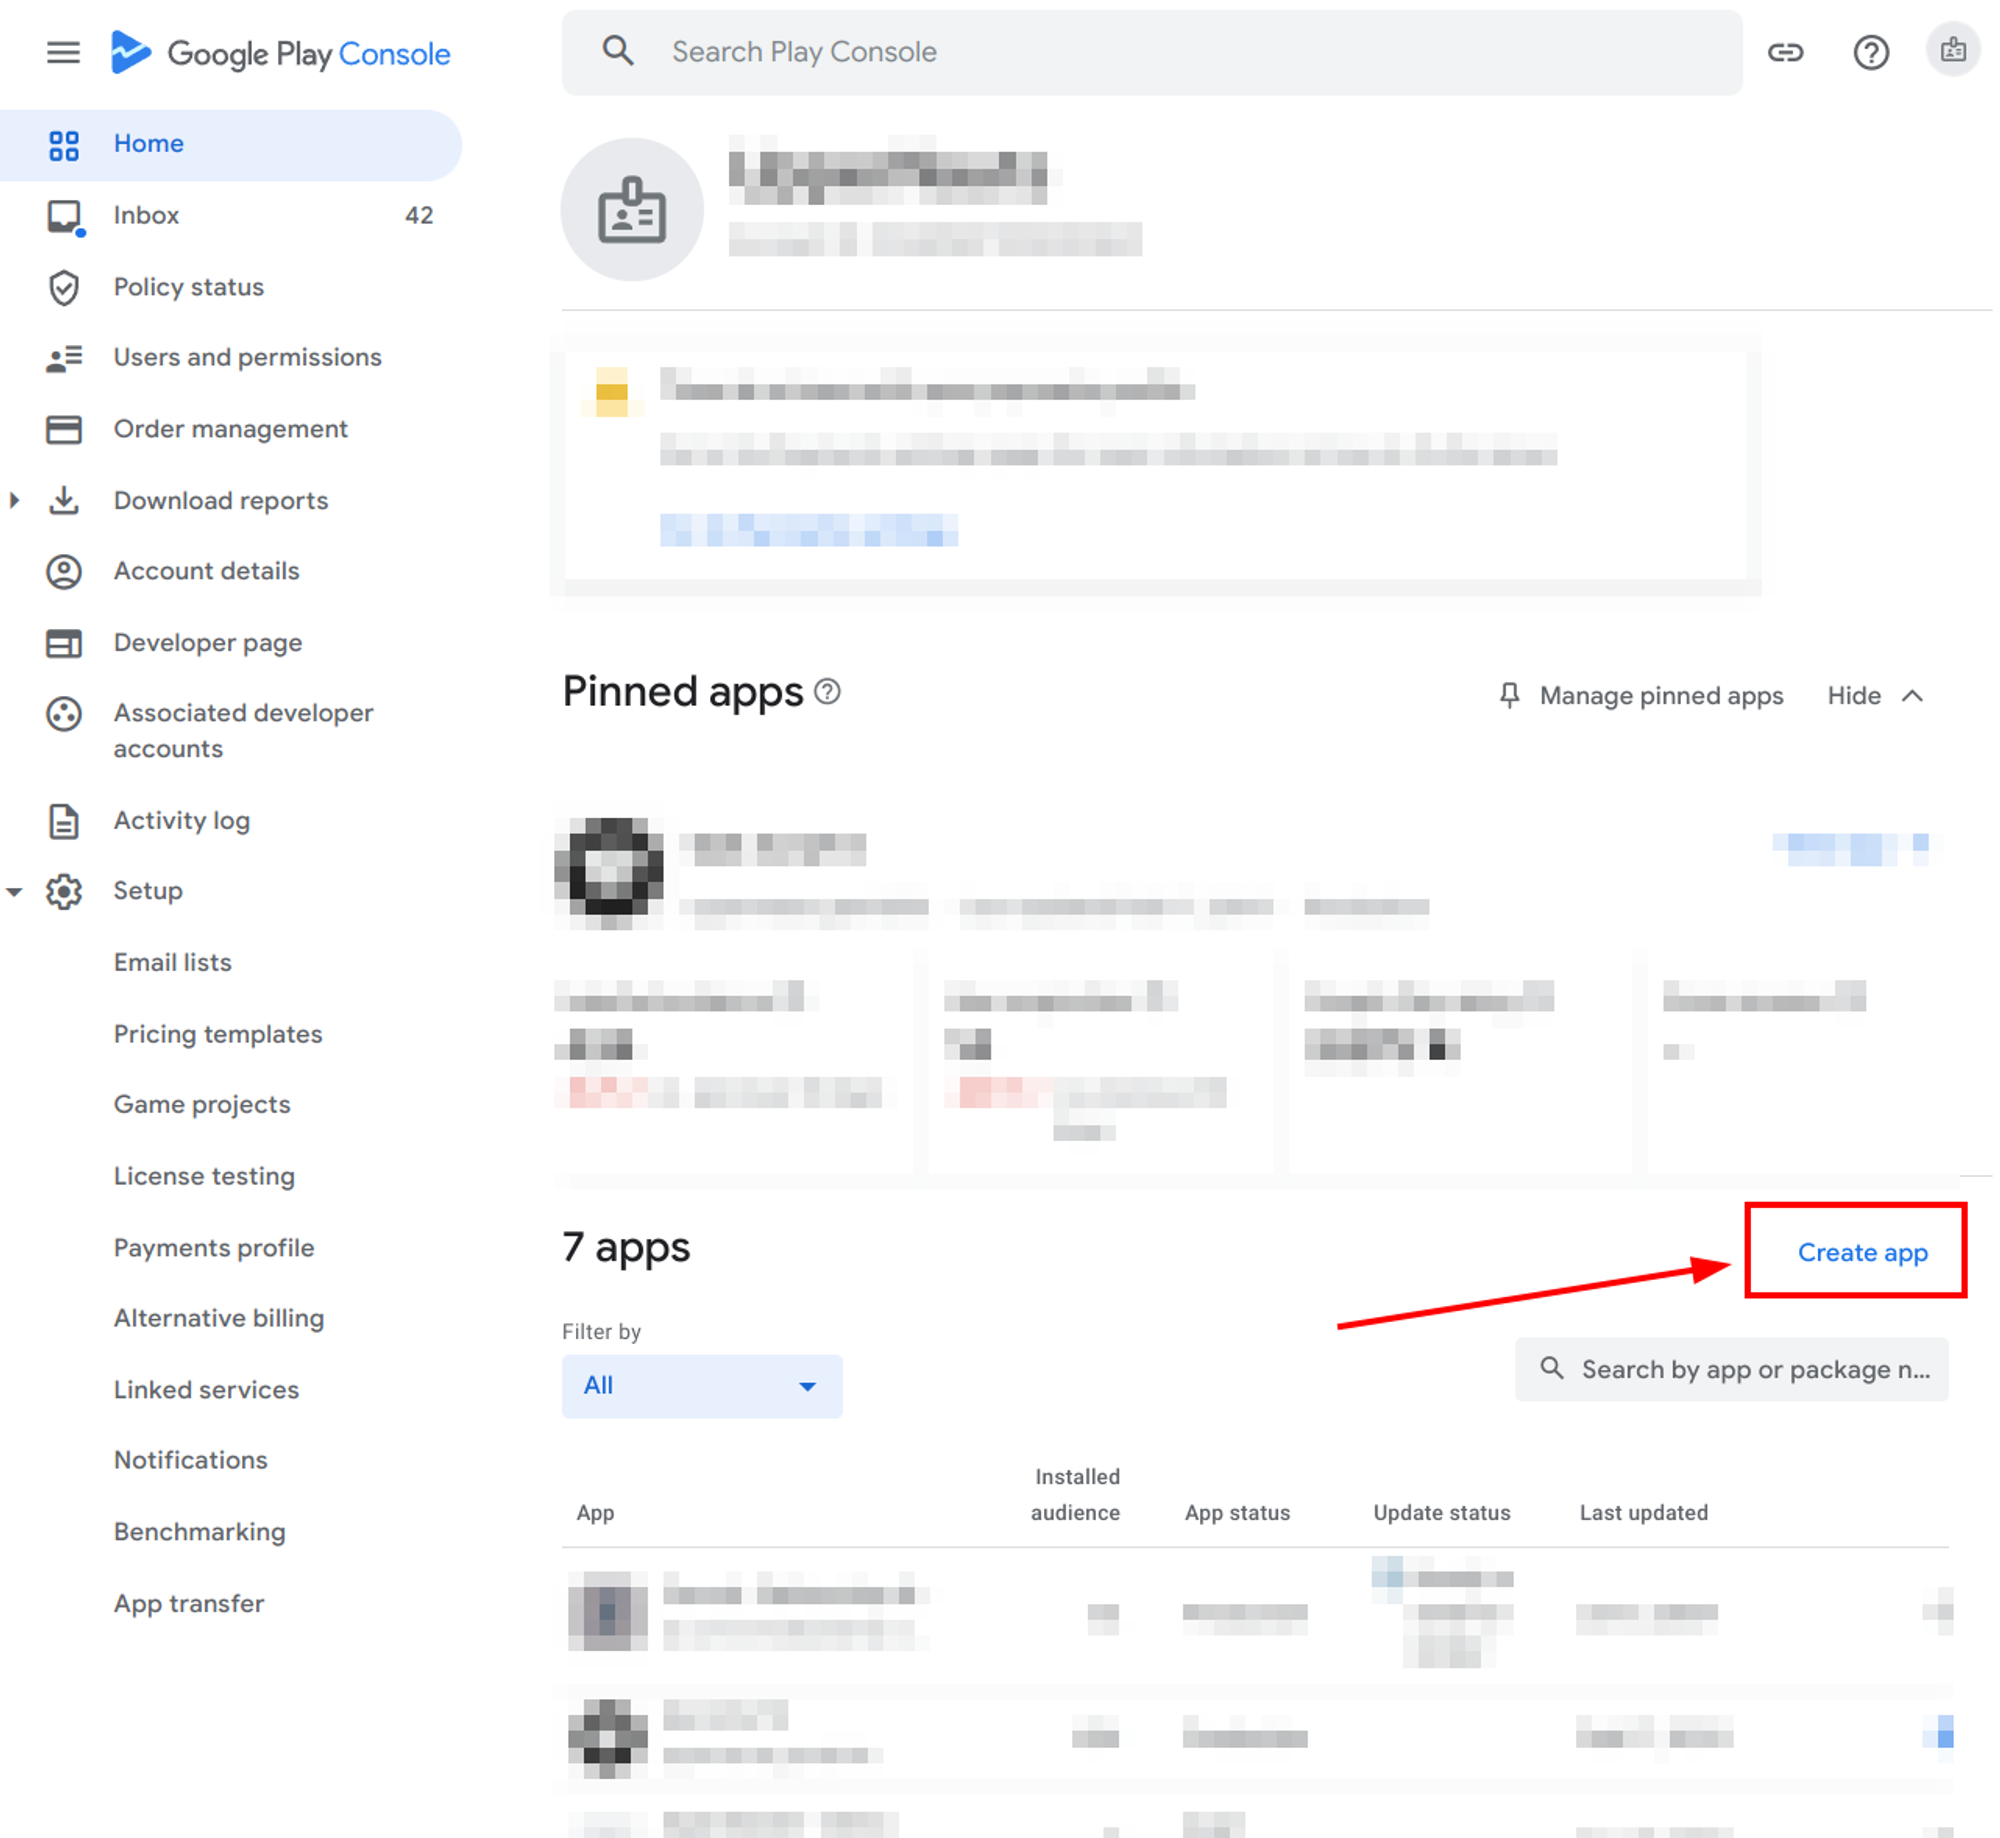
Complete the form, and click “Create app” to confirm
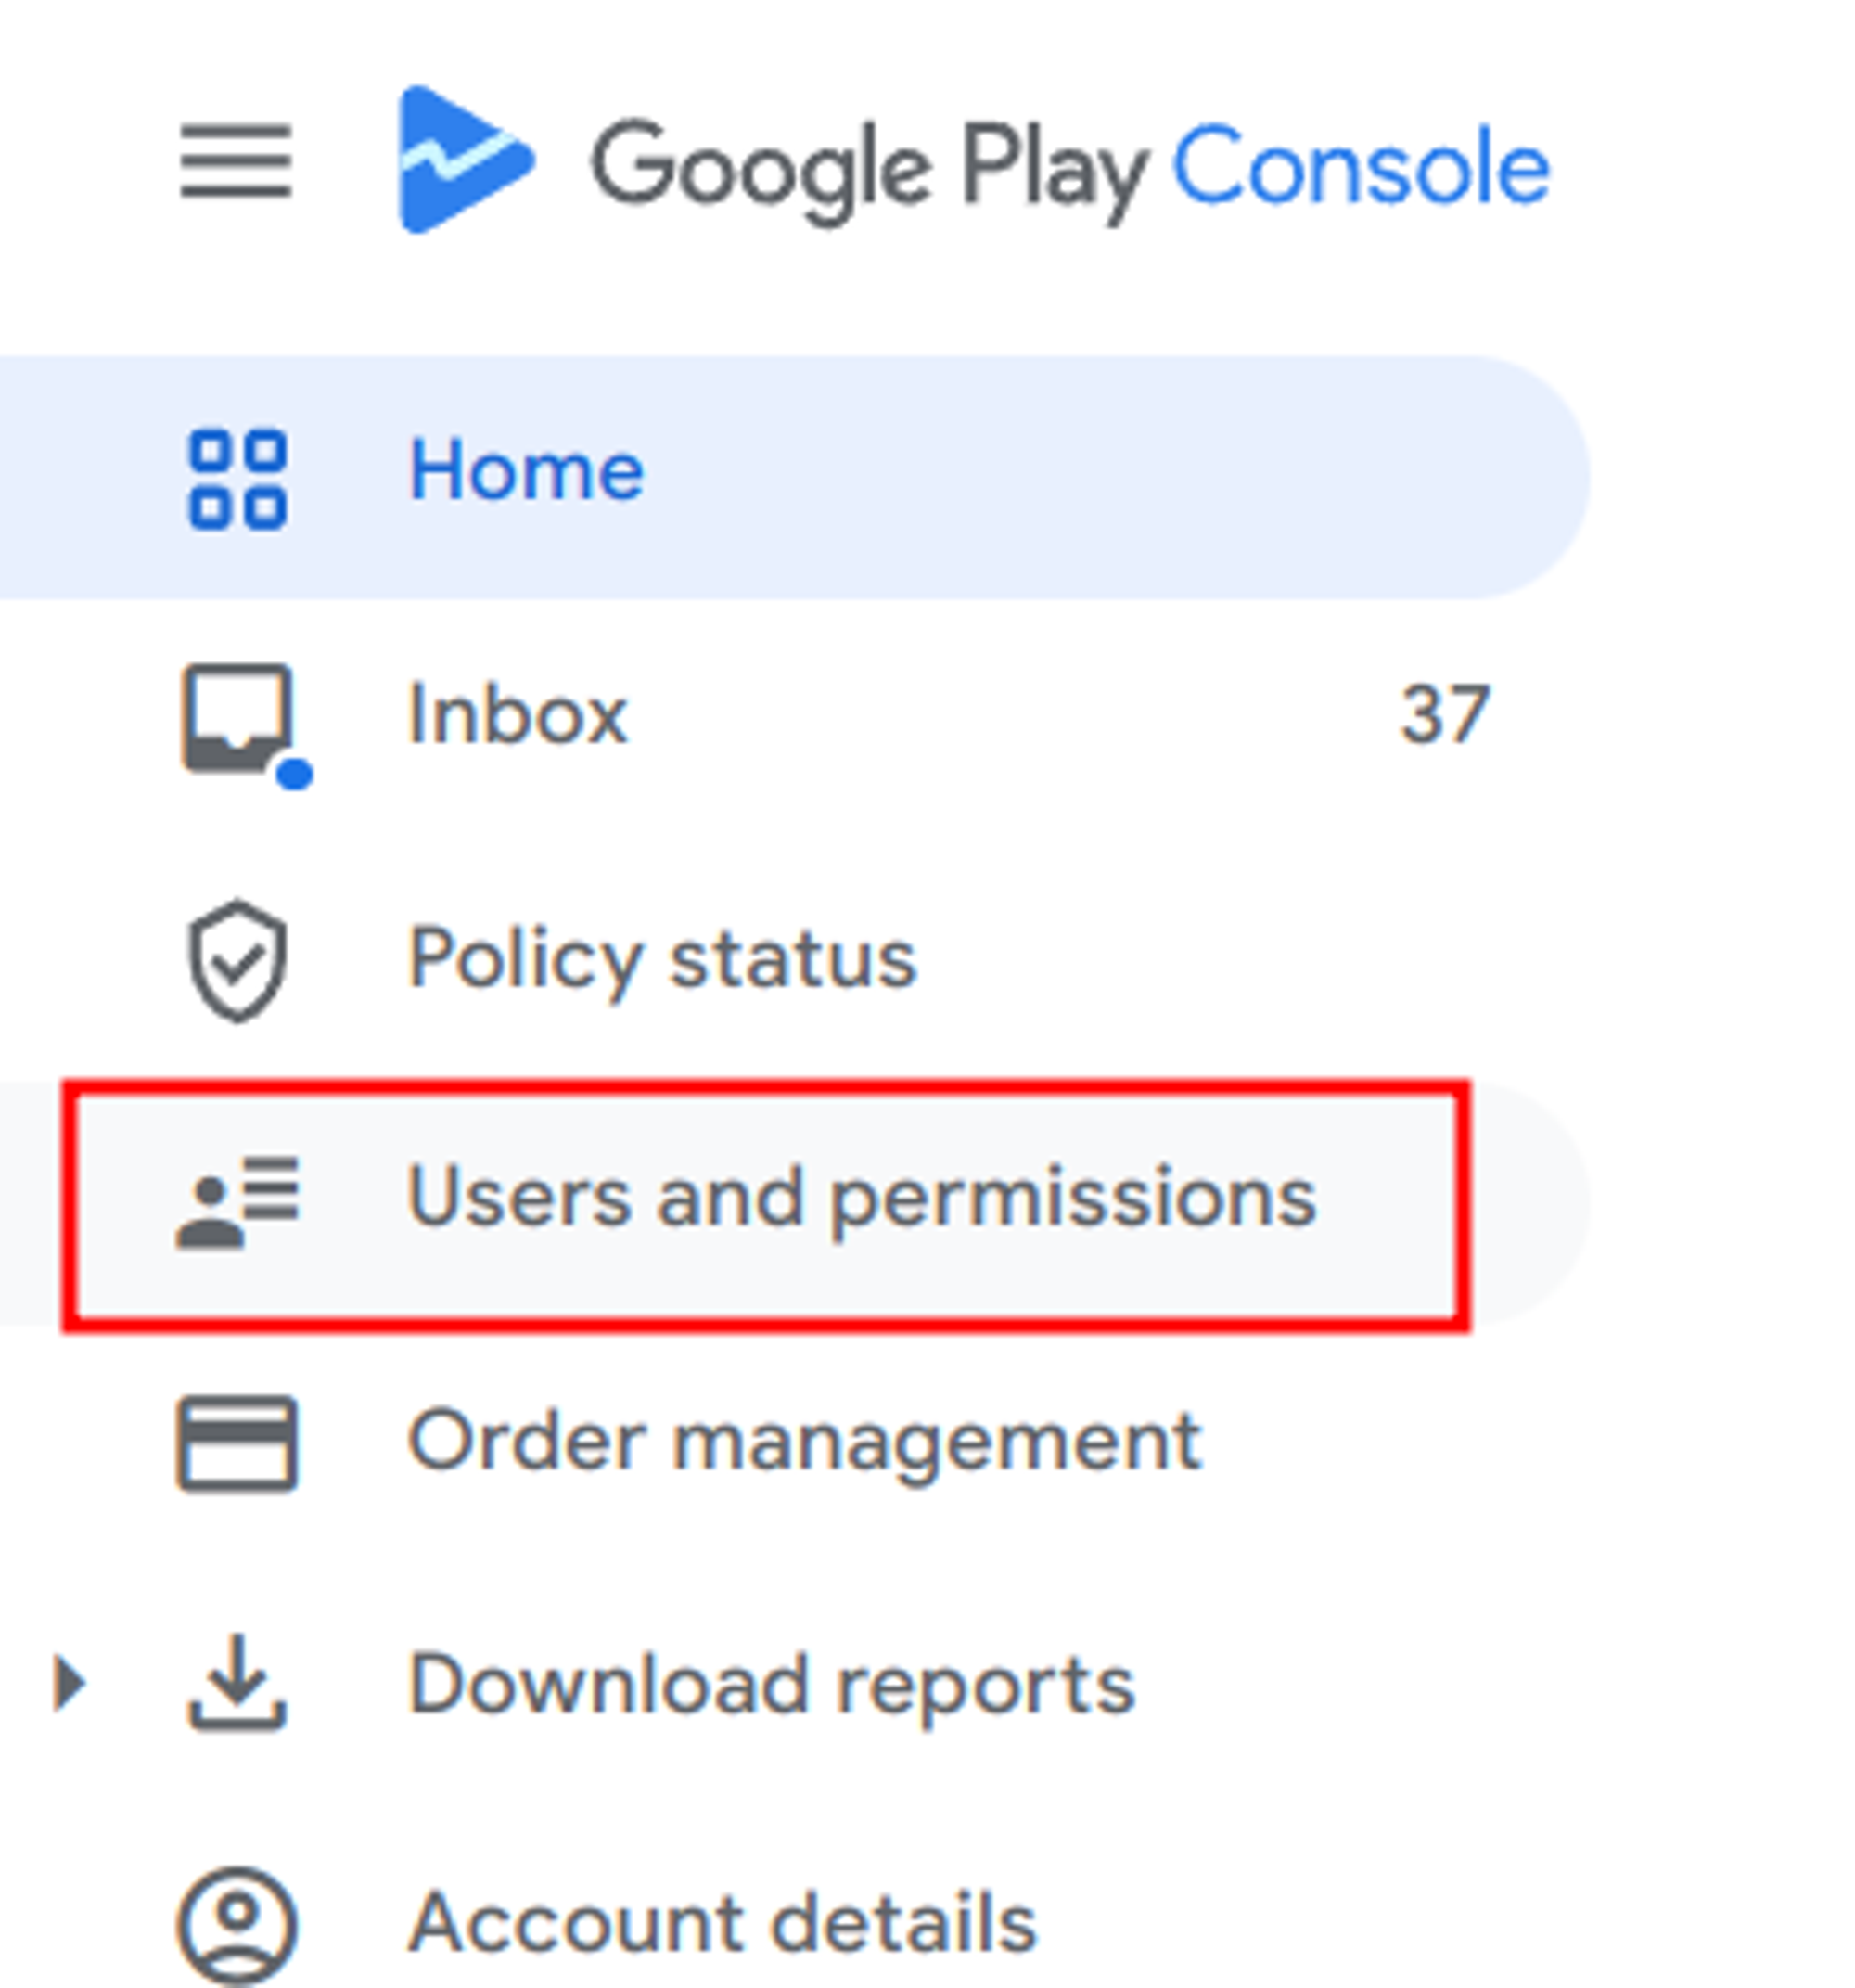
Grant Financial Access to RevenueCat (Google Play Console)
In Google Play Console, click on Click on “Users and Permissions” in the sidebar
Click on “Invite new users”
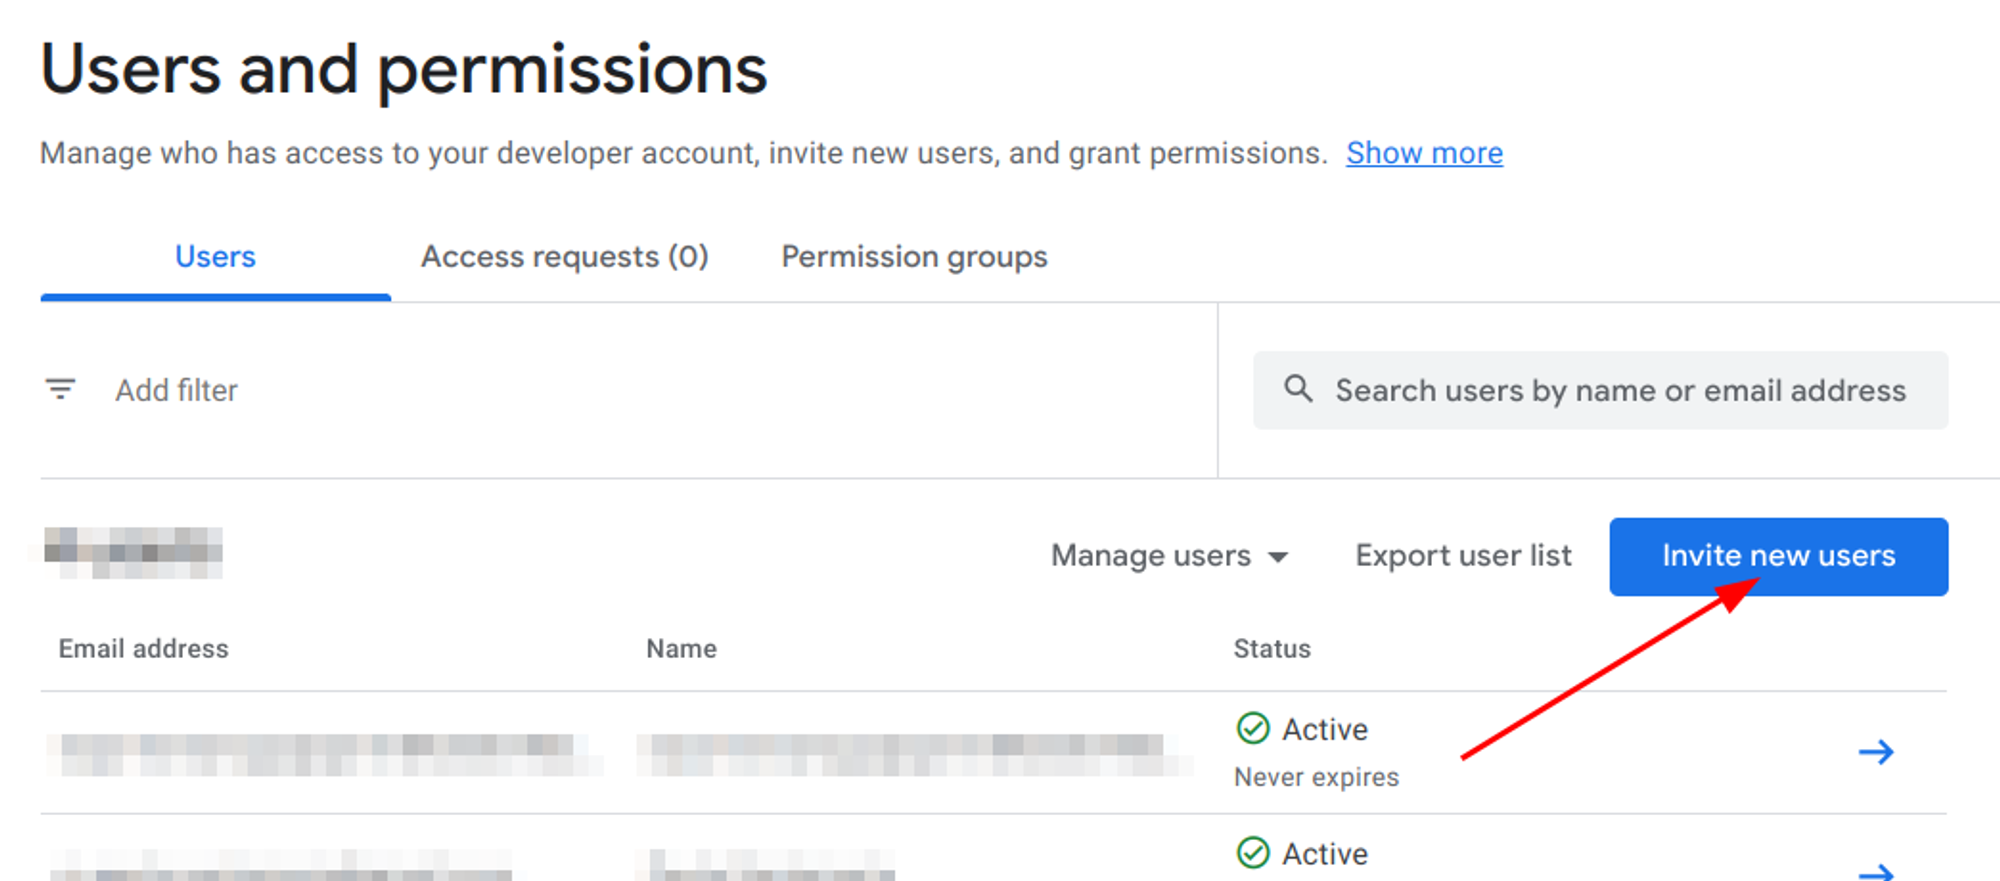
Paste the email address you got in the previous step after creating the service account. Then click the “Add app” button, and select your app. Click on “Apply”.
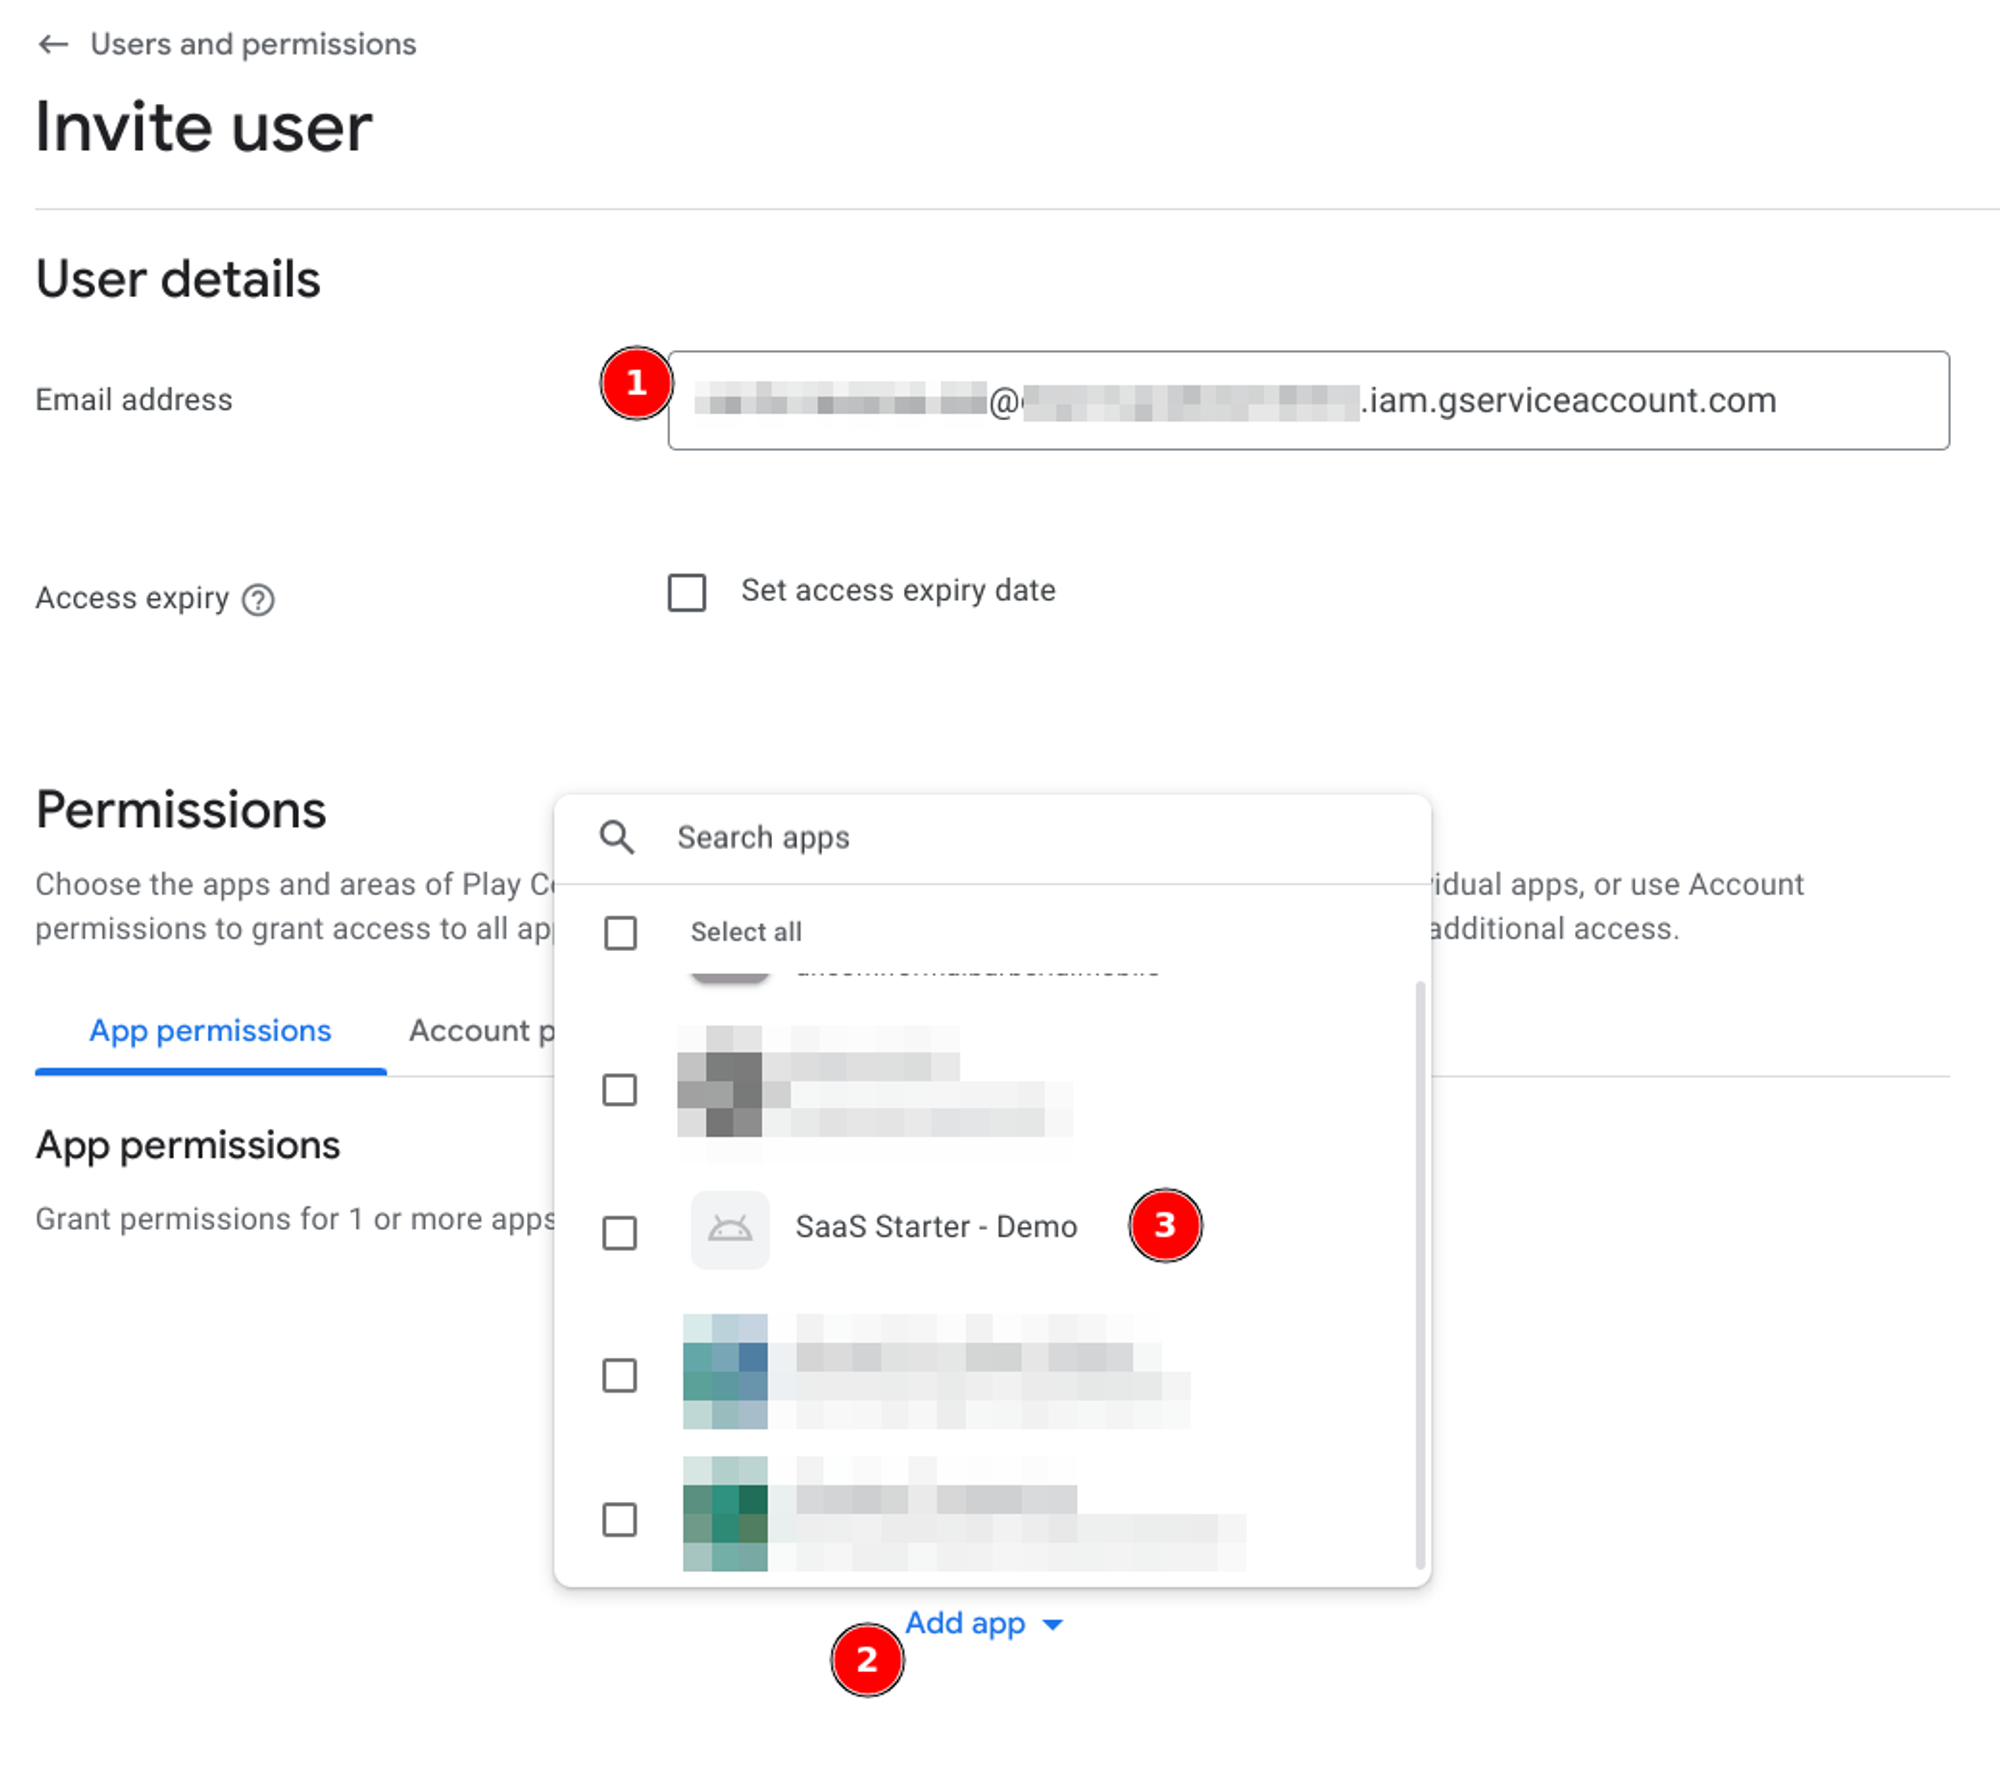
Grant at least the following permissions:
“View app information” & “View app quality information”
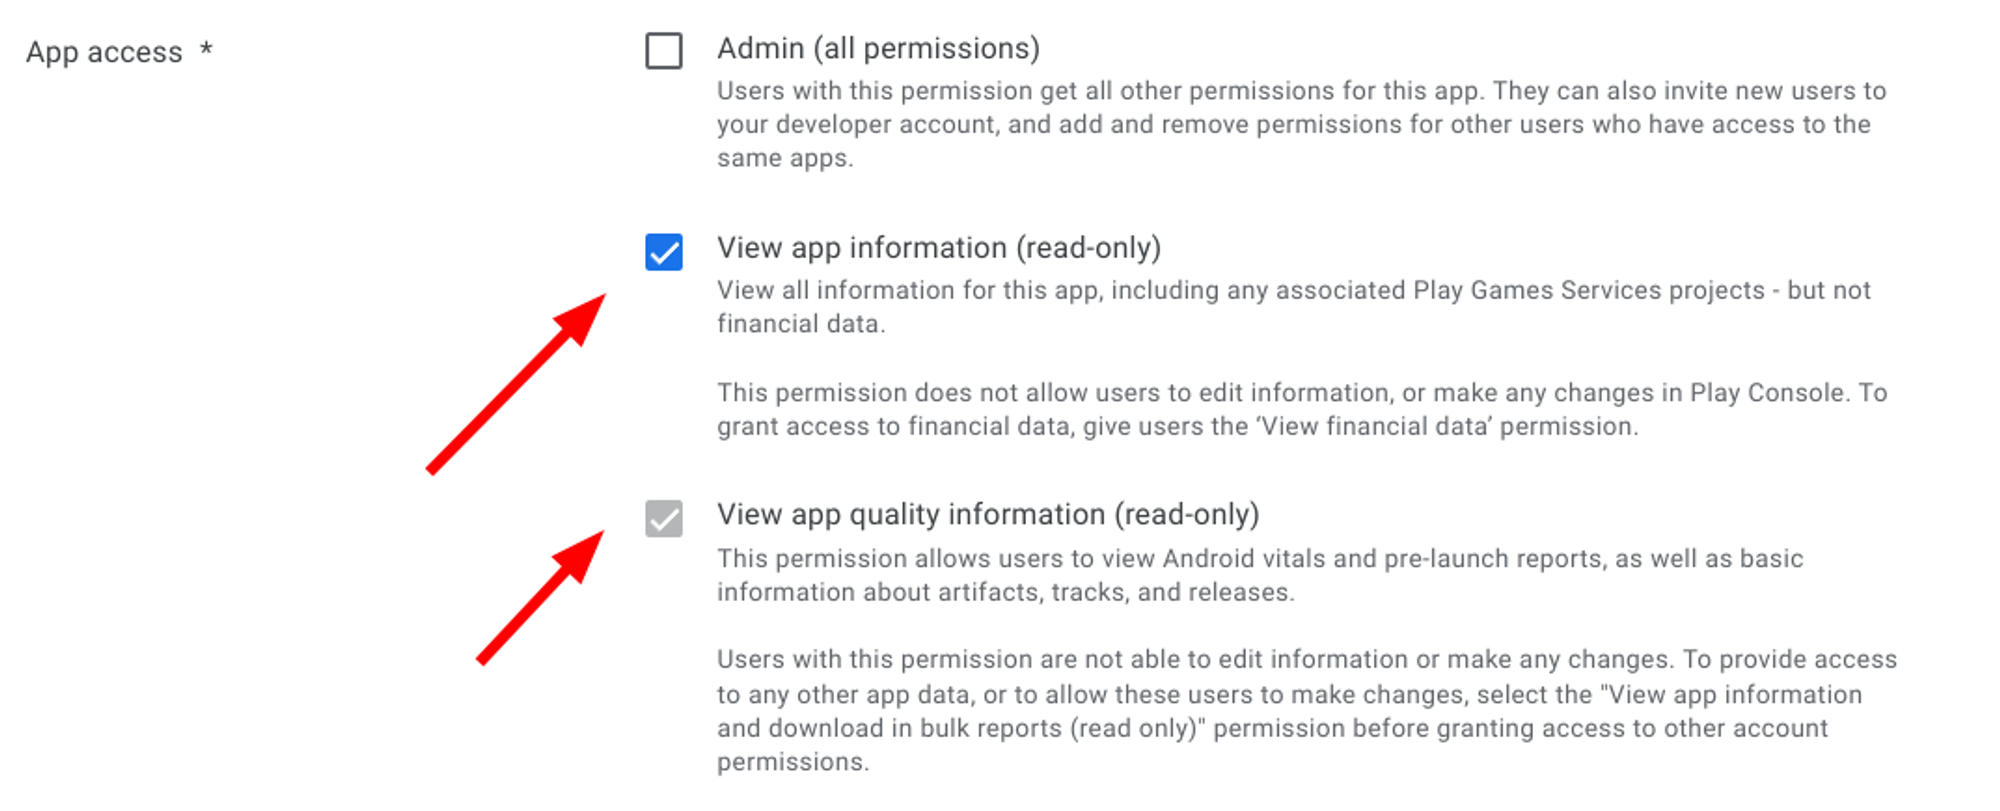
“View Financial data” & “Manage orders and subscriptions”

Feel free to read through all the available options and check any additional option based on your needs. Those described above are the bare minimum to integrate with RevenueCat.
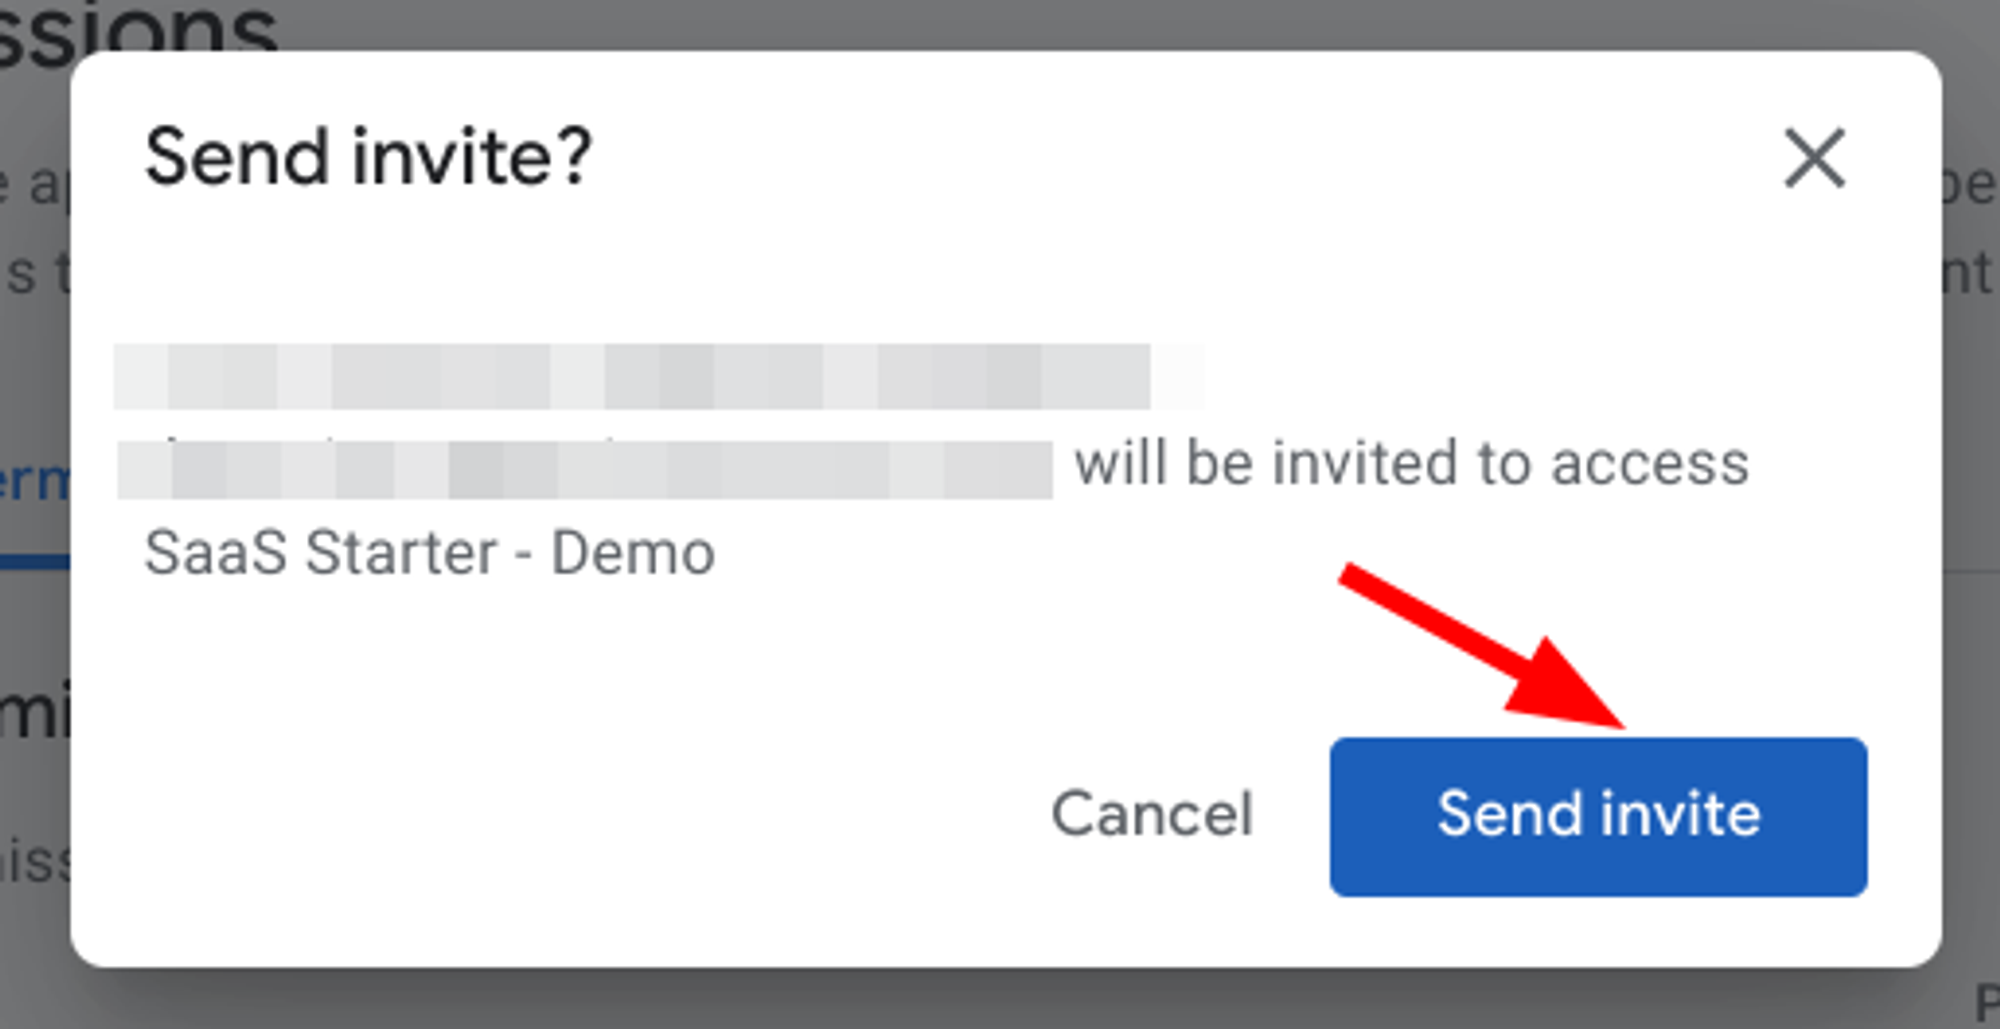
Click “Apply”, then “Invite User”, and finally “Send Invite”.
Update the credentials JSON in RevenueCat
Visit your RevenueCat dashboard, and go to your Project page.
Select “Play Store - Android”
Choose a proper name to easily identify your Android app in RevenueCat
In the “Google Play Package” field, use the same package identifier that you set in the
app.js, file underapp.androidPackageUpload the JSON file you generated for the Service Account before
Click “Save Changes” to finish.
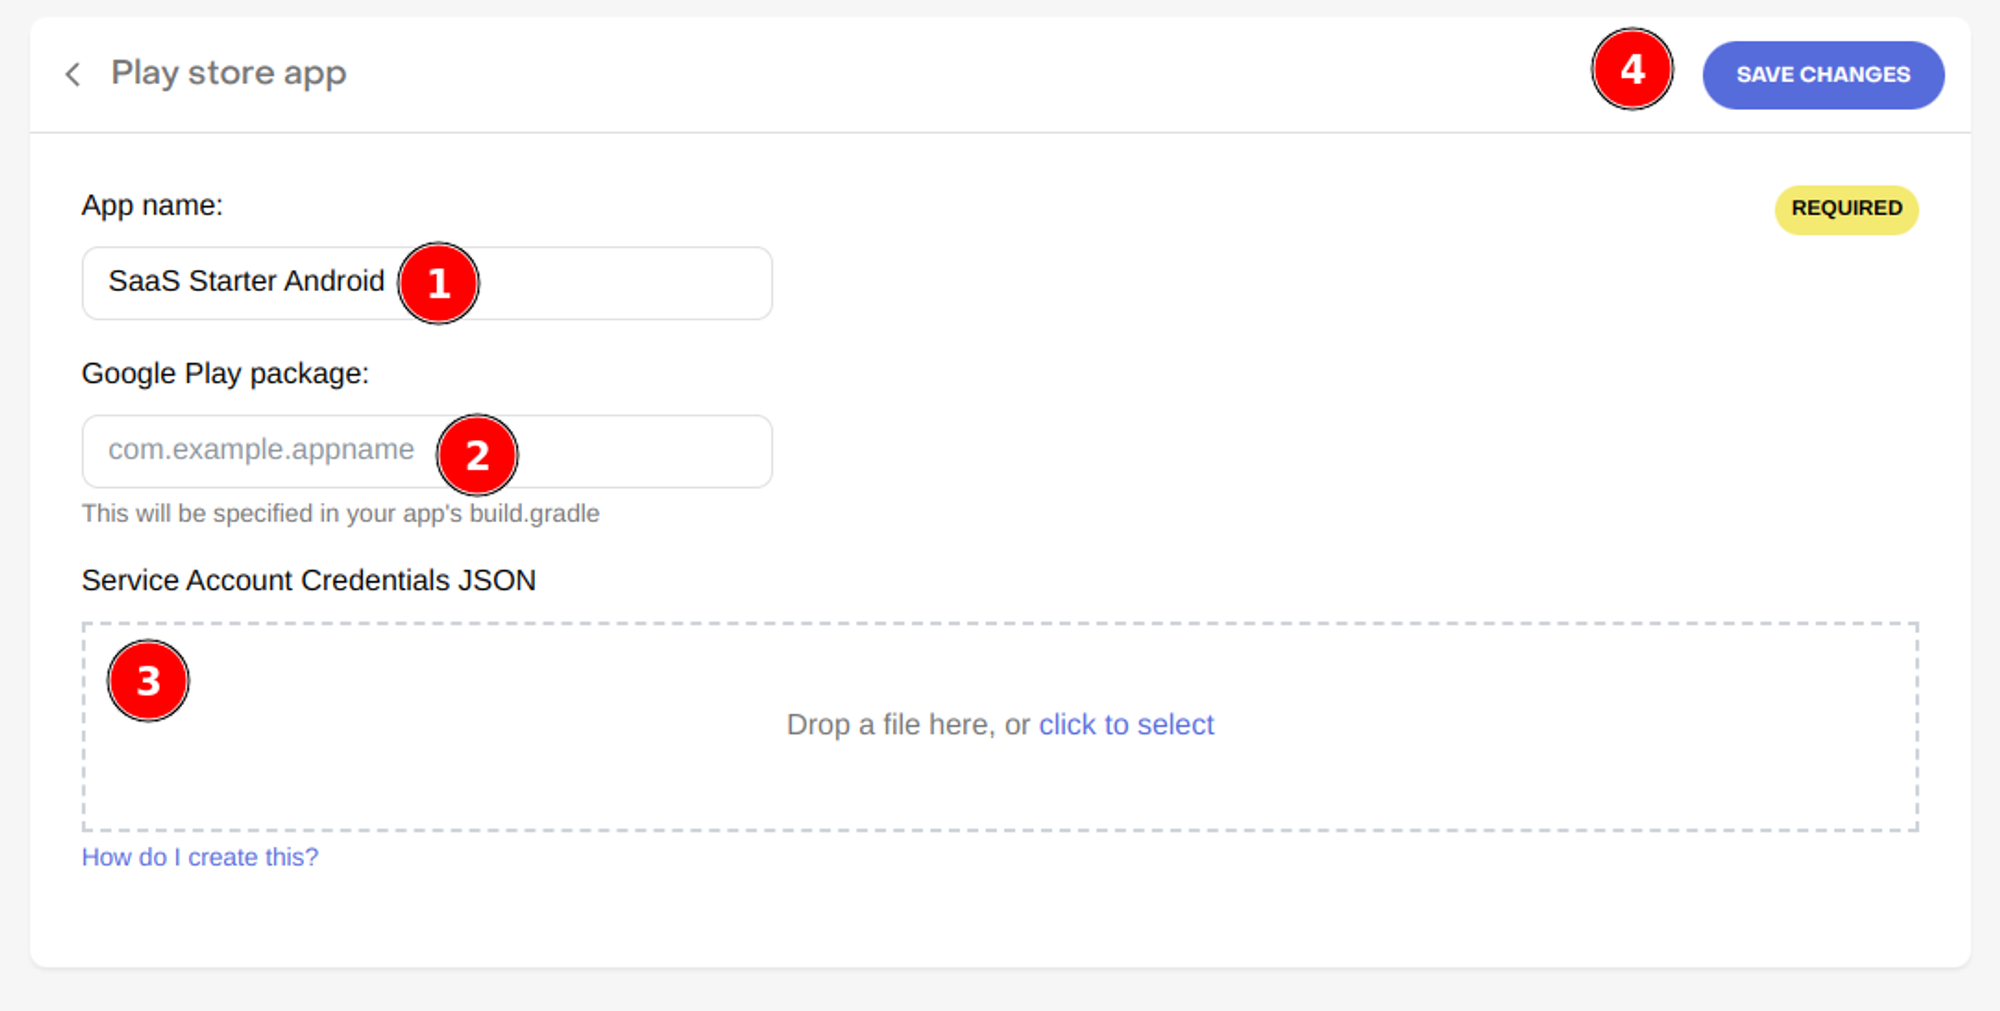
The validation process may take up to 36 hours, as described in the RevenueCat documentation here
Getting the Api Key
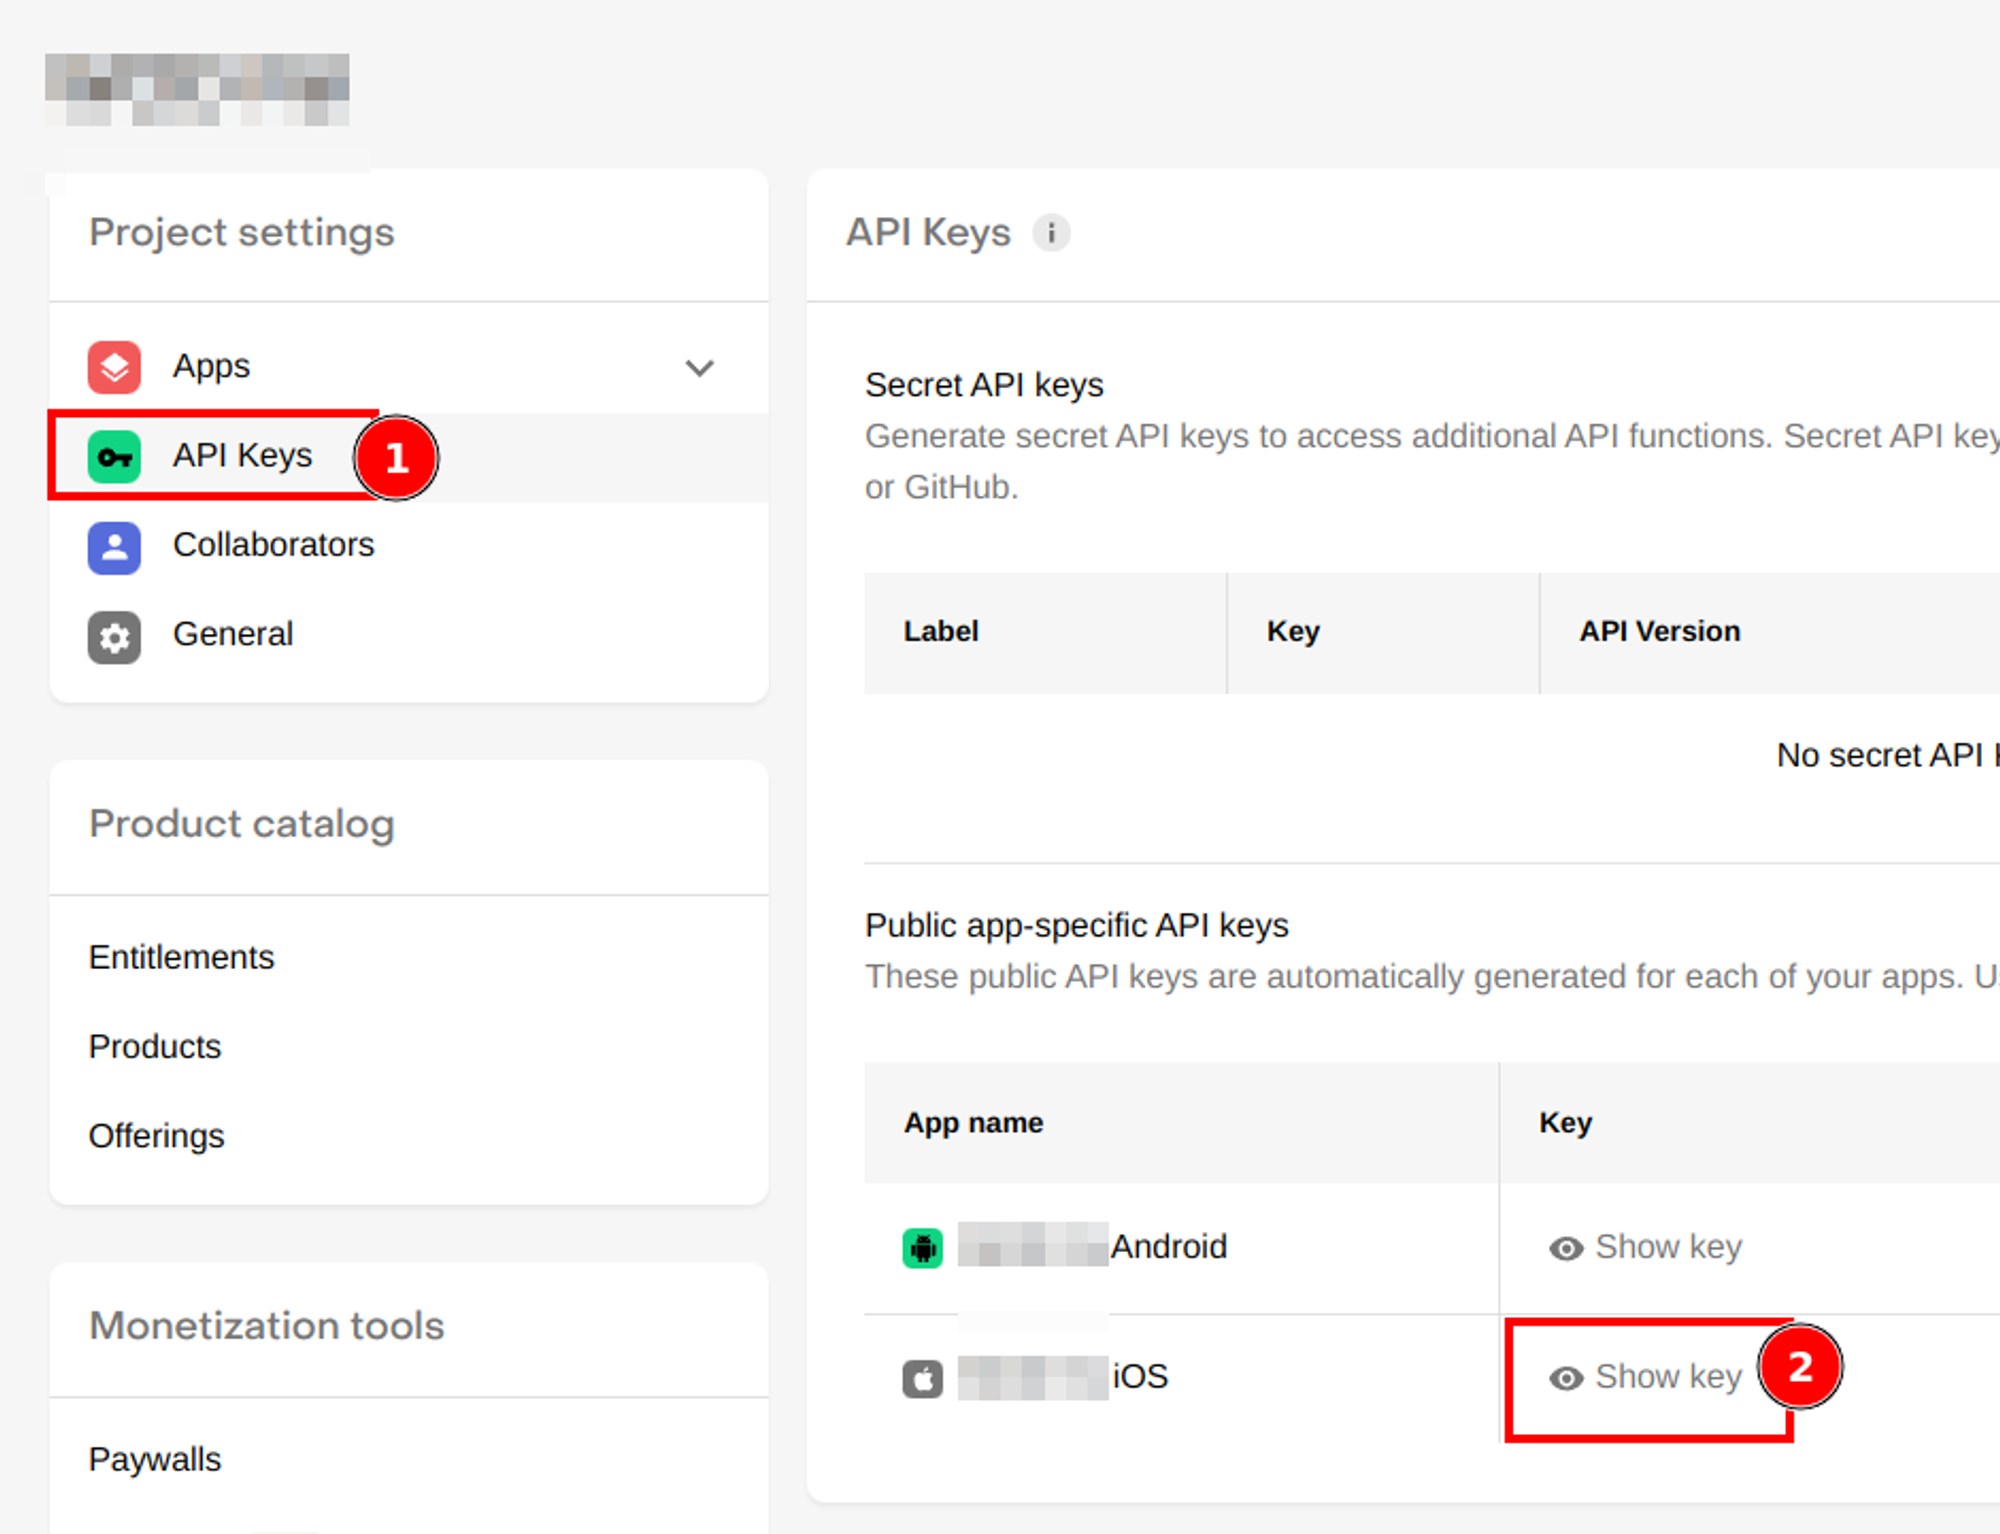
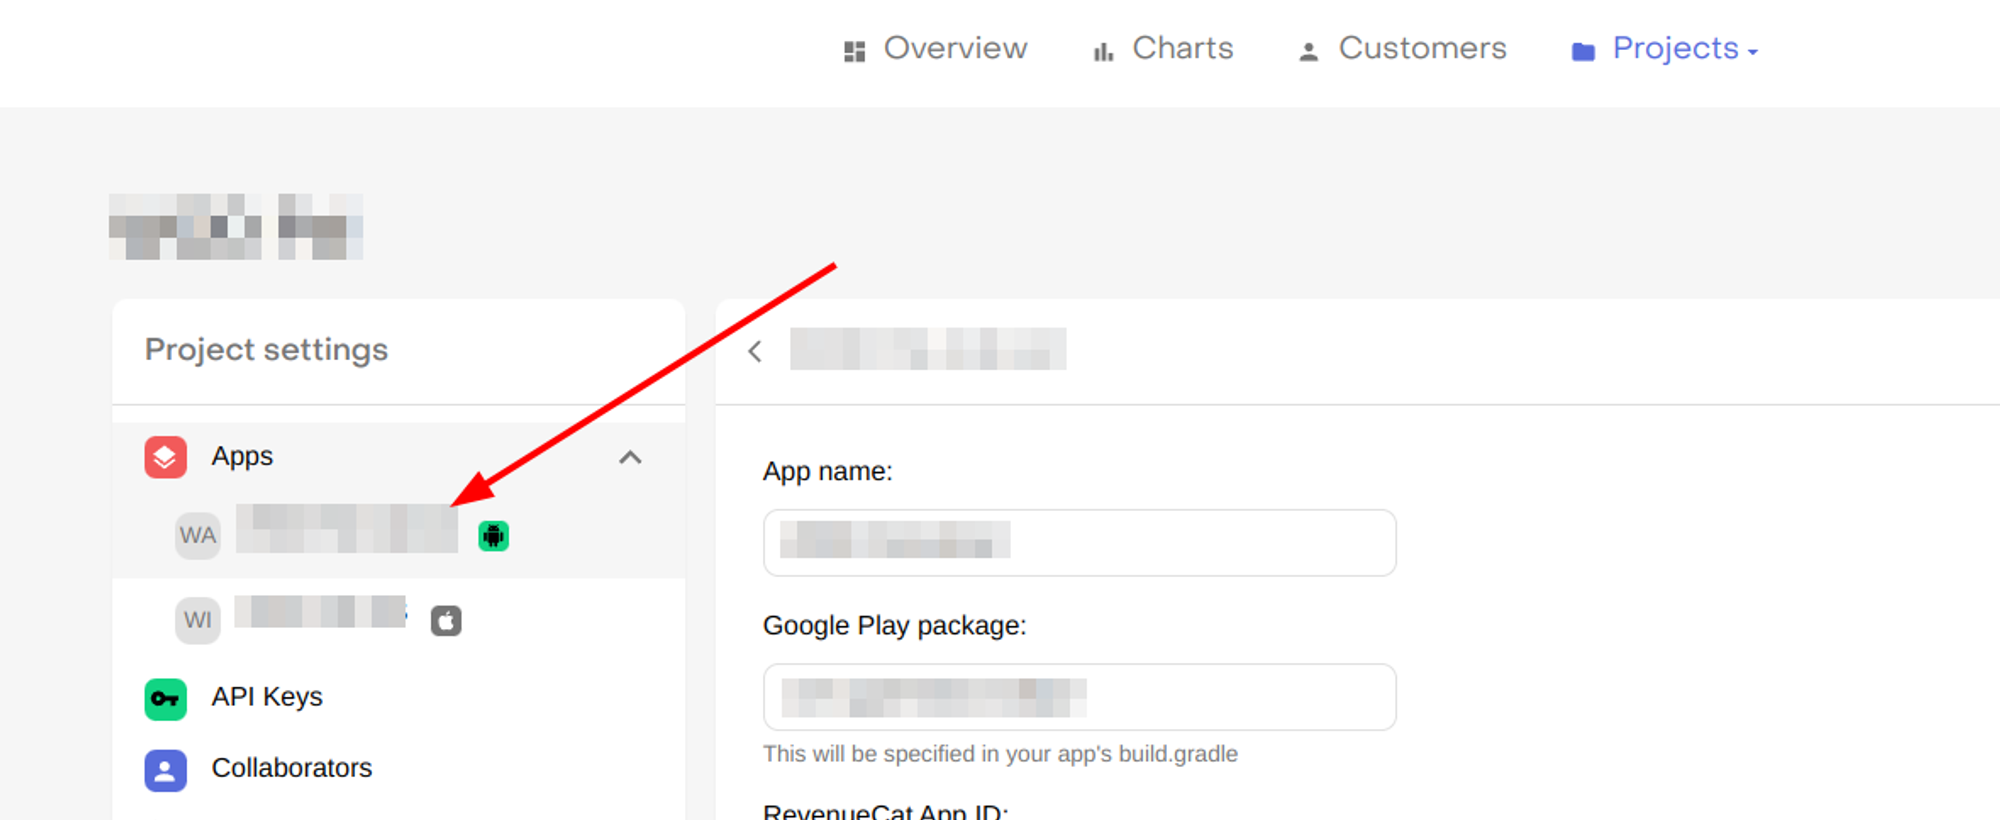
In the sidebar, click on “API Keys” under the “Project settings” section
Click on “show key” and copy the API key.
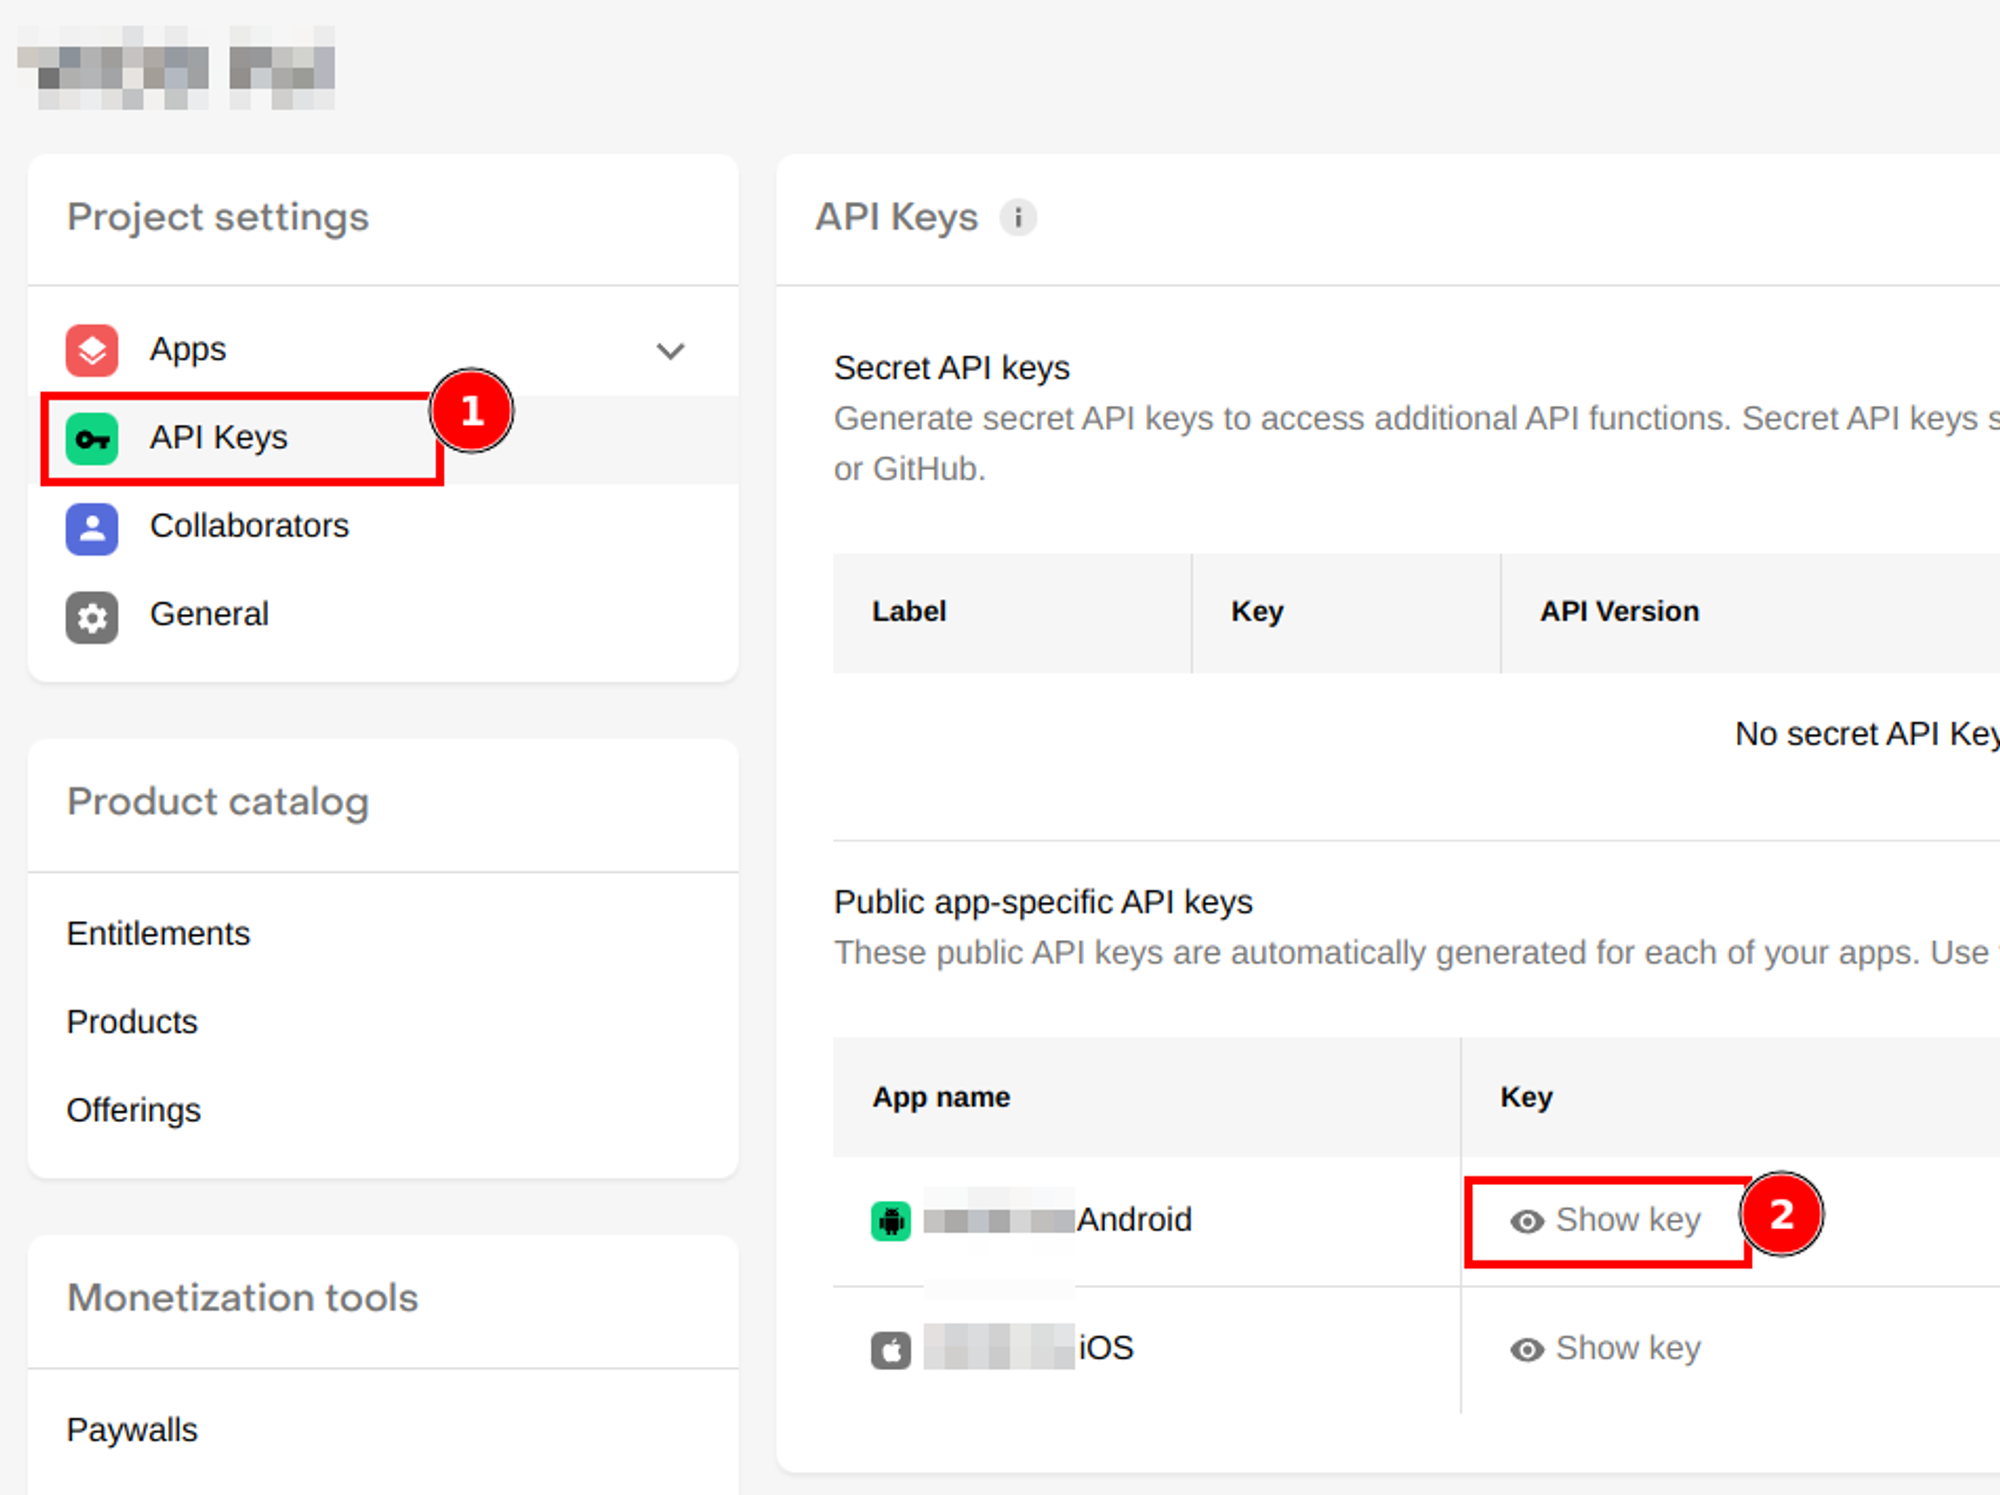
Update the
.envfile in your React Native project, replacing the following line with the Android Key.#.env file EXPO_PUBLIC_REVENUECAT_API_KEY_ANDROID="[YOUR_EXPO_PUBLIC_REVENUECAT_API_KEY_ANDROID]"
Enable Google Real-Time Developer Notifications to speed up the verification process
RevenueCat does not require anything further than service credentials to communicate with Google, but setting up real-time server notifications is a recommended process that can speed up webhook and integration delivery times and reduce lag time for Charts.
Follow the instructions described in the official documentation
"Credentials needs attention"
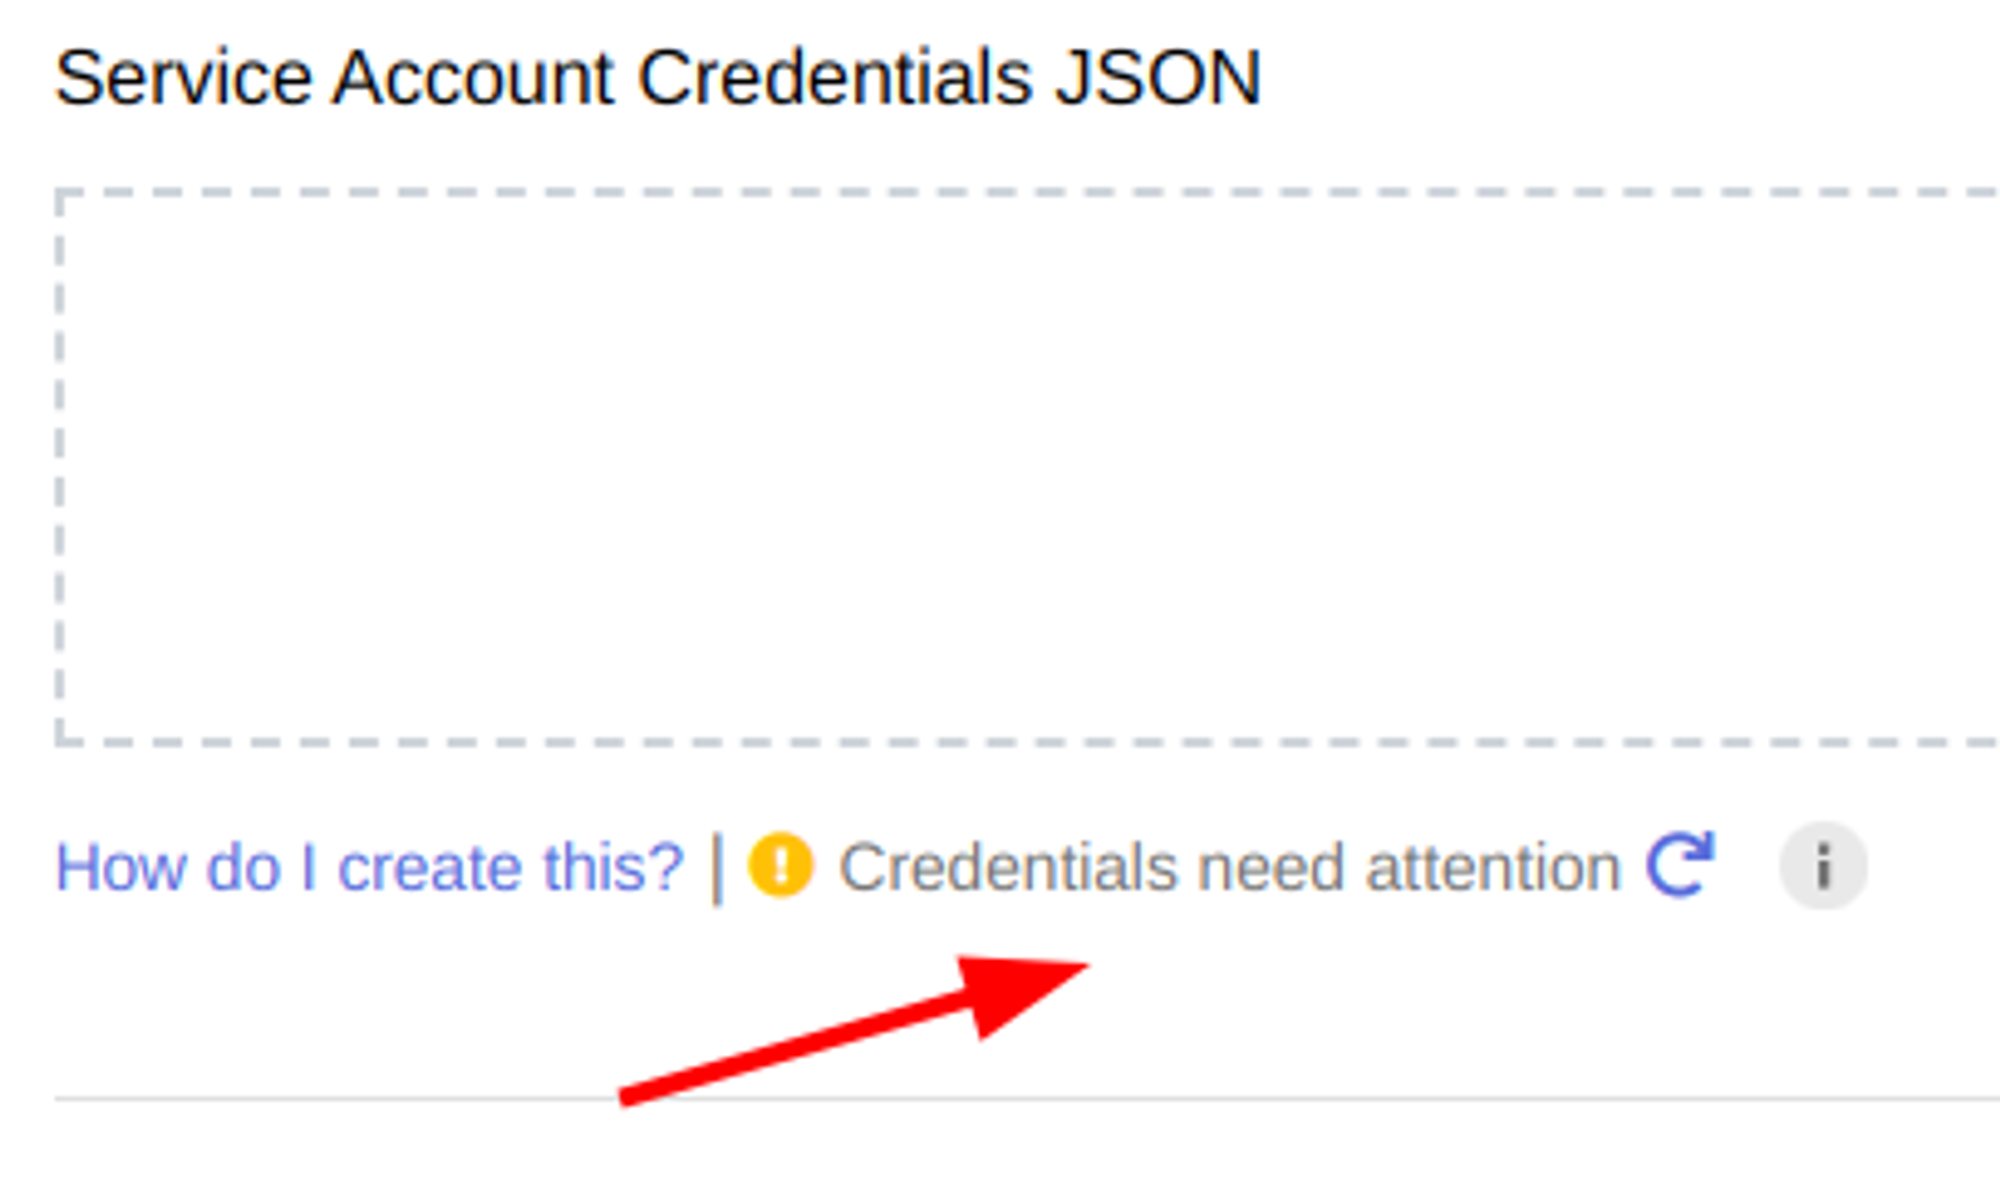
After getting the Android App Id, you’ll probably see a warning message in RevenueCat that says they couldn’t validate permissions to certain APIs. This is normal. In my experience, you’ll need to build and submit a build to the Google Play Console before you can get rid of this warning.
So, don’t waste time with this warning. We’ll get back later to check if the status has chanced.
iOS setup
EAS Build setup to generate a bundle identifier
Before you can setup iOS, you need to create an app in App Store Connect, and before you can do that, you need to register a bundle identifier. This is usually a tedius process, but the good news is thanks to Expo Application Services, this is really easy. But you'll need to setup EAS in your project first
First, you’ll need to install
eas-cli. It is the command line app you will use to interact with EAS services from your terminal. To install it, run the command:npm i -g eas-cliLogin into EAS using the eas-cli package:
eas loginRun the following command to generate a new project in Expo.
Make sure to set the
slugproperty on yourapp.config.tsfile before proceeding, as this will be the name of your project in Expo.eas build:configureFollow the steps described, and make sure to copy the
projectIdfrom your terminal. You’ll need to update yourapp.jsfile like this:{ ... extra: { + projectId: "XXXXXXXX-XXXX-XXXX-XXXX-XXXXXXXXXXXX" } }
Register your Bundle Identifier using EAS (iOS)
Before you can continue configuring RevenueCat, you’ll need to register your Bundle Identifier for iOS. The easiest way to do this is using EAS build. However, you don’t need to go through the entire build process, mainly because you are still missing the RevenueCat App Id for iOS. To avoid unnecesary builds, follow these steps:
Run the following command to start the build process
eas build --profile development --platform iosEnter your iOS credentials to sign in.
After a successful login, you should see a message that says that your bundle identifier was registered, like this

Feel free to cancel the build process. You’ll go back later after getting the RevenueCat App Id.
Create your iOS app on App Store Connect
With the Bundle Identifier registered, you can now create a new App in the App Store Connect and select the registered Bundle Identifier.
Go to App Store Connect
Click on “My Apps”
Click on the “+” button, and the select “New App”
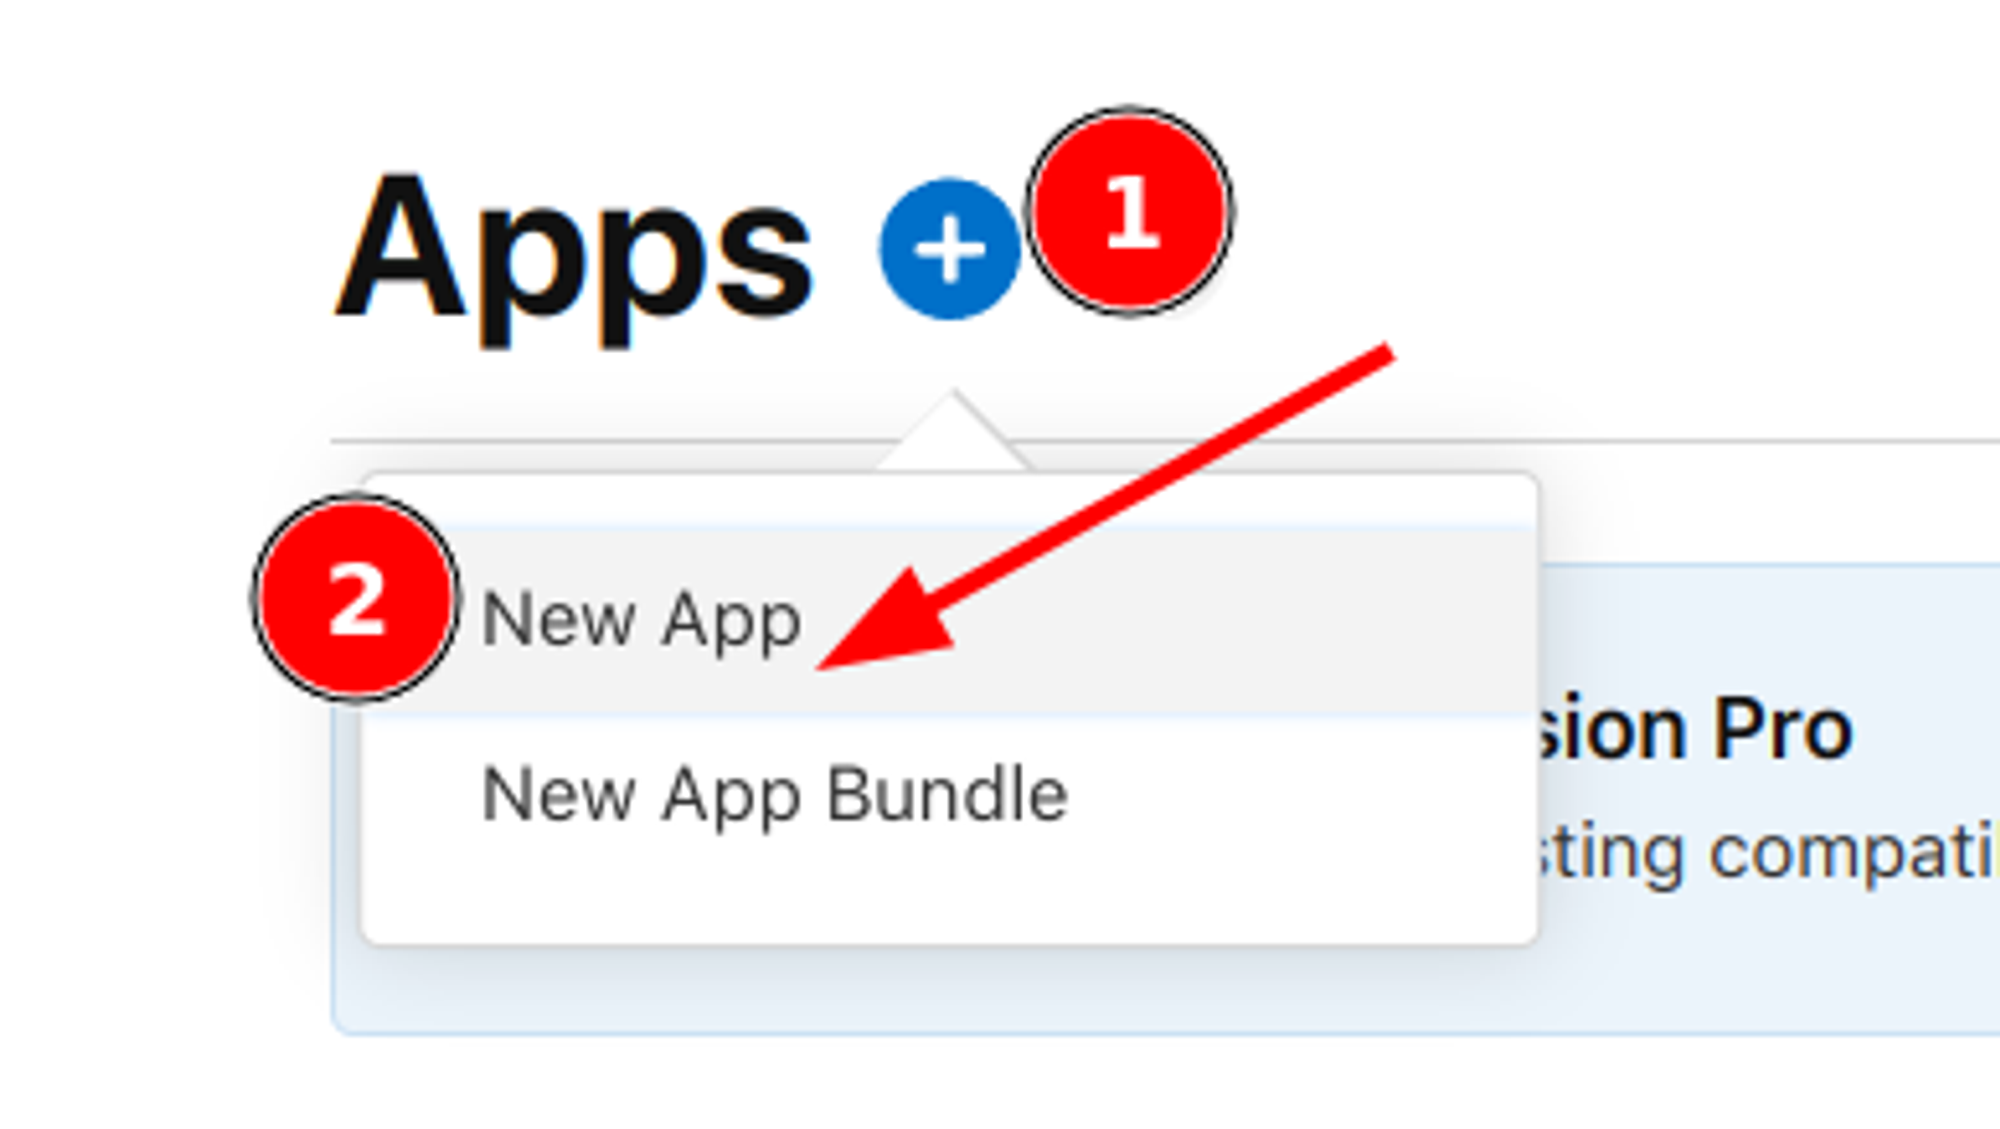
Choose a name, and make sure to select the right bundle identifier.
Click on “Create” to confirm
Setup App Store Connect Shared Secret (iOS)
With your new app created in App Store Connect, follow these steps to get the Shared Secret.
Go to App Store Connect
Navigate to “My Apps” and select your app.
Select "App Information" under the "General" section from the left side menu
Select "Manage" under the App-Specific Share Secret section from the right side
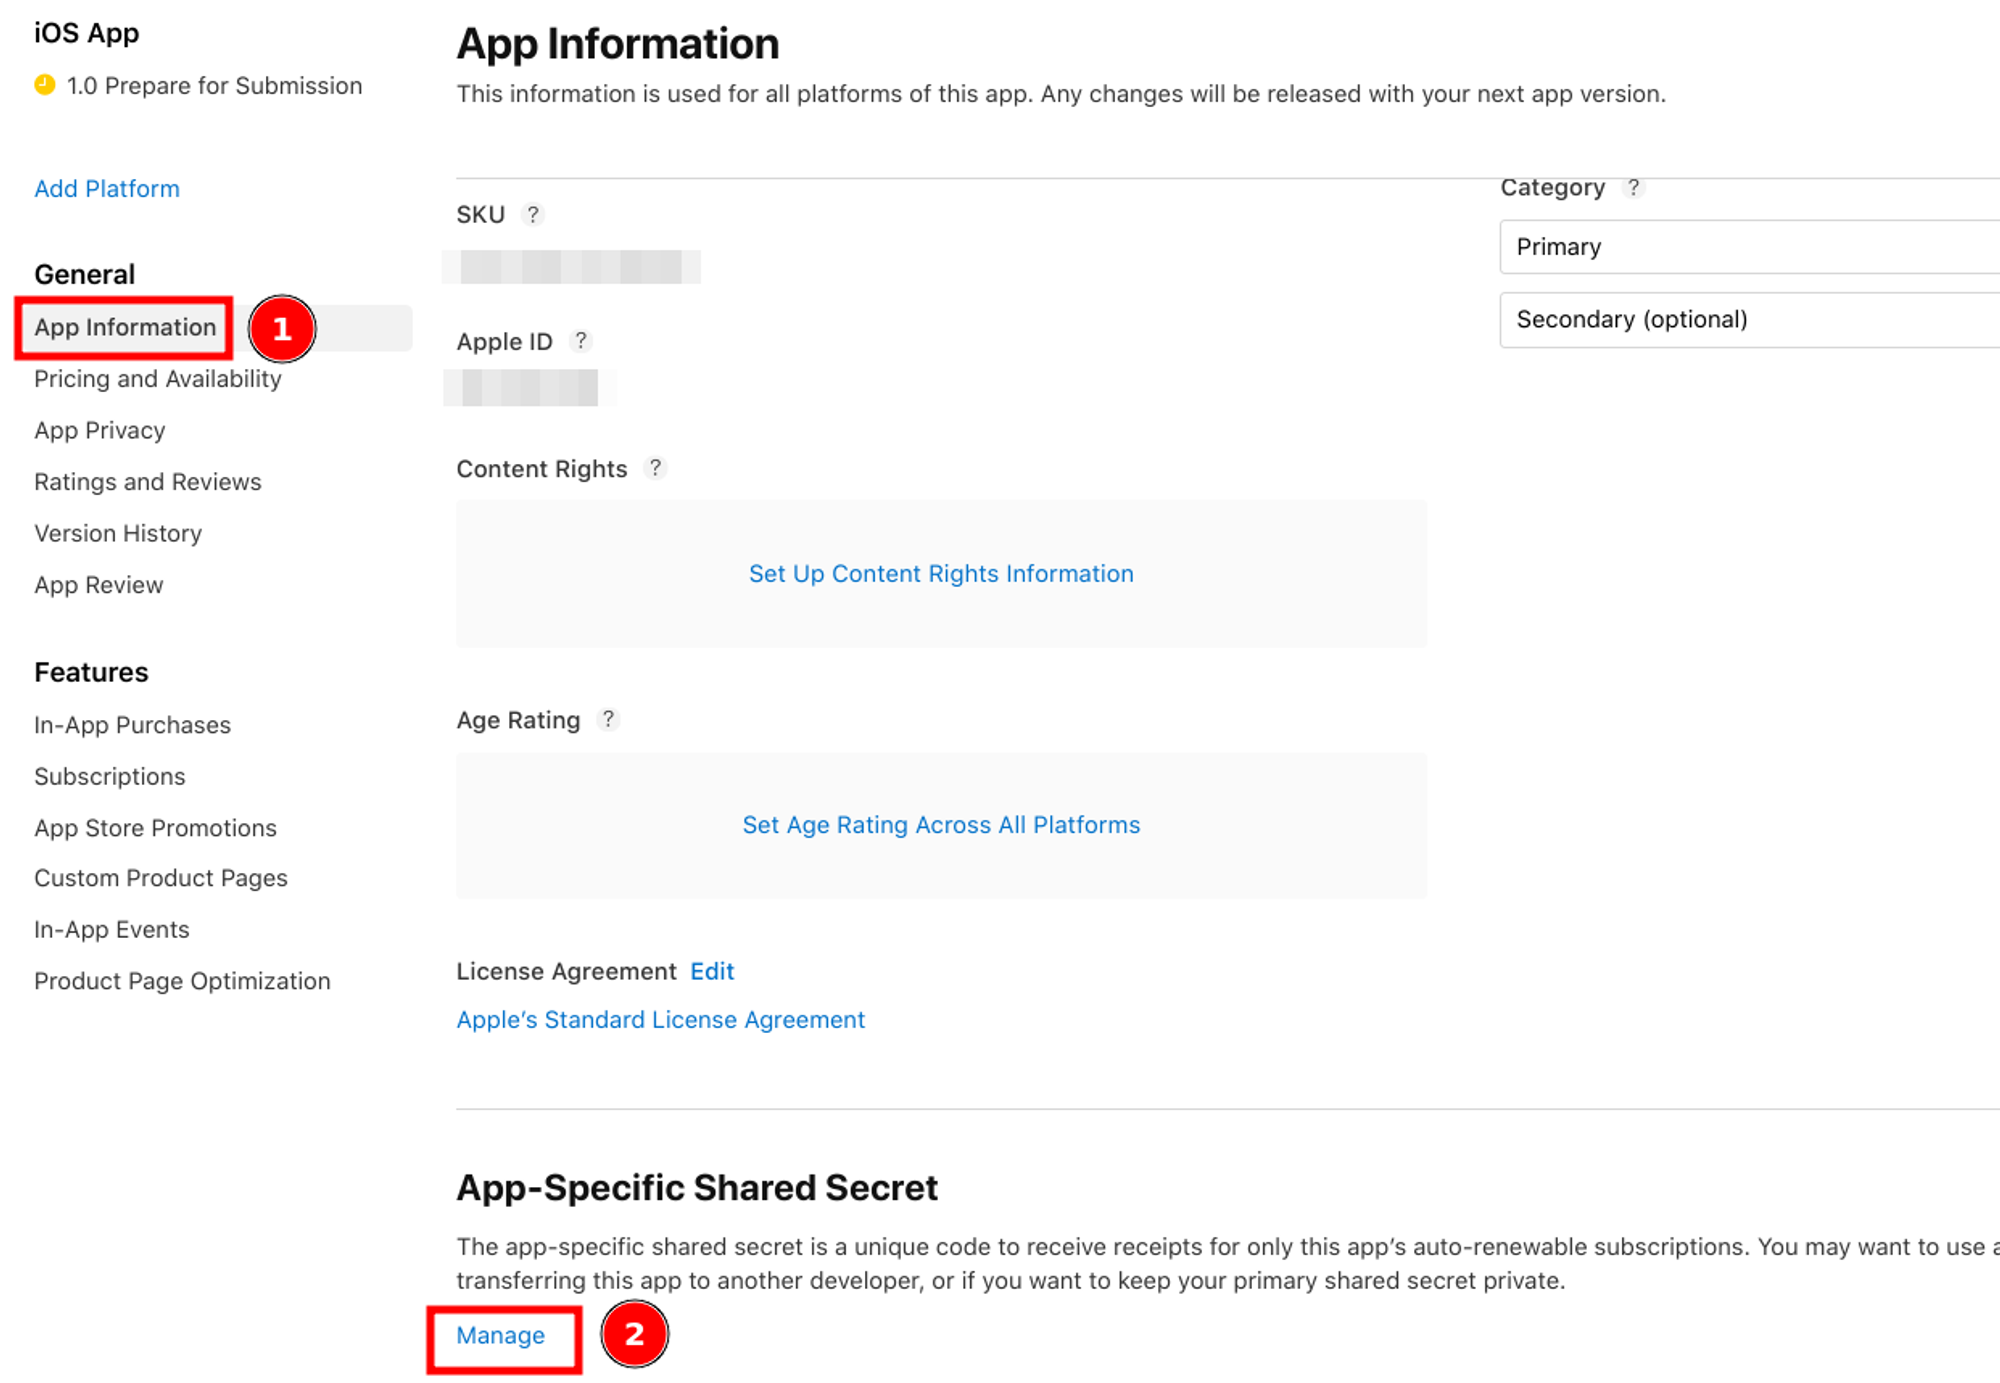
Click on “Generate”
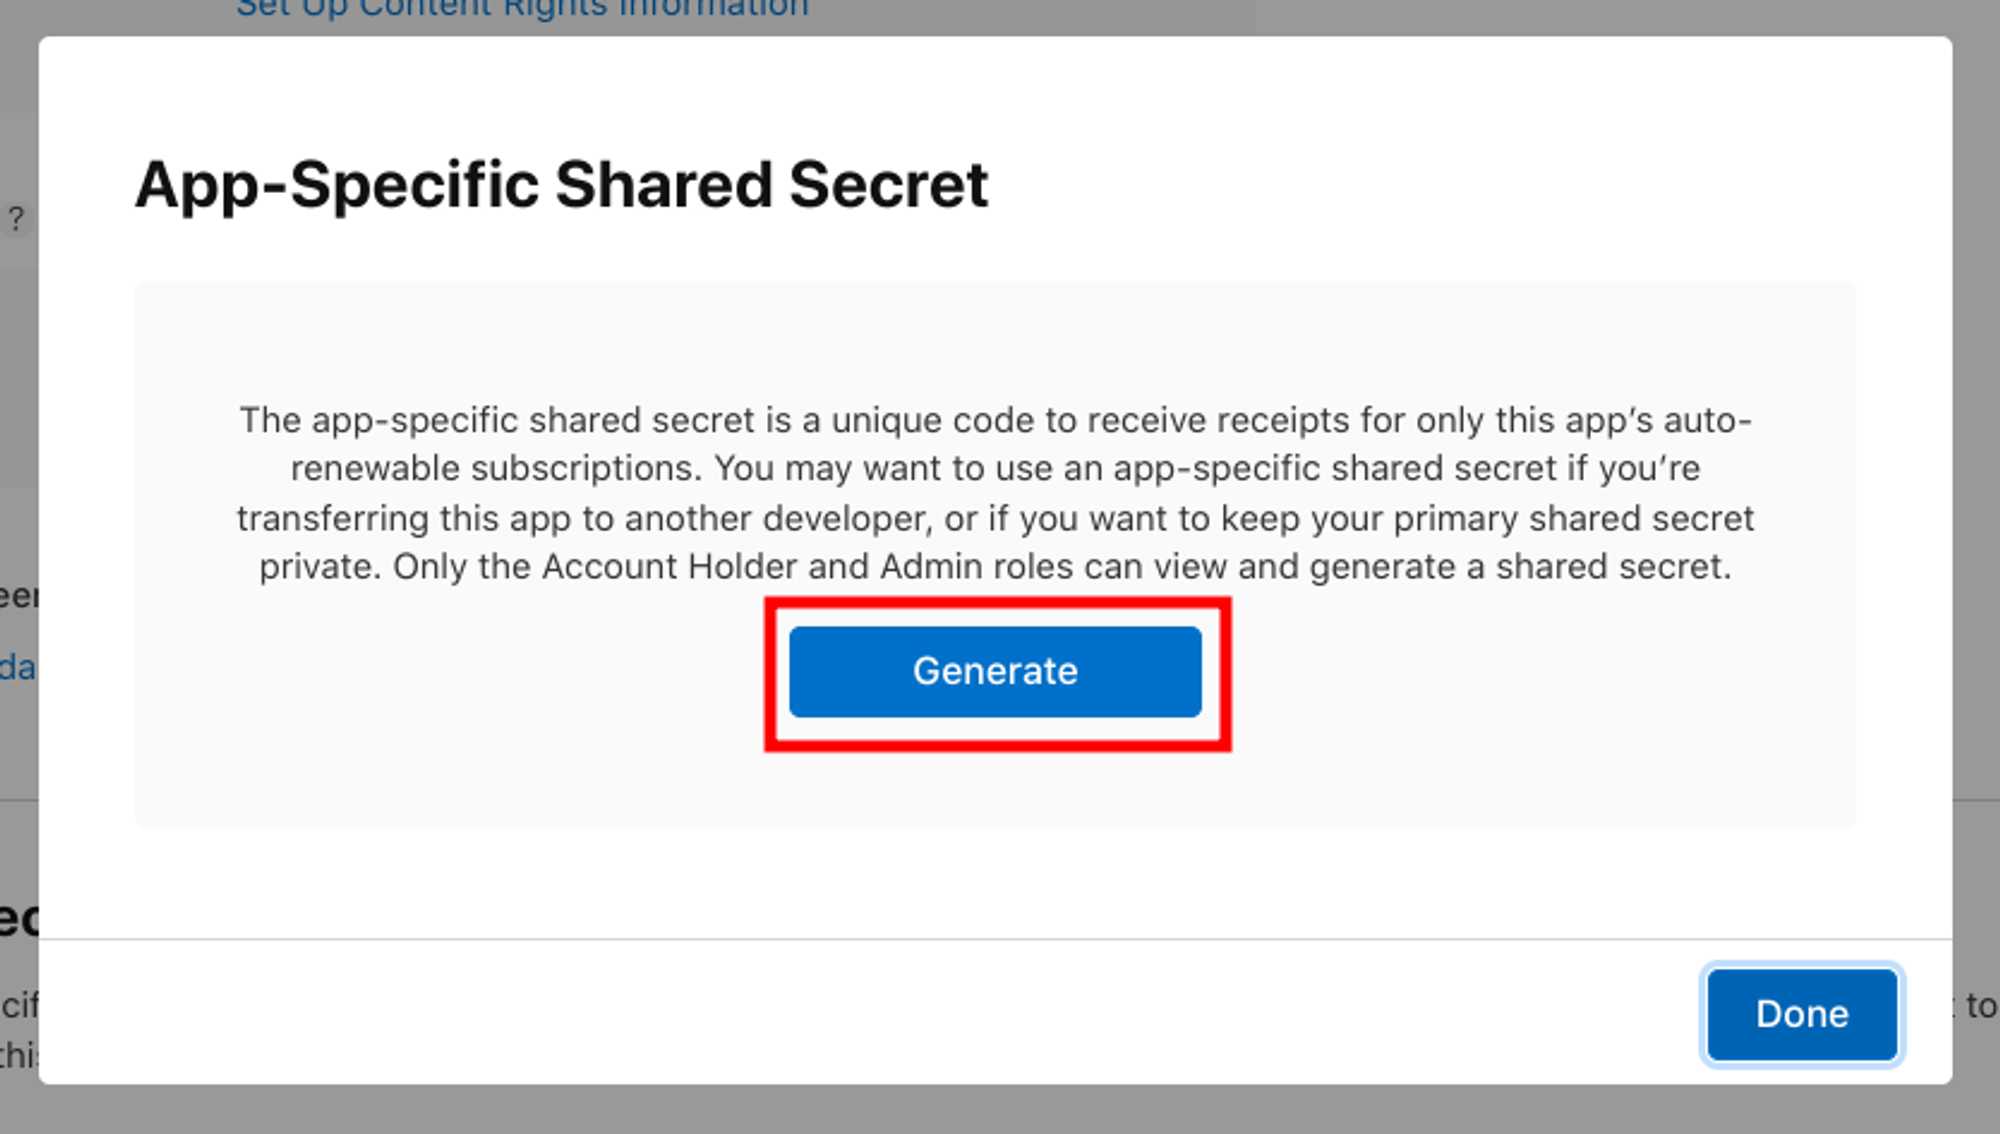
Copy your shared secret and save it safely. You’ll need to paste it in RevenueCat later.
In-App Purchase Key configuration (iOS)
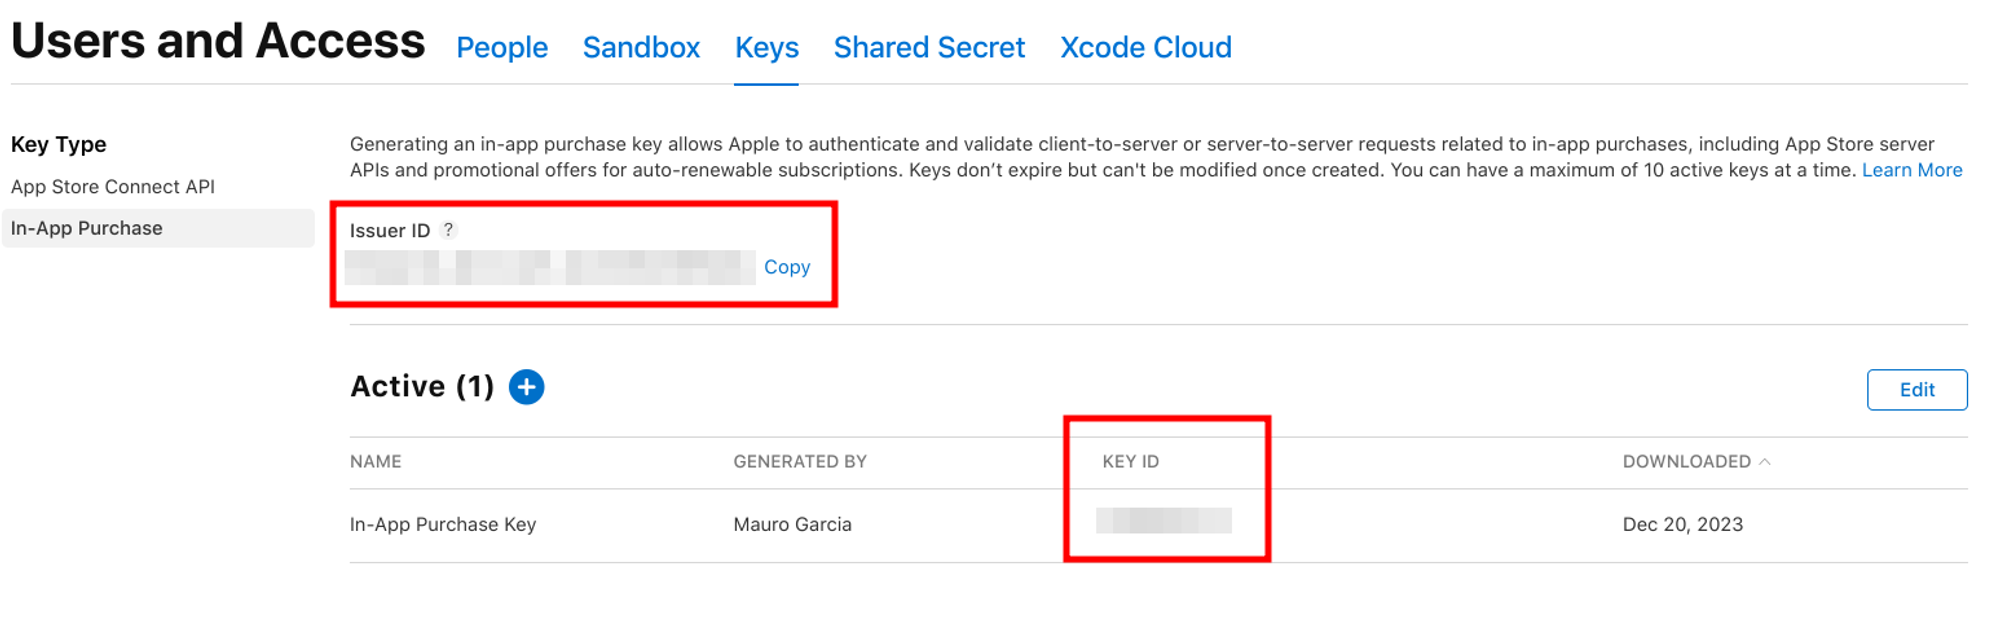
For RevenueCat to securely validate purchases through Apple Store Kit 2, authenticate and validate Subscription Offers requests with Apple and enable customer lookup via Order ID for iOS apps, you need to upload an in-app purchase key, and you'll also need to provide an Issuer ID.
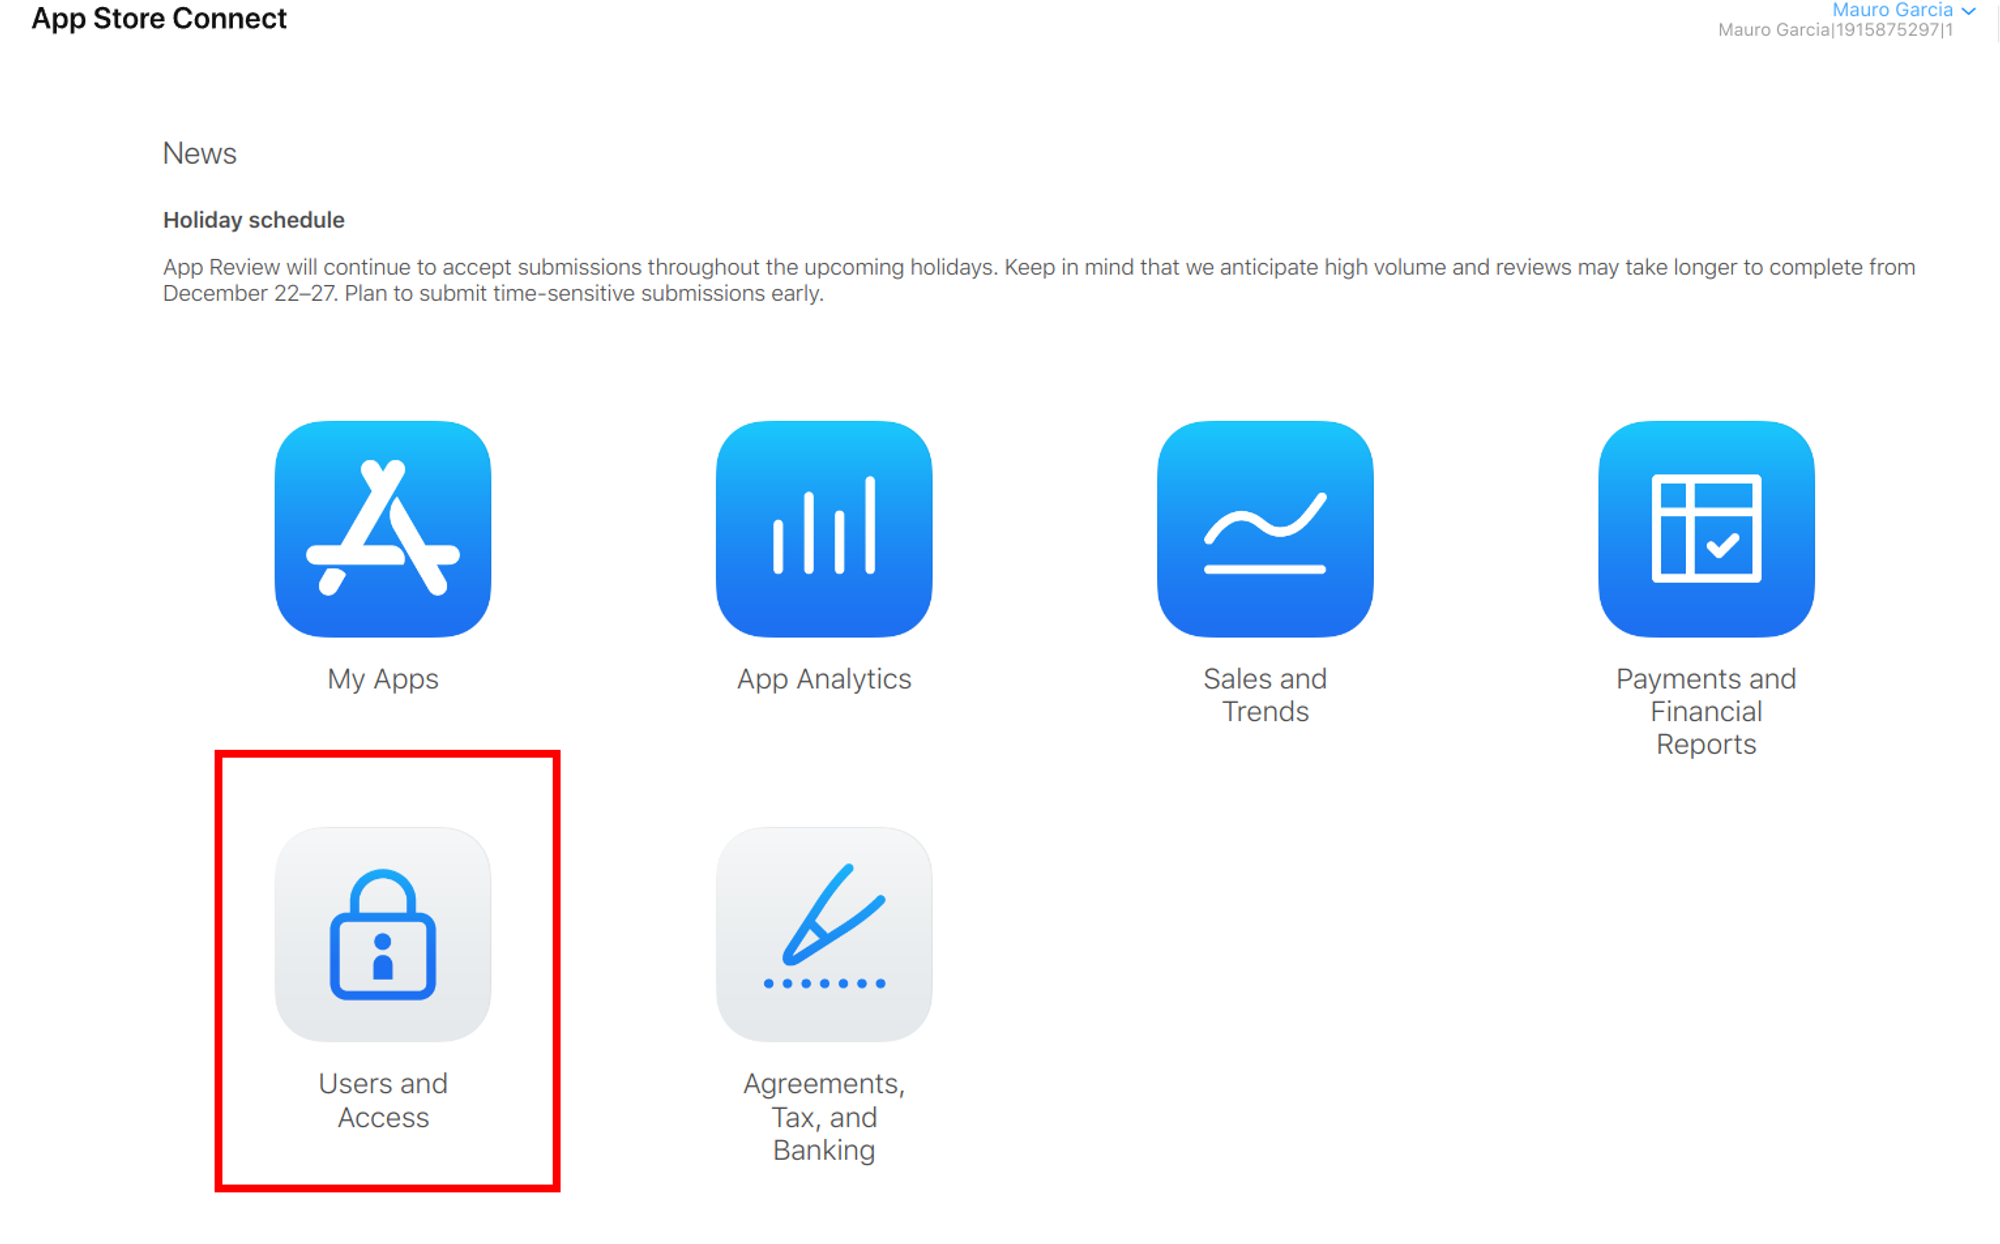
In-app purchase keys are generated in the Users and Access section of App Store Connect. You can use the same in-app purchase key for all of your apps.
Go to App Store Connect
Click on “Users and Access”
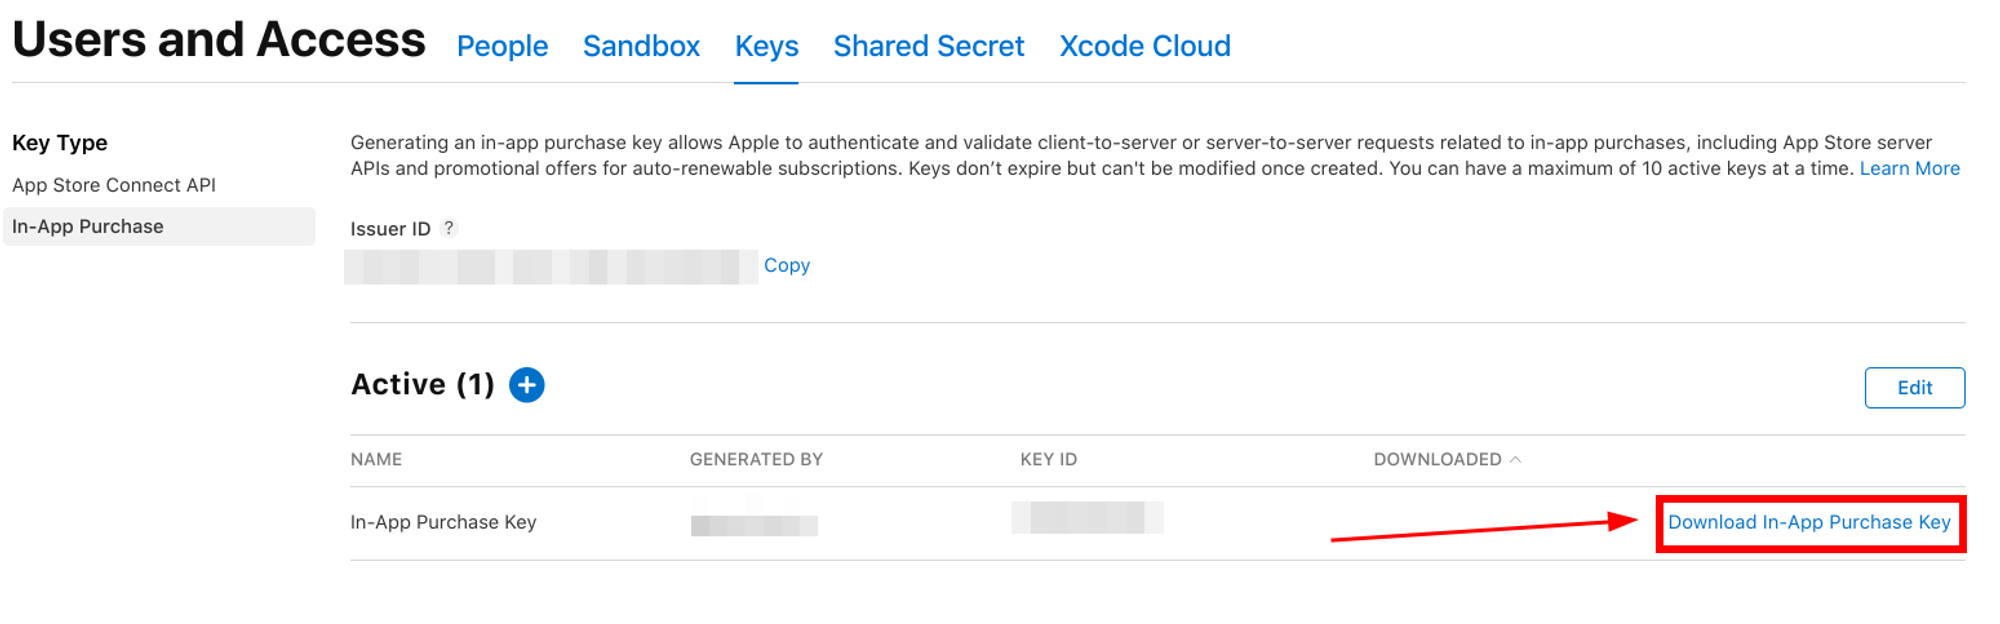
Click the “Keys” tab, and then the “In-App Purchase” option in the sidebar. Finally, click the “Generate In-App Purchase Key” button
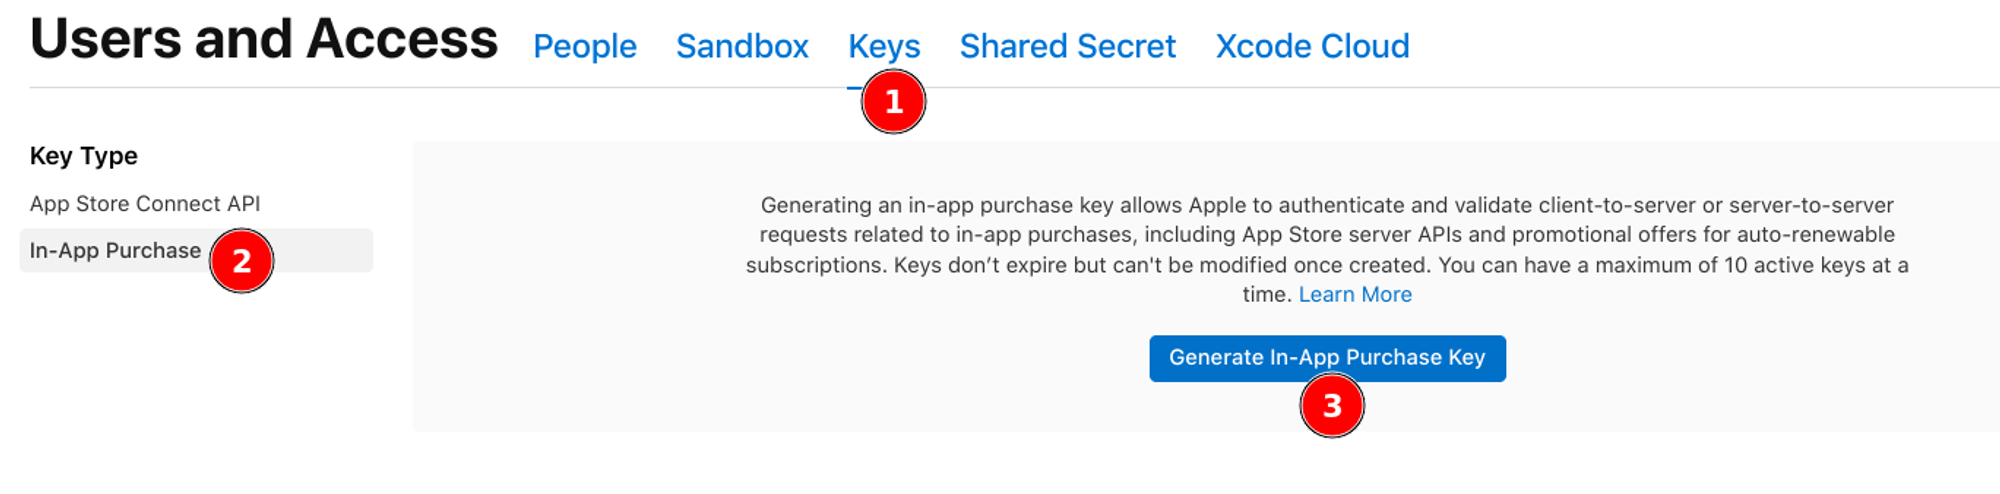
Choose a name, and click “Generate” to confirm

Once your key is generated, it will appear in Active Keys and you get one shot to download it. Select “Download In-App Purchase Key” and store the file in a safe place, you'll need to upload this to RevenueCat in the next step.
You can only download an individual API key once. Prepare to copy and save your key in a safe place that you can refer to later on.
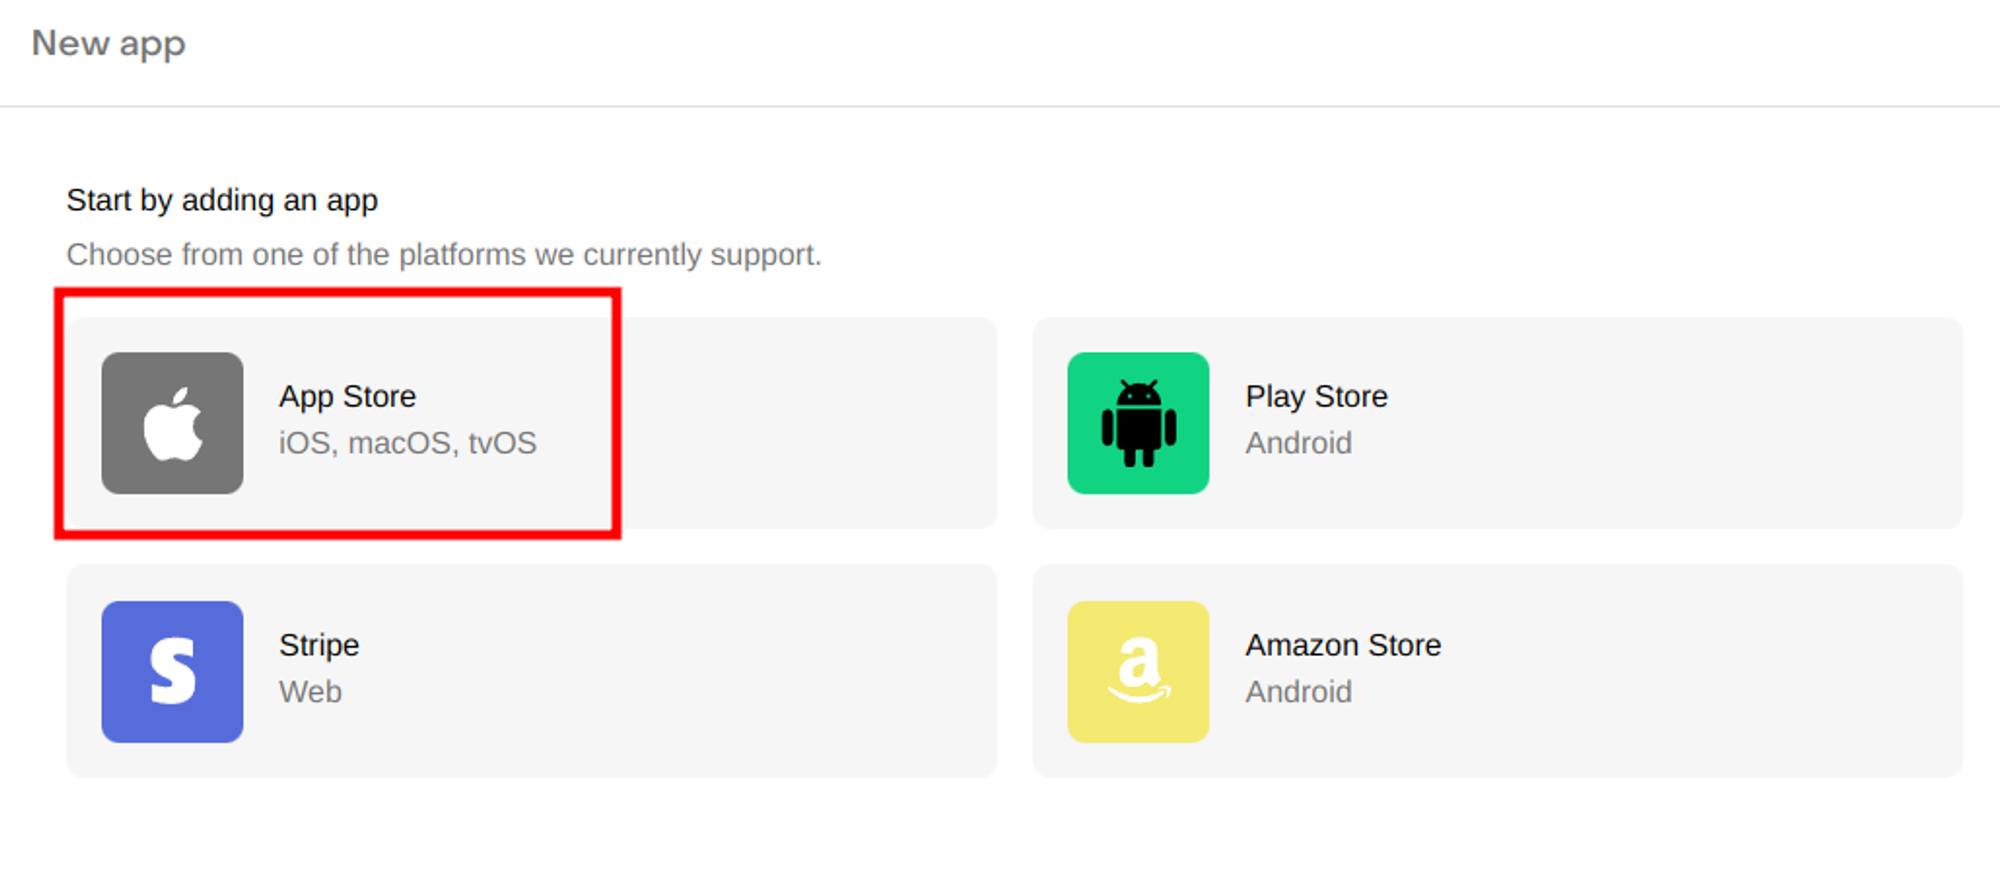
Setup iOS App in RevenueCat
Visit your RevenueCat dashboard, and go to your Project page.
In the top right corner, click on “New”
Select “App Store”
Choose a proper name to easily identify your iOS app in RevenueCat
Copy the “App Bundle ID” name from the
app.jsfile in your projectUpload the
.p8file you just created (In-App Purchase Key)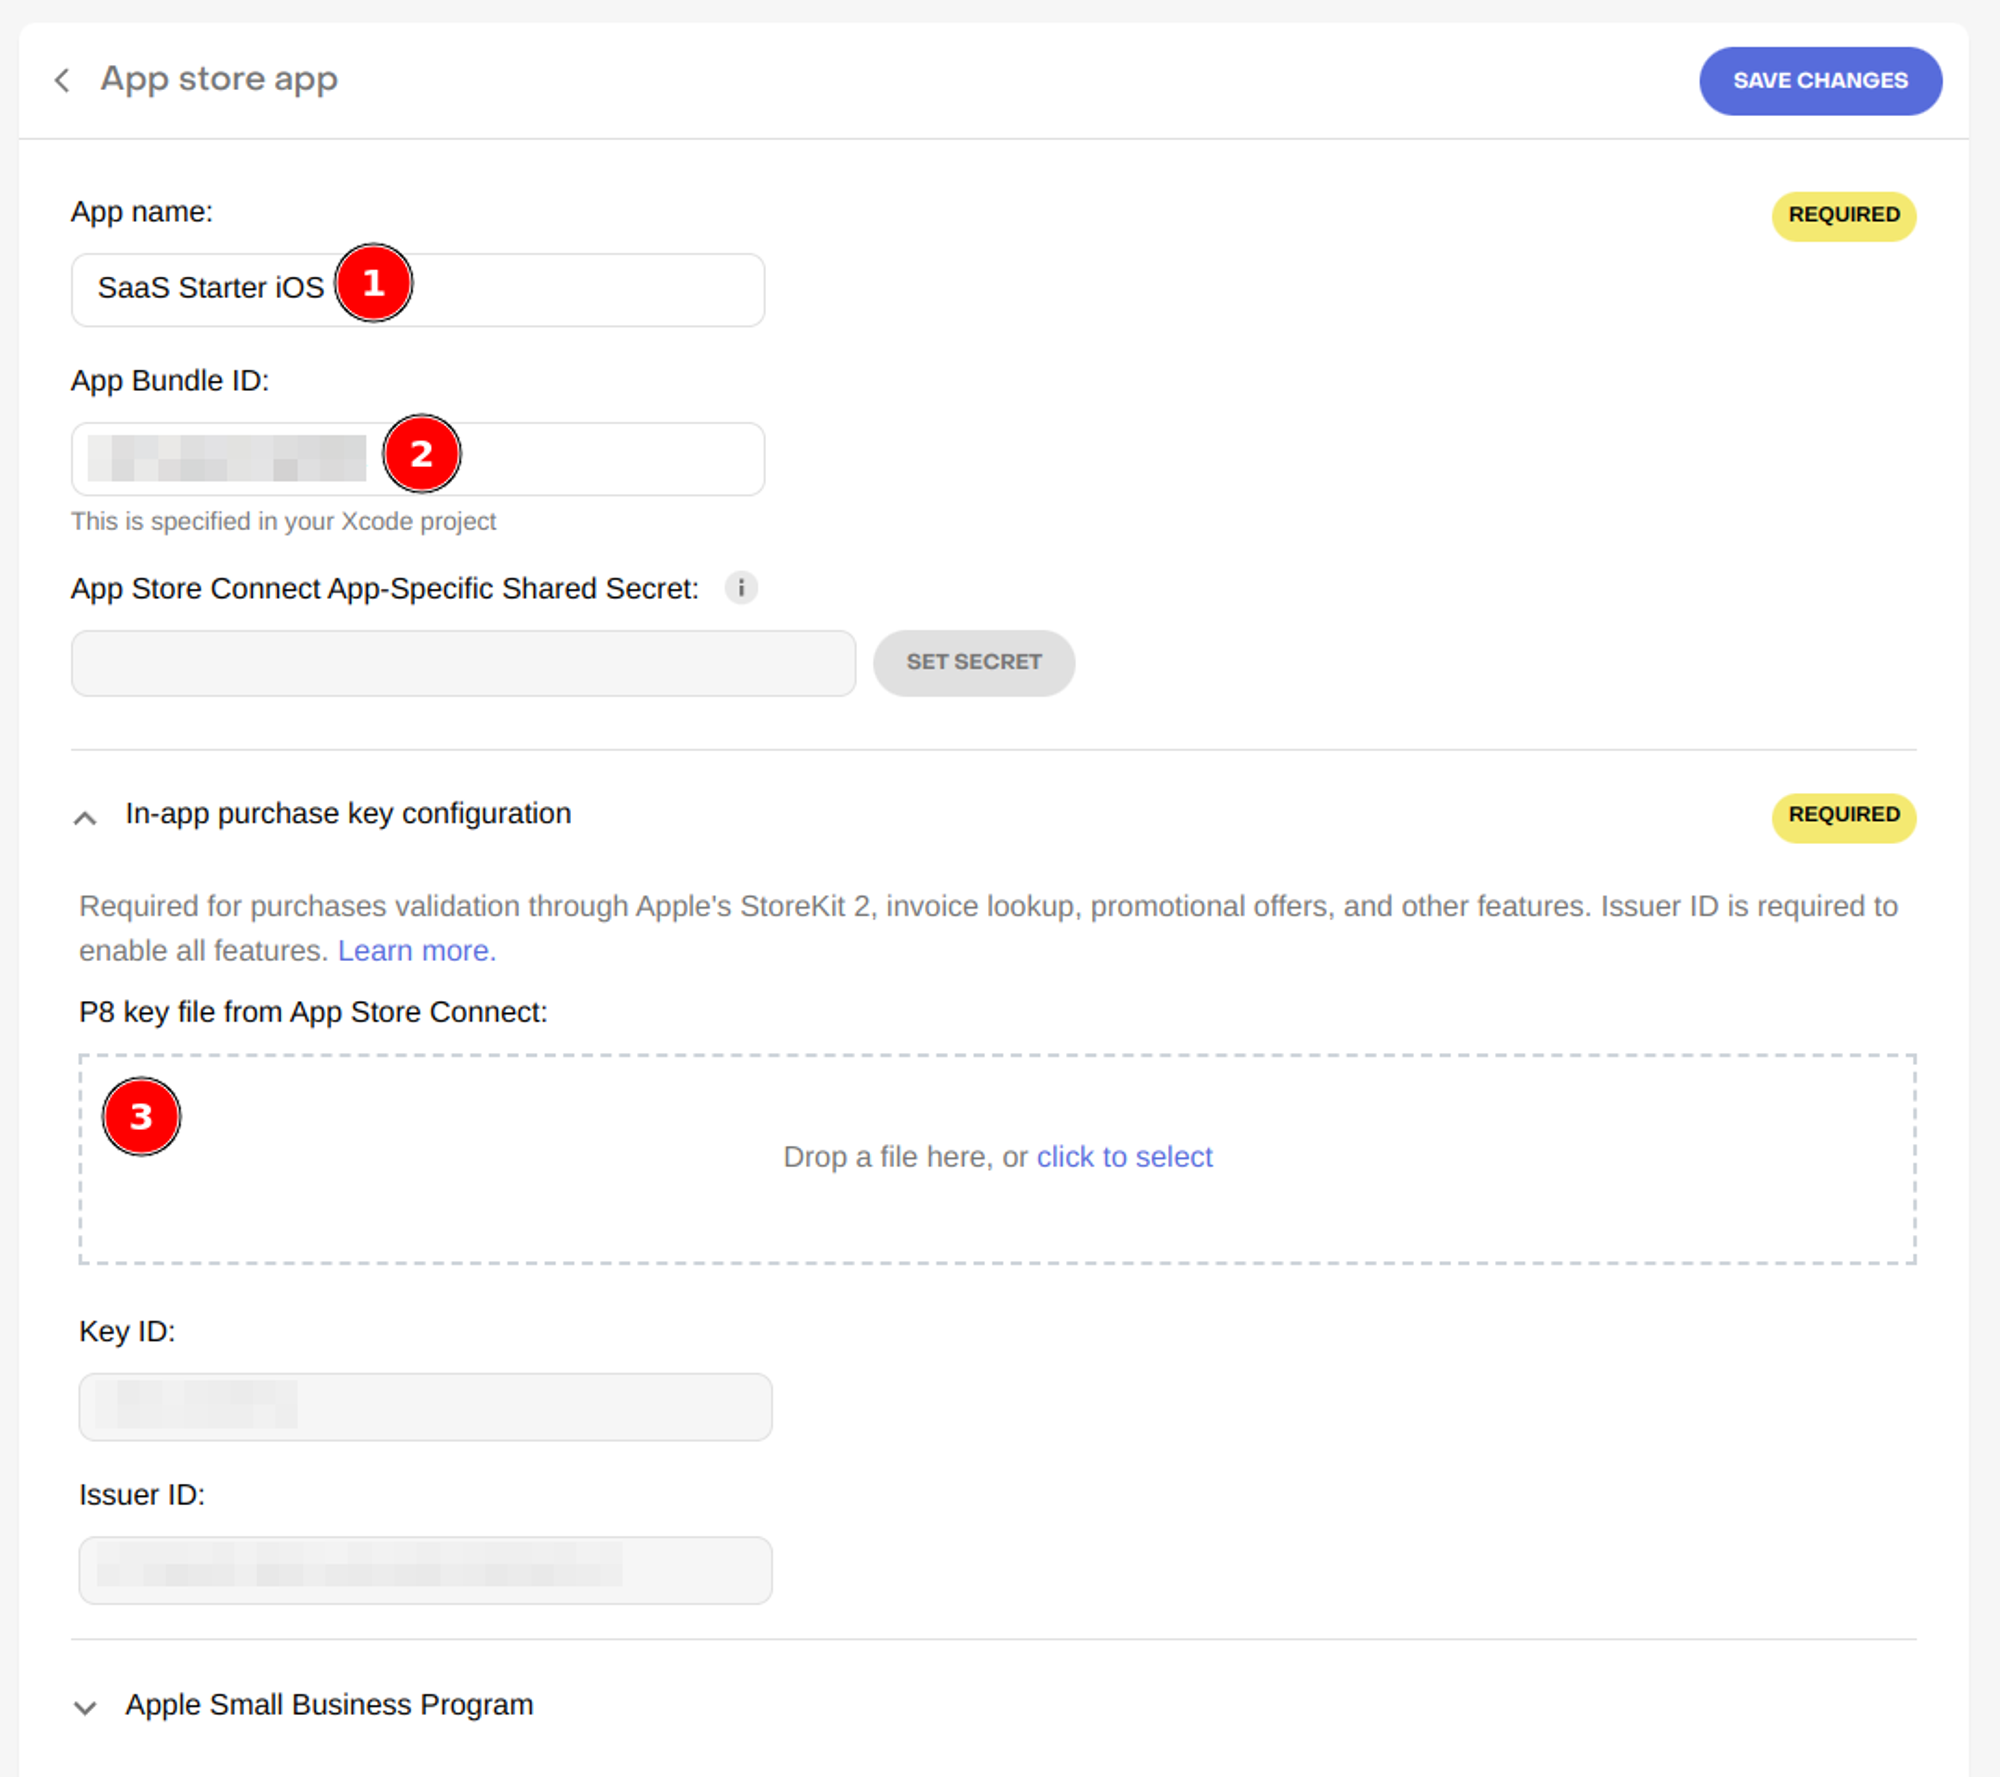
Click on “Set secret” and paste the Shared Secret you generated before.
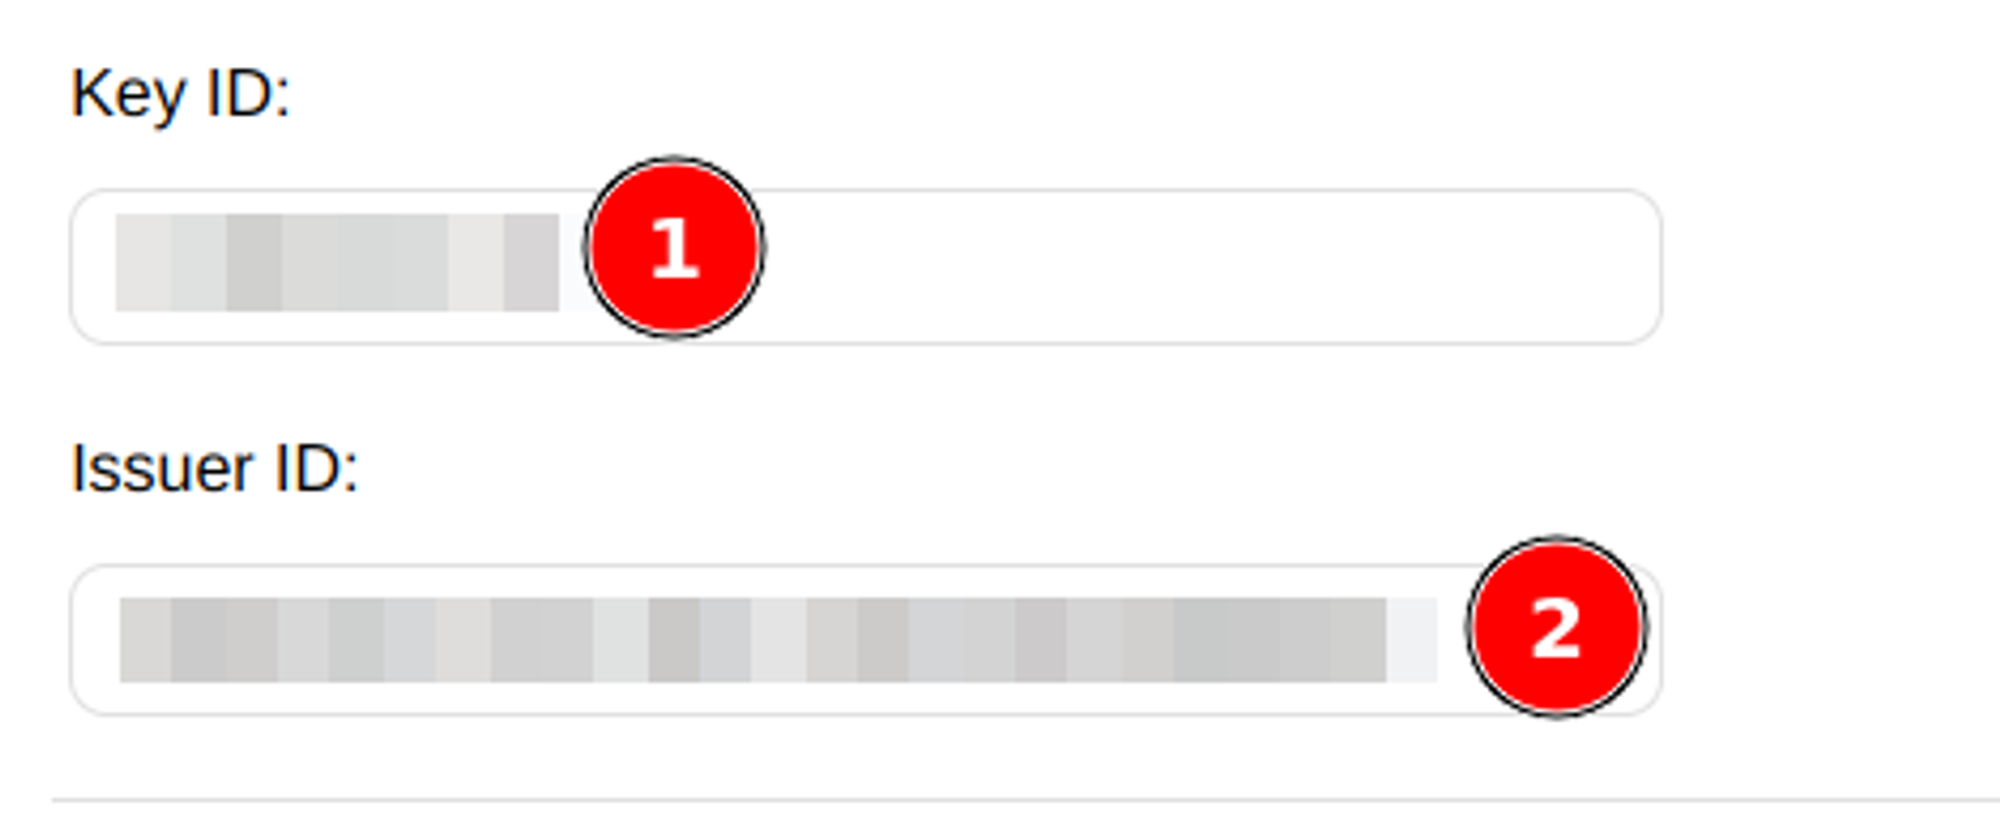
Make sure to add the Key ID and Issuer ID. You can get those values from App Store Connect.
Click “Save Changes” to finish.
Getting the Api Key
In the sidebar, click on “API Keys” under the “Project settings” section
Click on “show key” and copy the API key.
Update the
.envfile in your app with the new api key#.env file EXPO_PUBLIC_REVENUECAT_API_KEY_IOS="[YOUR_EXPO_PUBLIC_REVENUECAT_API_KEY_IOS]"
Building your app with EAS
react-native-purchases is a native module, which means you won't be able to test your app using Expo Go on your phone. You'll need to use a development client
But first, you'll to run the following commands:
# Install EAS globally
npm i -g eas-cli

# Run initial configuration
eas build:configure
This will guide you through the EAS configuration and will create a eas.json file with two profiles: development (used for the dev client) and production (used for to publish to the stores)
Building & Submitting your Android app
Now that you have both keys generated, you'll need to build and submit a first version of your app to the Google Play Console.
To generate your first build, run the following command:
eas build --platform android --profile productionYou'll get a link to track the progress of your build on EAS. Once it's done, go to expo.dev, then select your project, and go the “Builds” section in the sidebar.
Download the latest Android production build.
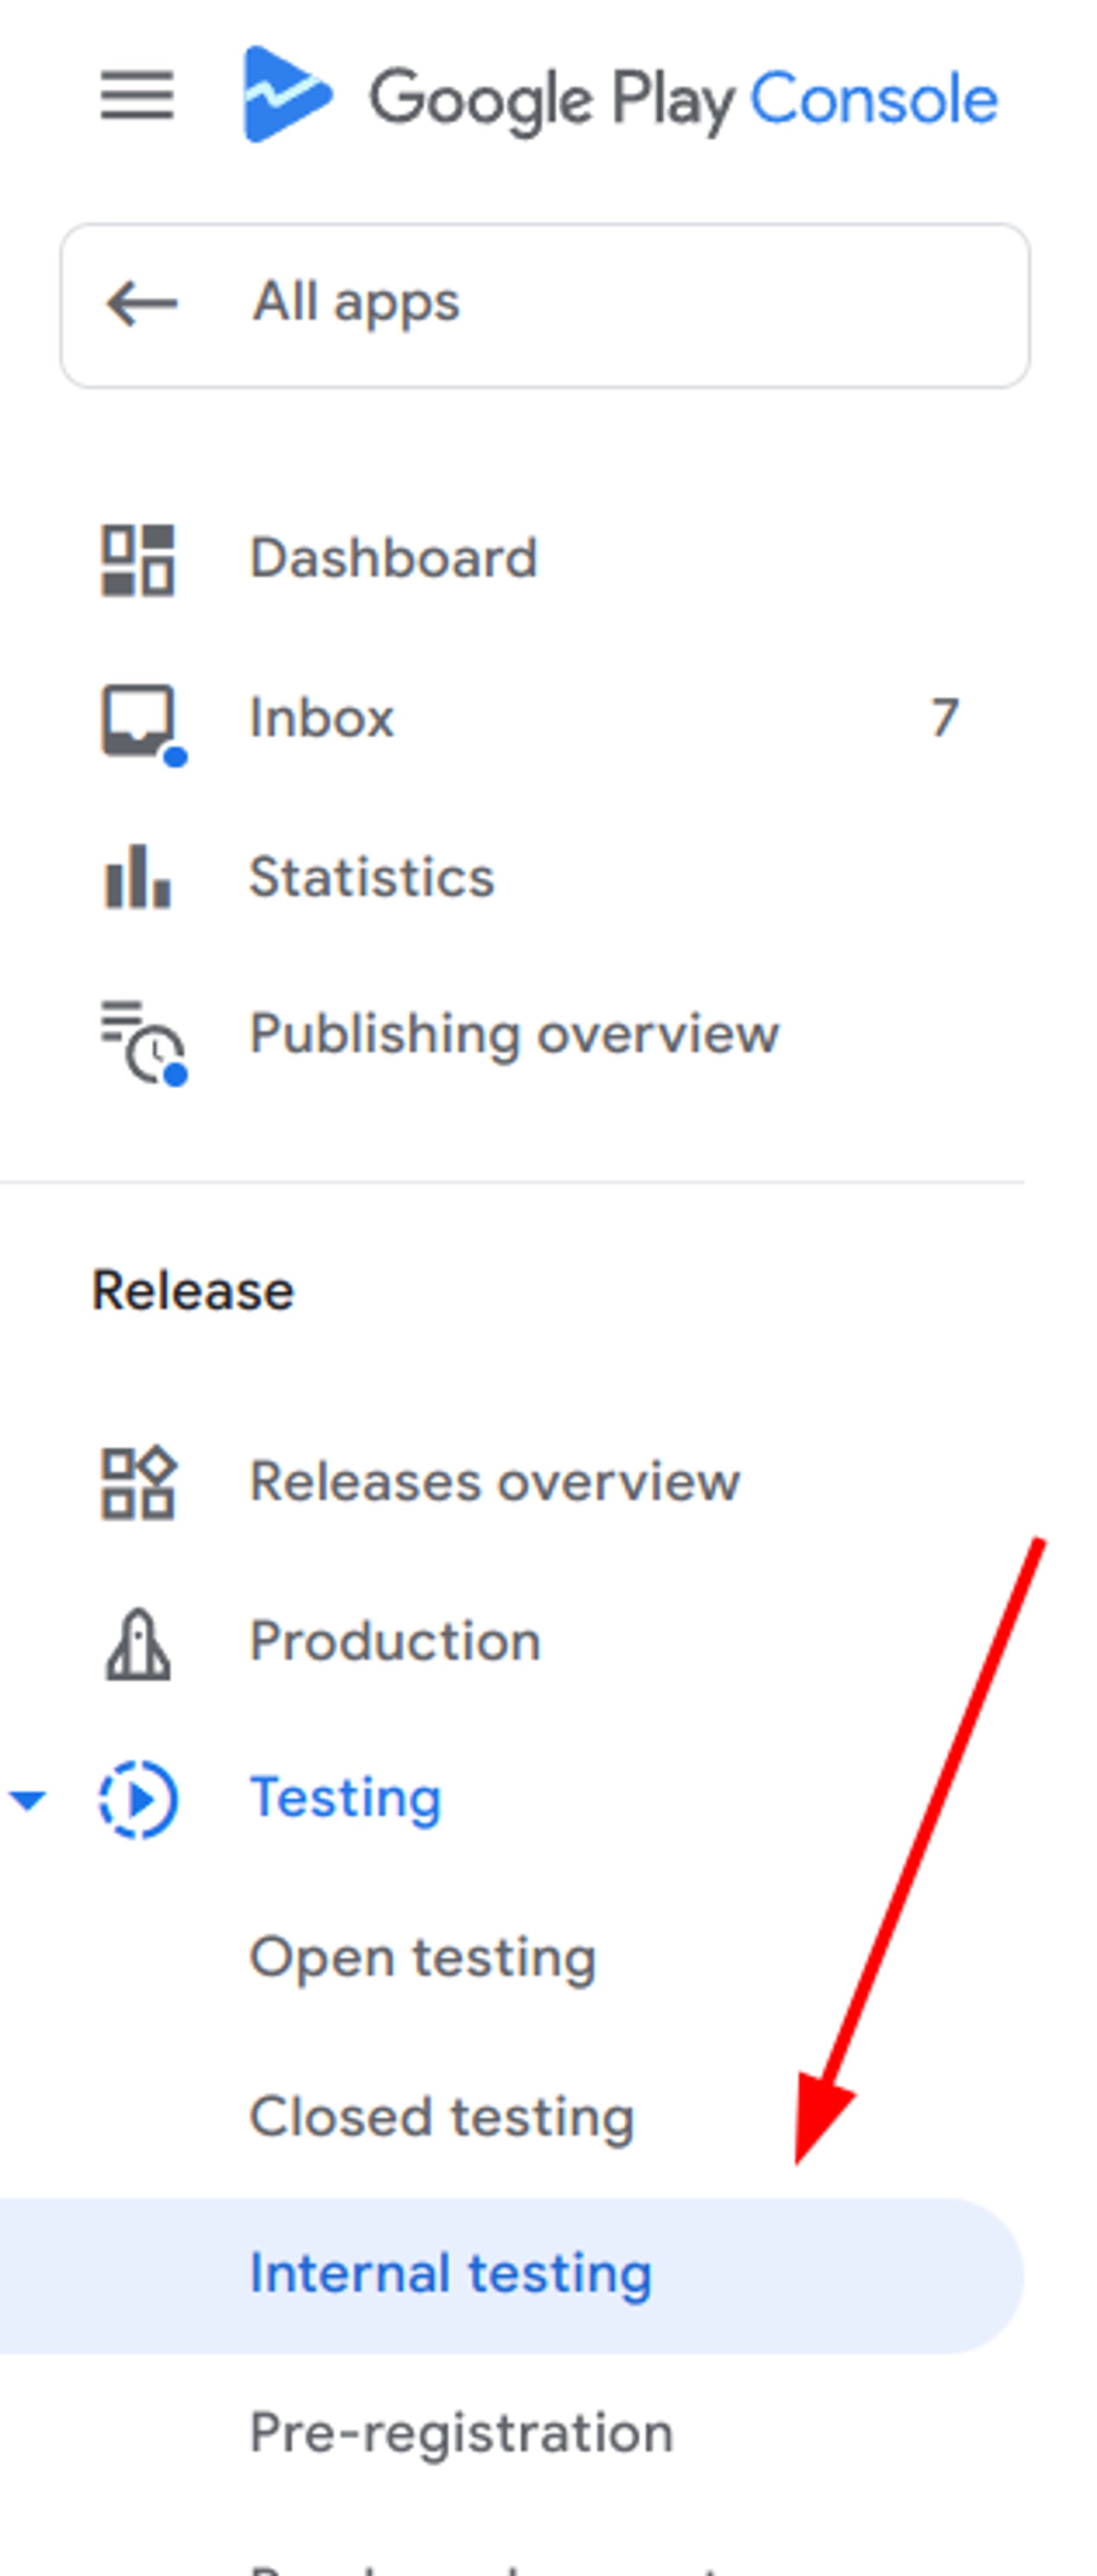
Go back to Google Play Console, and select your app.
In the sidebar, click on “Testing” → “Internal testing”
Click on “Create new release”
Upload your app bundle, and add the requested information to create your first release.
Checking permission status for the APIs (Android)
Once you have submitted your first internal build to the Google Play Console, it’s time to go back to RevenueCat and make sure all the permissions to the different APIs are valid.
Go back to your RevenueCat dashboard, choose your app, and select the Android App.
Below the “Service Account Credentials JSON” file uploader, Make sure you see a label that says “Valid credentials” and everything is checked like this
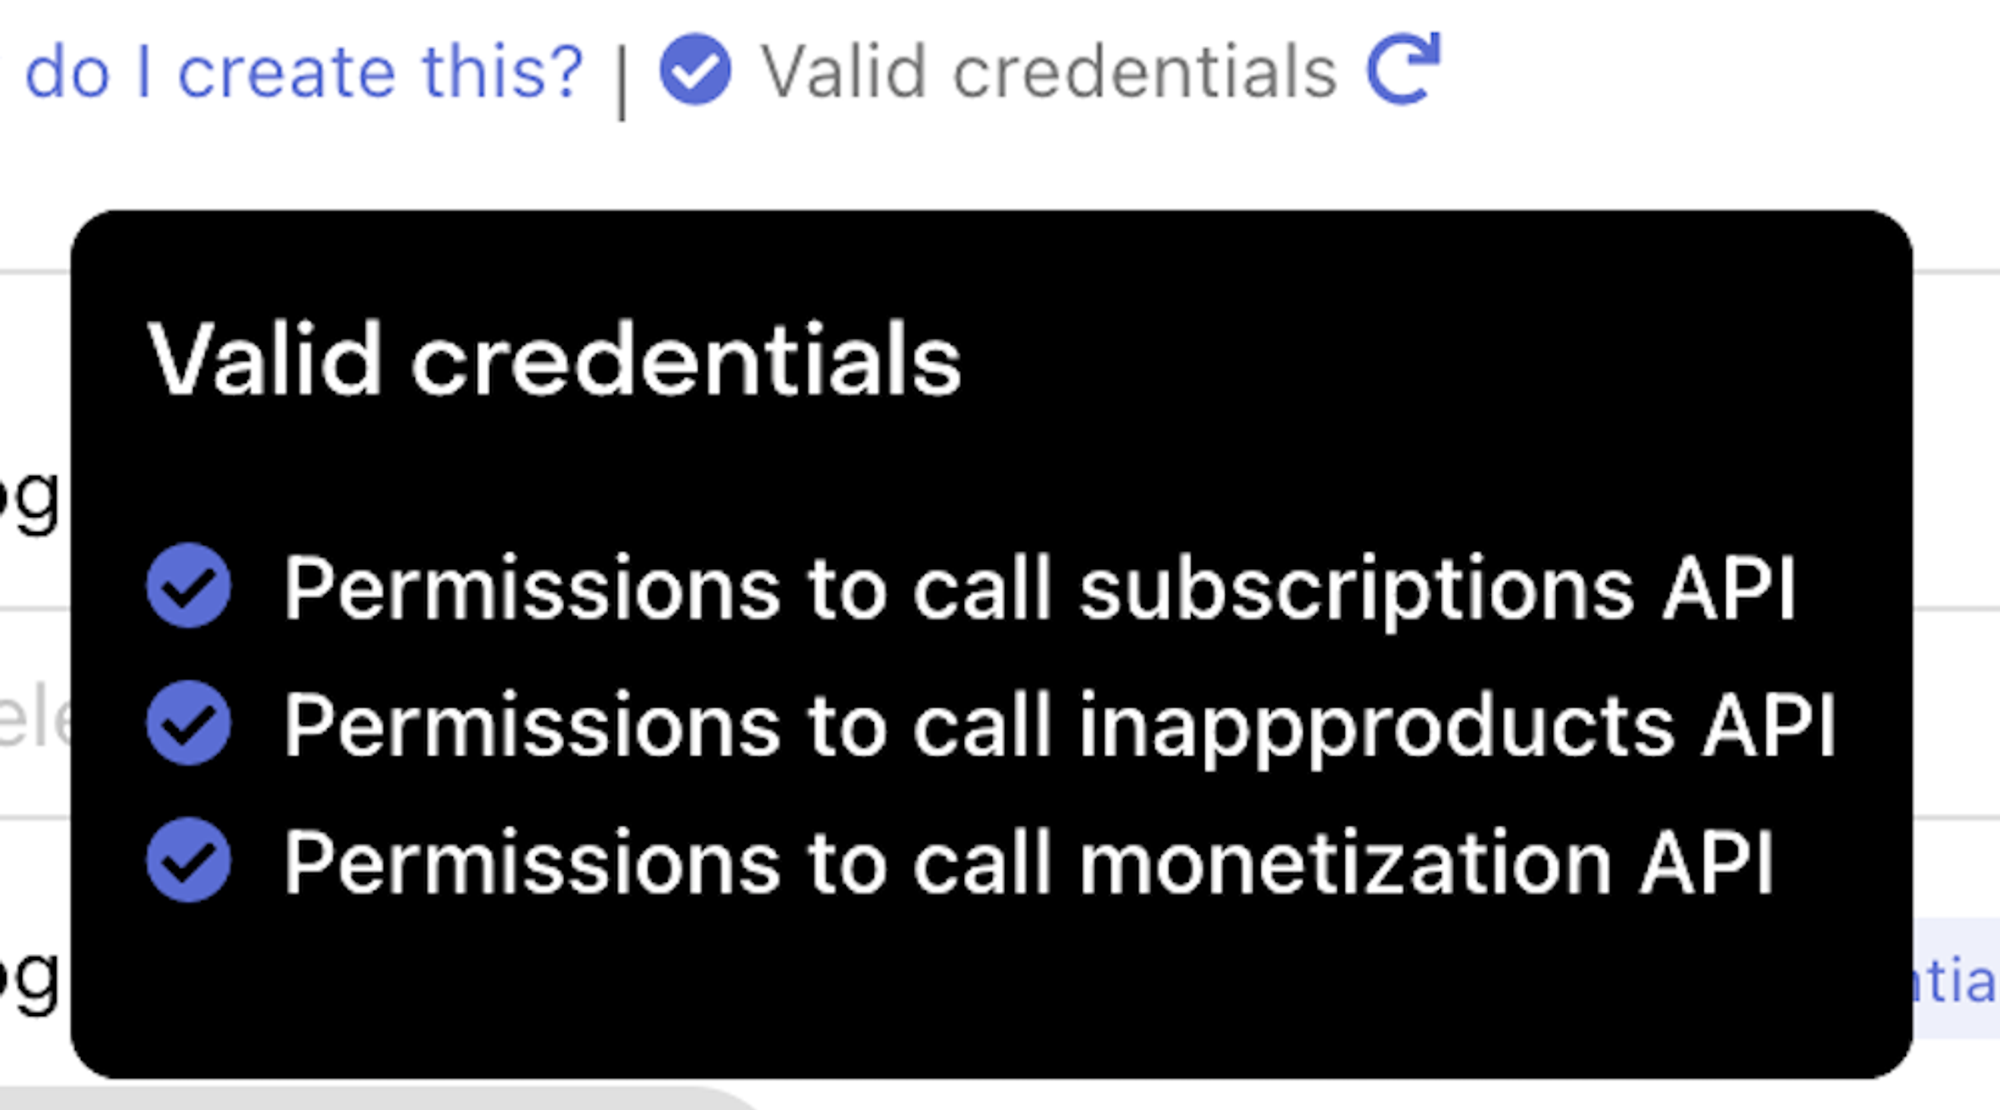
Follow the troubleshoot if you have any issue. More information here
Congrats! You are done with the first part! I know it's tedious, but it will worth the pain in the end!
What's next?
In the next part of the series, I'll guide you through everything you need to setup in the stores to enable in-app purchases & subscriptions.
You can read the next part of the series here:
Happy coding!