Maps in React Native: A Step-by-Step Guide

Introduction
Maps are everywhere and can be used for a wide range of purposes, allowing you to represent different types of data, and enabling powerful interactions for your users.
Whether you need to display store locations for a delivery app, show routes in a fitness app, or highlight nearby hospitals in a healthcare app, chances are you will need to deal with maps sooner or later.
In this series, we'll cover the basics of working with maps in React Native:
Expo Project setup
Google Cloud Console setup
Creating a Google project
Getting API keys for each platform
Setting up restrictions for each platform
- Getting the required SHA-1 Certificate Fingerprint by building our app with EAS build
Creating a basic map
Requesting user permission to access their current location
Displaying data within the map
Handling user interactions.
More!
These series are divided into two parts:
The boring (but needed) part: Project setup, getting the API keys, building the app, and getting the SHA-1 Certificate (required for your API keys)
The fun part: Start playing with maps and adding cool features.
By the end of this article, you’ll be done with the boring stuff, and you’ll have a basic map working in your app. The next article will cover the fun part, and will be released next week.
Creating a new project
Let’s start by creating an empty react native project with Expo. I’ll be using the expo-template-blank-typescript to avoid dealing with TypeScript configurations.
npx create-expo-app -t expo-template-blank-typescript
Adding react-native-maps
If you're working with maps in React Native, look no further than react-native-maps. It offers a lot of handy features, including markers, user location tracking, and event handling, as well as advanced functionalities like overlays and marker clustering.
Furthermore, you have the freedom to completely customize the appearance of your map to align with your brand or to support dark mode.
Run the following command in the root of your project to add react-native-maps
npx expo install react-native-maps
By using the npx expo install command, we make sure that we get the right version of react-native-maps for the Expo SDK version we are using. At the time I’m writing this article, the latest SDK version is 48.
Setting up Google Maps SDK
While working with react-native-maps. You’ll need to use the GOOGLE_PROVIDER to present a unified look and feel on both platforms. Because the Google provider relies on Google APIs for many features, we’ll need to get our API Keys and tie everything up within our Expo project so everything works as expected.
But there’s a catch. In order to properly setup your Android API key restrictions (highly recommended to protect your API key from unauthorized use), you’ll need to provide a SHA-1 Certificate Fingerprint. There are two ways you can get this certificate:
Build your app and upload your binary to the Google Play console.
Create a development build with EAS build, the Expo service that allows you to build your apps in the cloud.
You’ll eventually need to upload your binary before publishing your app to the Play Store, but it involves many additional steps that are outside of the scope of this tutorial, so we’ll proceed with option 2.
Creating a development build with EAS build
For this part of the tutorial, you’ll need to have an Expo account and install the eas-cli globally. If you don’t have an account already, please visit https://expo.dev and sign up.
If you are already using EAS and want to add maps to an existing project, you can skip the following steps
Once you have an Expo account, run the following command on your terminal to globally install the
eas-clipackagenpm install -g eas-cliRun the
eas logincommand, and enter your username and password.Once you are logged in, run the following command to set up your project.
eas build:configureSelect all platforms when asked, so you can build for both platforms later.
After this step, your project will now include a new
eas.jsonfile where you can setup your different build profiles. For the scope of this article, we’ll use the “preview” profile that is already configured. Besides, Expo will create a new project for you. You can now visit expo.dev and search for your new project.Update your
app.jsonfile to provide a package name for your Android app, and a bundle identifier for your iOS app.{ "expo": { "name": "maps-demo", "slug": "maps-demo", "version": "1.0.0", "orientation": "portrait", "icon": "./assets/icon.png", "userInterfaceStyle": "light", "splash": { "image": "./assets/splash.png", "resizeMode": "contain", "backgroundColor": "#ffffff" }, "assetBundlePatterns": ["**/*"], "ios": { "supportsTablet": true, + "bundleIdentifier": "com.example.mapsdemo" }, "android": { "adaptiveIcon": { "foregroundImage": "./assets/adaptive-icon.png", "backgroundColor": "#ffffff" }, + "package": "com.example.mapsdemo" }, "web": { "favicon": "./assets/favicon.png" }, "extra": { "eas": { "projected": "..." } } } }Run the following command to create your first Android build
eas build --platform android --profile preview
Follow the instructions, and EAS will proceed to create a new Android Keystore for you. This Keystore is used to sign the Android app during the build process, ensuring its security and integrity.
After signing the app, Expo will automatically start building your app in the cloud.
At this point, you can visit https://expo.dev and see your new project with the first build in progress.

This build can take a few minutes, but we can already get the SHA-1 Certificate we need. 😉
Getting the SHA-1 Certificate Fingerprint
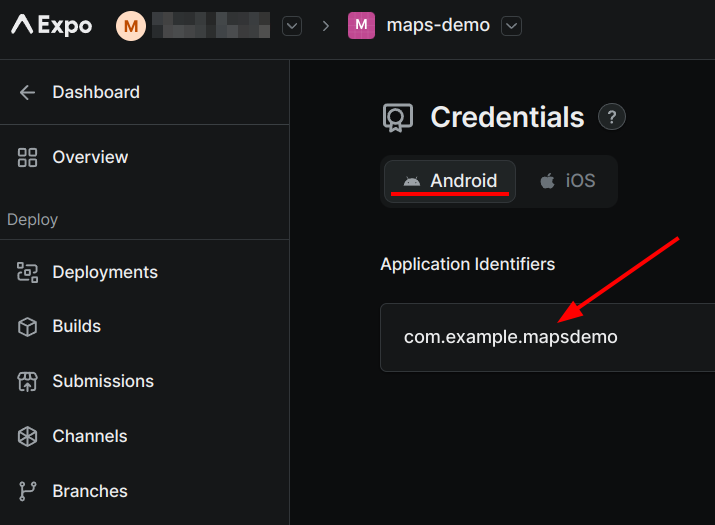
Go to https://expo.dev and click on your new project in the sidebar, as shown in the image above.
From your project dashboard, click on “Credentials” within the “Configure” section

With “Android” active in the top menu (active by default), click on your application identifier
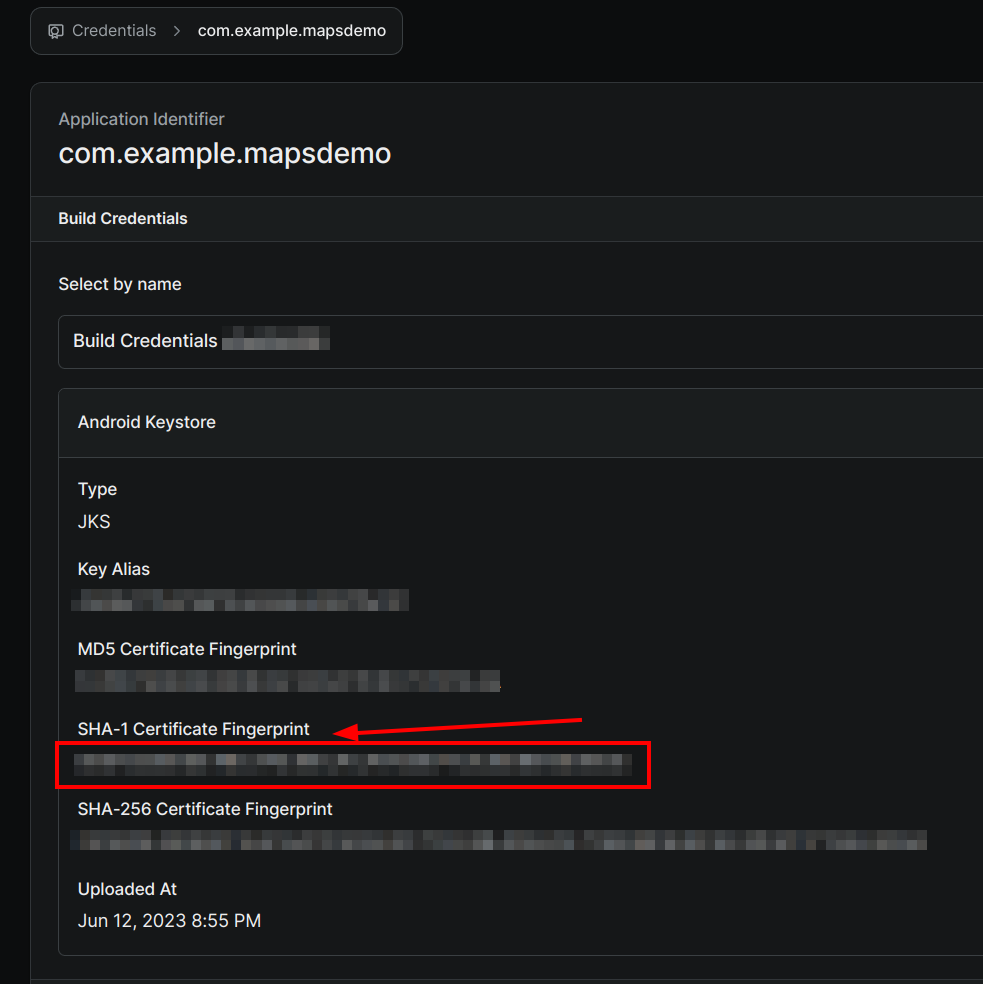
Within the “Android Keystore” section, you’ll see your generated SHA-1 Certificate Fingerprint. Copy this, as you’ll need it below while setting up everything in Google Cloud Console.
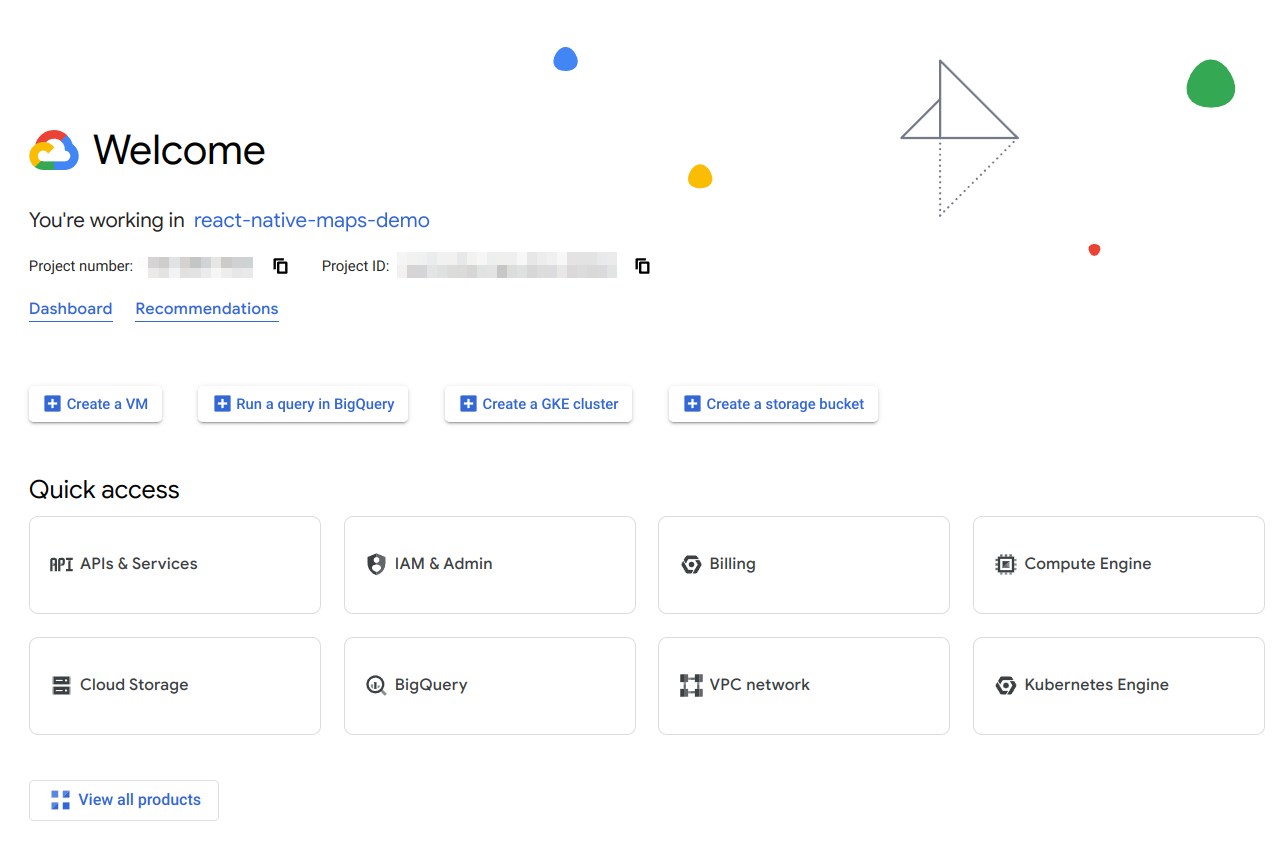
Creating a project in Google Cloud Platform
Before we can use Google as a Maps provider, it is essential to create a project in Google Cloud Platform. To set up your project, follow these steps:
Visit cloud.google.com and sign in.
Click on the dropdown at the top left corner.
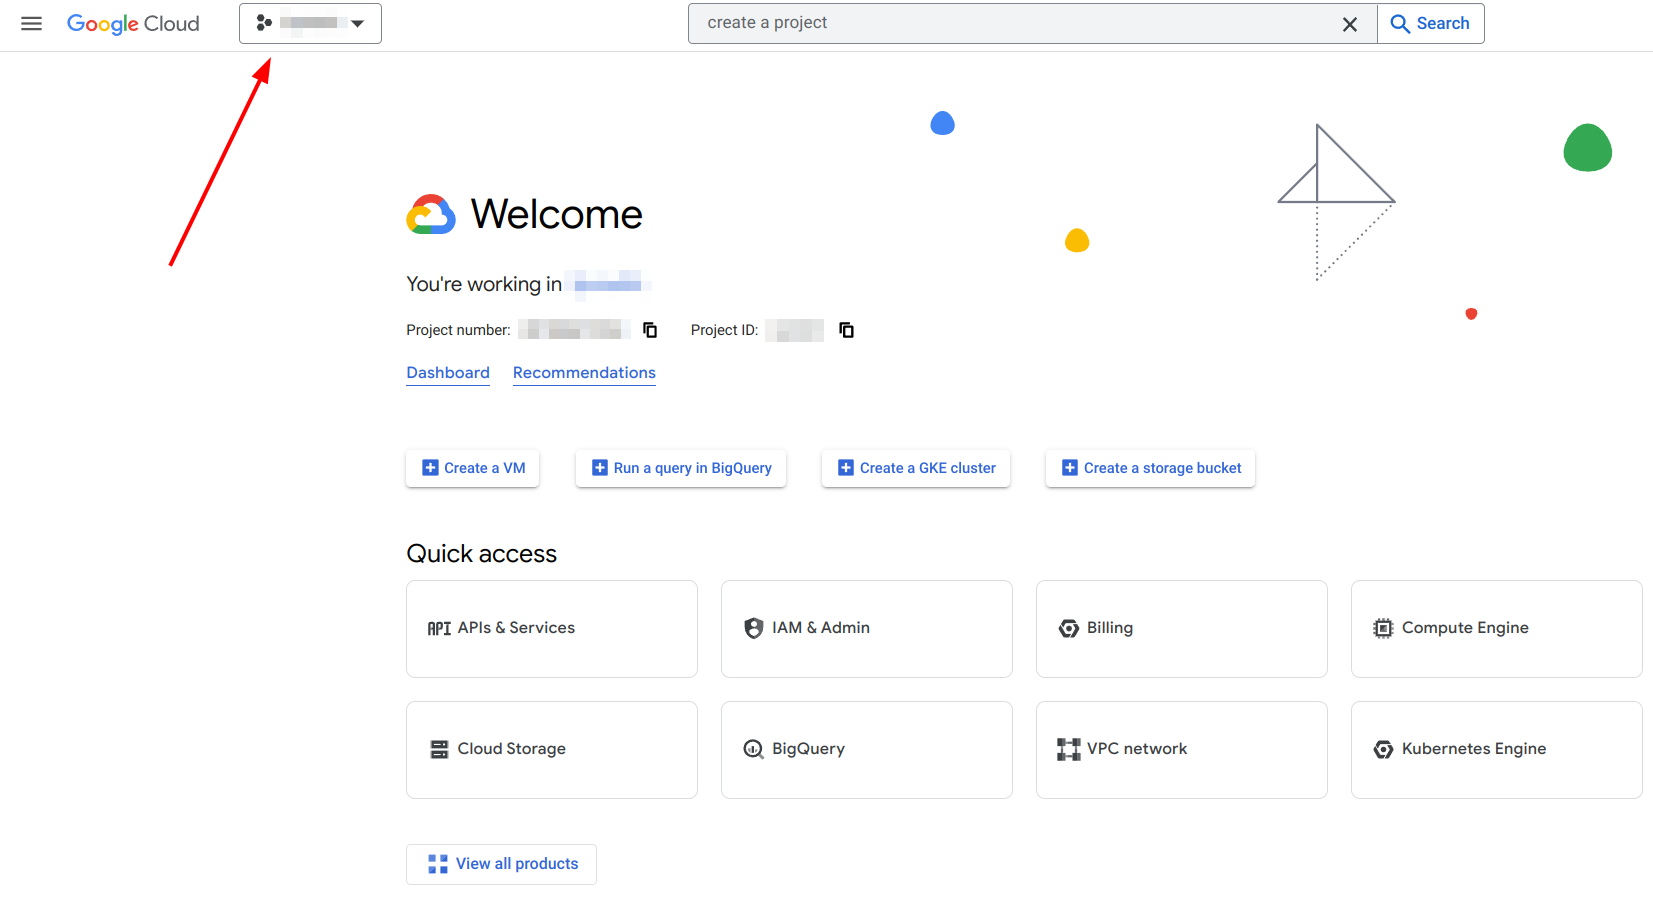
Click on "New Project" at the top right corner.
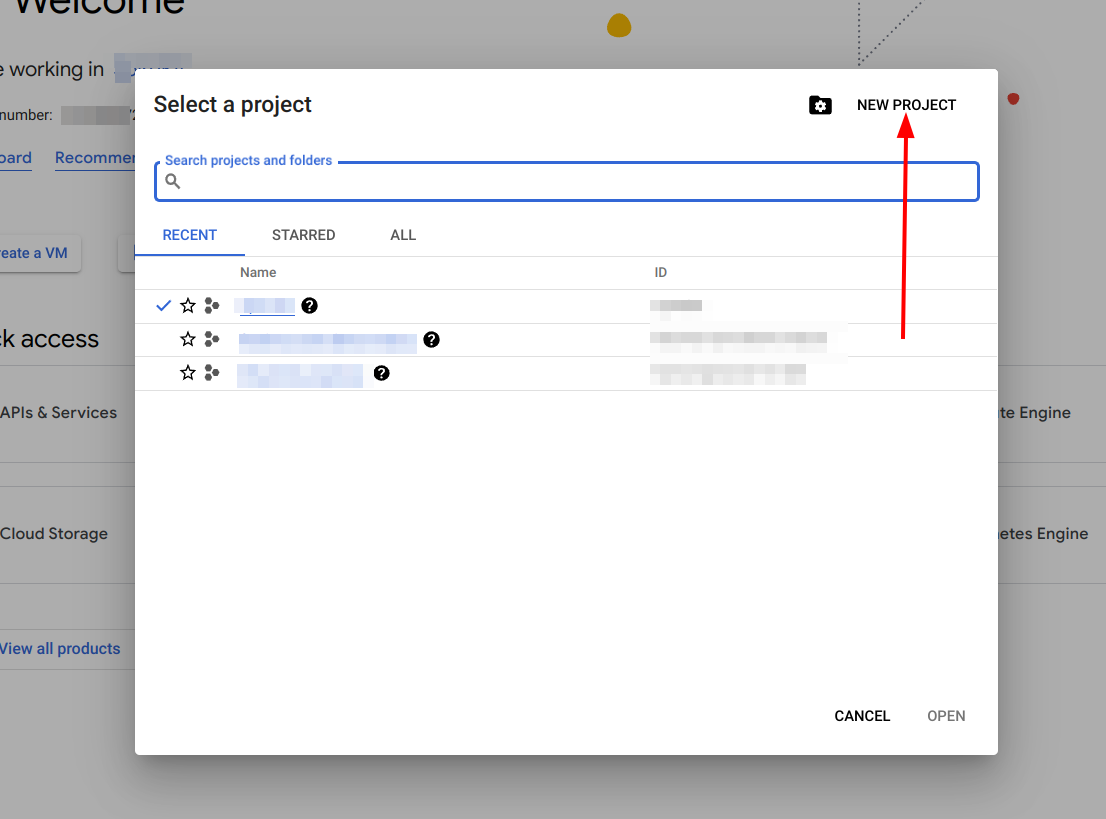
Fill in the form and click on "Create", and wait until the project is created. It could take a few seconds or even minutes.
Warning: Once you confirm this form, you won’t be able to change your project id.
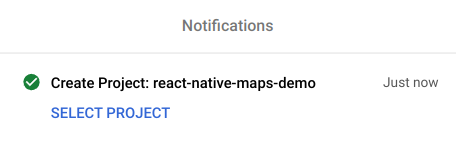
Once the project creation is finished, you receive a notification like in the image below. Click “Select project” to set your new project as active, and you’ll be redirected to your new project’s dashboard.
Enabling Google Maps SDK
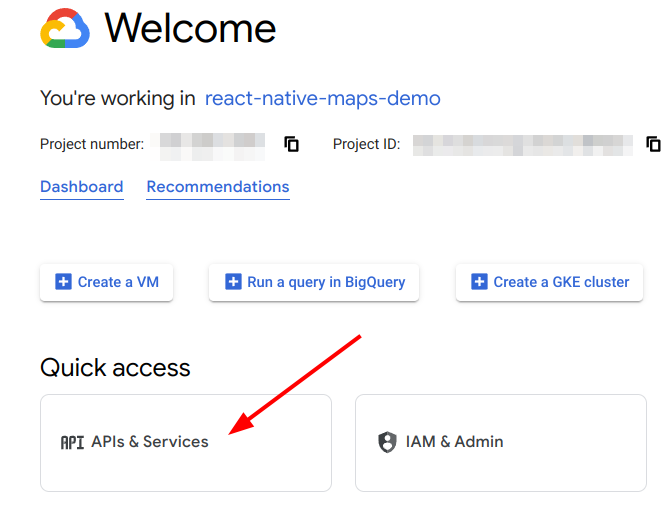
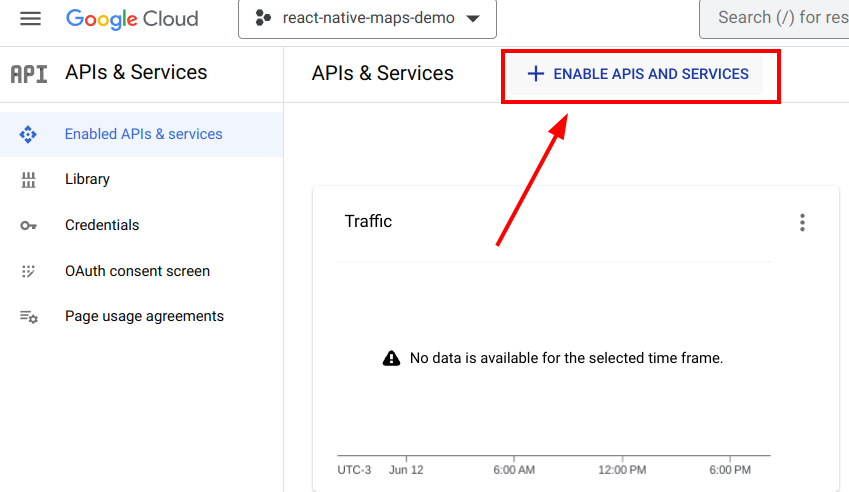
With the new project created, we now need to enable Google Maps SDK. Let’s do that step-by-step:
Click on “APIs & Services”
Click on “Enable APIs and services”
We’ll need to enable “Maps SDK for Android” and “Maps SDK for iOS”.
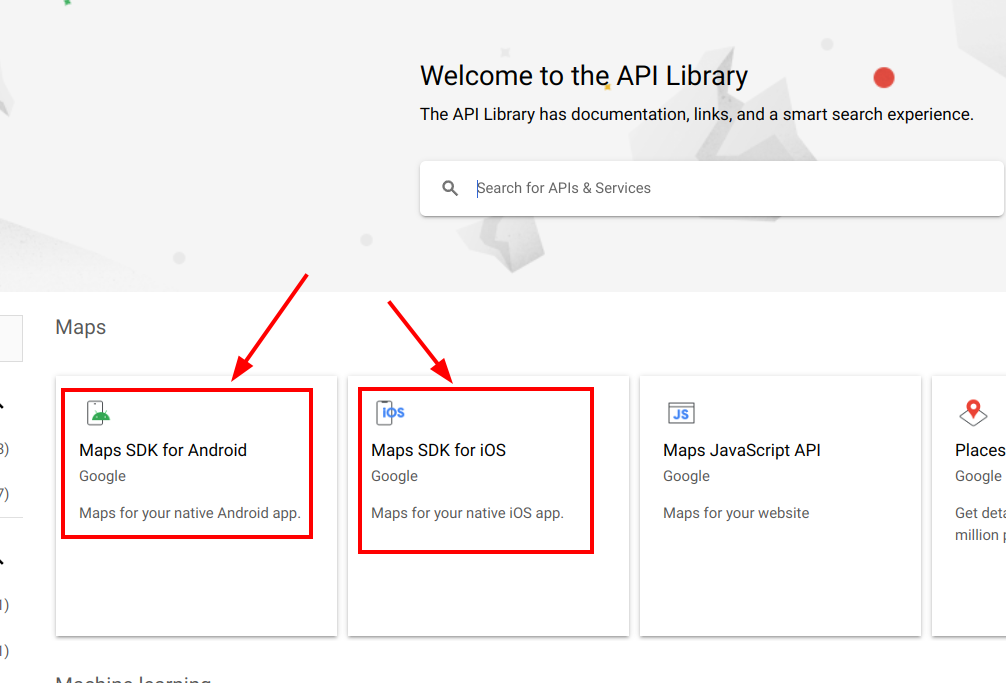
Let’s start with Android first. Click on the “Maps SDK for Android” card.
Next, click on “Enable”. This will take a few seconds, and you’ll get your API key.
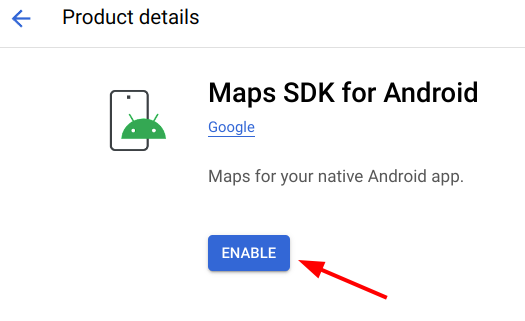
Make sure to store the key. You’ll need it later.
Repeat the same steps for iOS to enable “Maps SDK for iOS”
At least in my case, I didn’t get an API key for iOS after enabling it. So we’ll create an API key later in this article.
You now have both services enabled for your Google Console project. The next step is to set up a few app restrictions for each platform.
Setting up “App restrictions”
Setting up app restrictions while working with the Google Maps SDK is highly recommended for several reasons:
Security: By setting up app restrictions, you can ensure that only your authorized apps are able to use the Google Maps SDK with your API key.
Quota management: The Google Maps SDK has usage limits and quotas associated with it. By setting up app restrictions, you can effectively manage and monitor the usage of the SDK for each of your authorized apps. This helps prevent excessive usage that could lead to unexpected costs.
API key management: App restrictions provide an additional layer of protection for your API key. If you need to revoke access for a specific app or if you suspect unauthorized usage, you can easily update the app restrictions to disable access for that app without affecting other authorized apps.
App restrictions for Android
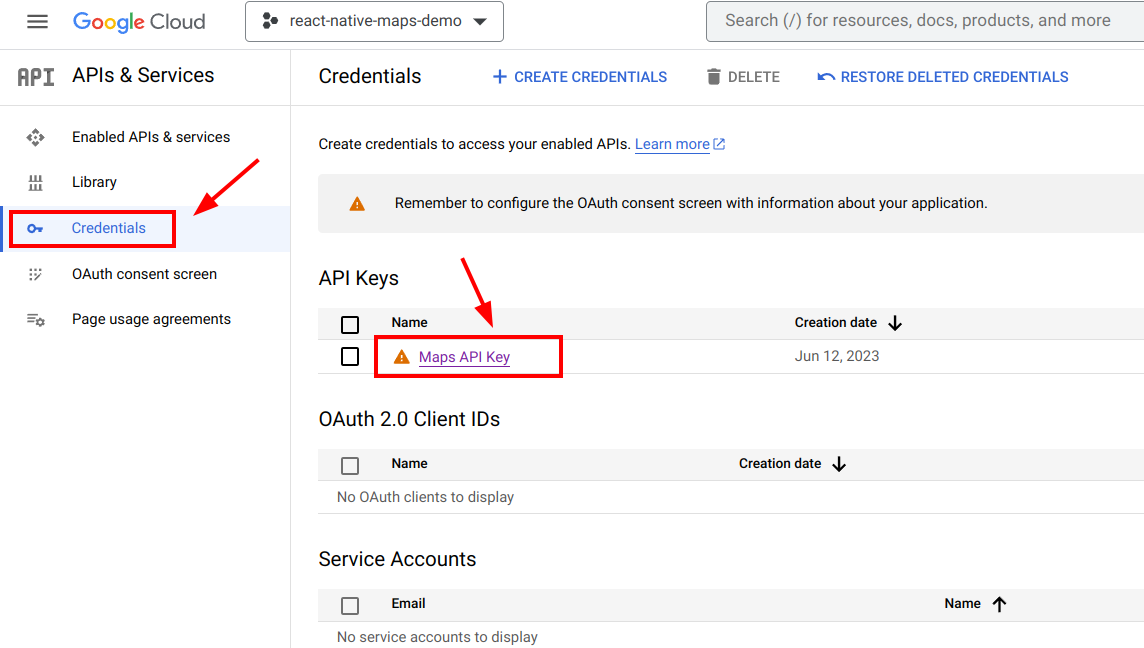
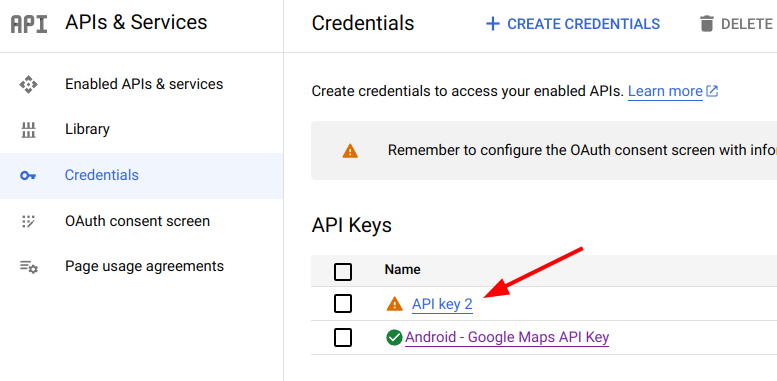
Within “APIs & Services”, click on the “Credentials” button in the sidebar, and then click on “Maps API Key”
Update the name of the API key so it’s easier to differentiate between Android and iOS. I added the “Android” prefix, but feel free to choose the name you want.
Within the “Set an application restriction” section, choose “Android apps”
A new section called “Android restrictions” will appear. Click on the “+ Add” button, and complete the form with your package name (needs to match with your
app.jsonfile) and your SHA-1 certificate fingerprint.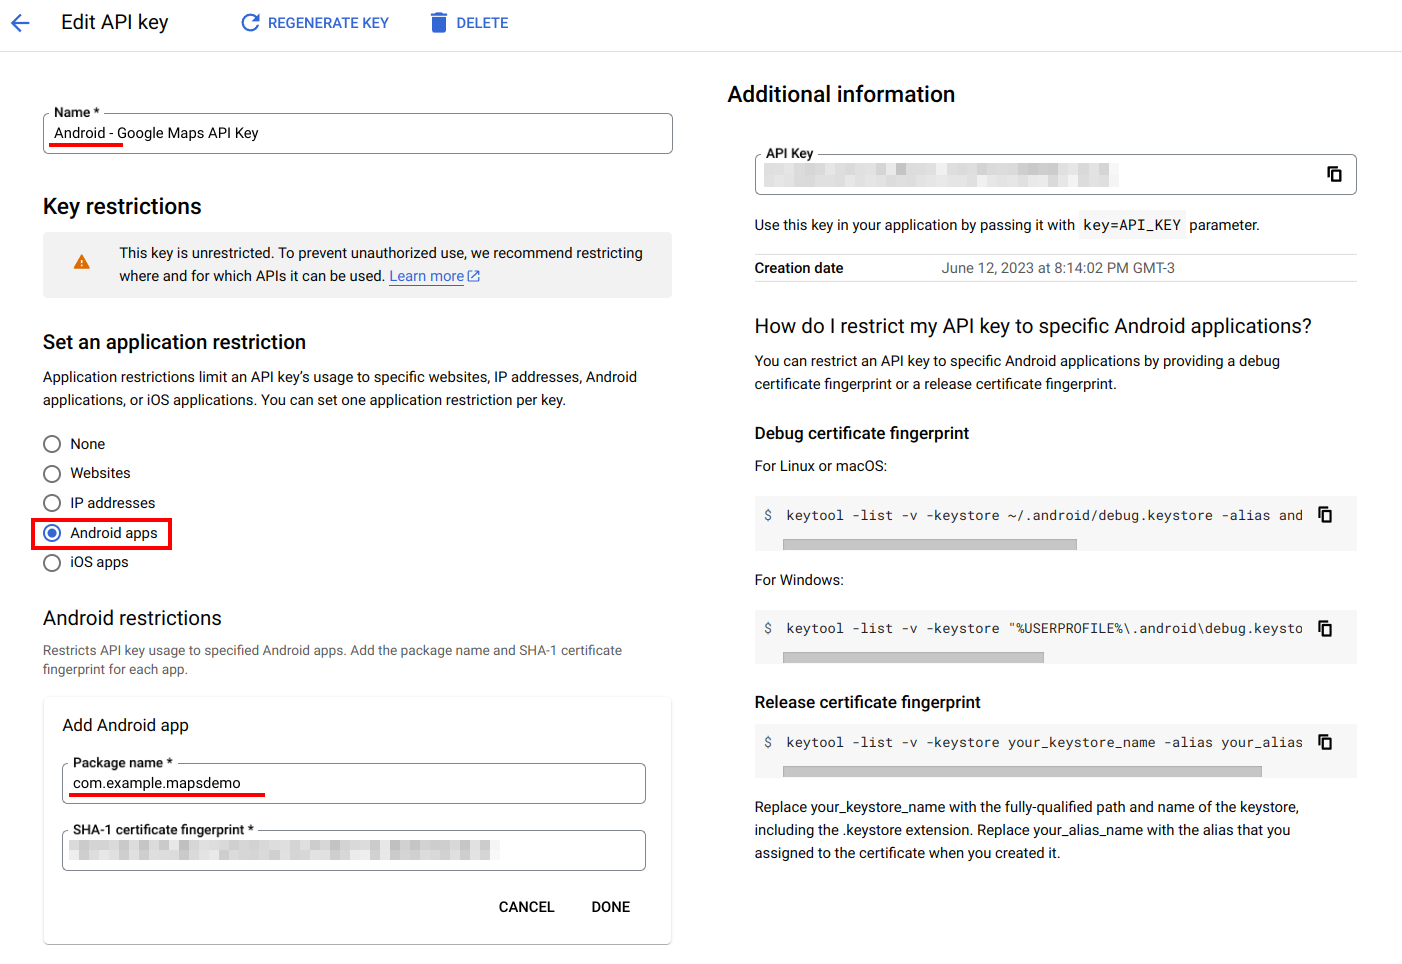
Click “Done” and then “Save” to confirm your new restrictions.
Copy your API key and add it to your
app.jsonfile:{ "expo": { ... "android": { ... "package": "com.example.mapsdemo", + "config": { + "googleMaps": { + "apiKey": "YOUR_ANDROID_API_KEY" + } + } } } }
App restrictions for iOS
Go back to the "Credentials" section and click on the "Create credentials" menu. then click on "API key"
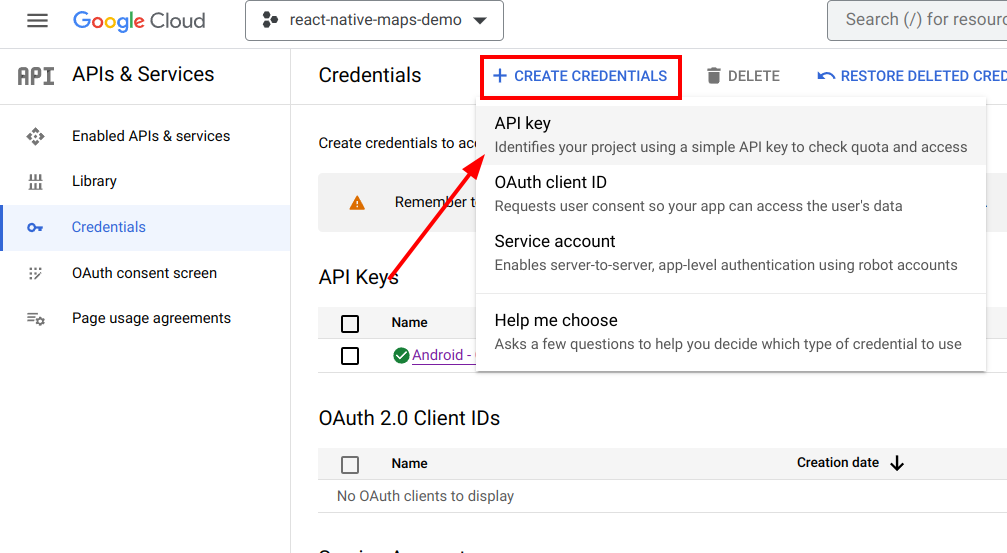
Google will generate a new API Key. Copy it for later. Then, close the modal and click on the new API to set up the restrictions, the same as you did for Android before.
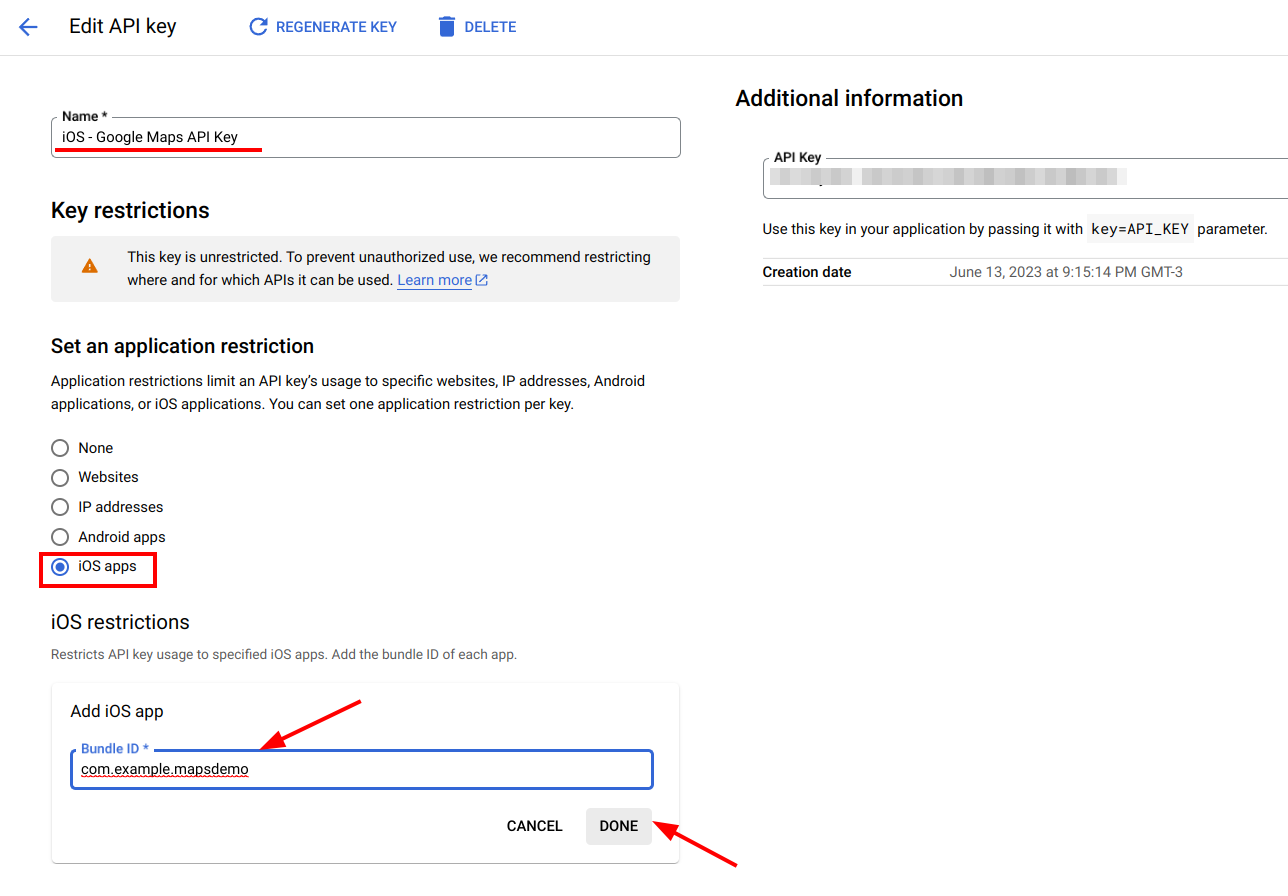
Update the name of the API key so it’s easier to differentiate between Android and iOS. I added the “iOS” prefix.
Within the “Set an application restriction” section, choose “iOS apps”
A new section called “iOS restrictions” will appear. Click on the “+ Add” button, and complete the form with your bundle identifier (it needs to match with your
app.jsonfile)Click “Done” and then “Save” to confirm your new restrictions.
Copy your API key and update your
app.jsonfile like this{ "expo": { ... "ios": { "bundleIdentifier": "com.example.mapsdemo", + "config": { + "googleMapsApiKey": "YOUR_IOS_API_KEY" + } }, ... } }
Adding a basic map
Update your App.tsx file to render a MapView that covers the entire screen
import React from "react";
import { StyleSheet } from "react-native";
import MapView, { PROVIDER_GOOGLE } from "react-native-maps";

export default function App() {
  return (
    <MapView
      provider={PROVIDER_GOOGLE} // Specify Google Maps as the provider
      style={styles.map}
      initialRegion={{
        latitude: -34.603738,
        longitude: -58.38157,
        latitudeDelta: 0.01,
        longitudeDelta: 0.01,
      }}
    />
  );
}

const styles = StyleSheet.create({
  map: {
    flex: 1
  },
});
Here are a few things to mention about this code:
The
providerprop is set to PROVIDER_GOOGLE, indicating the use of Google Maps as the map provider for both platforms.The
initialRegionprop defines the initial center and zoom level of the map using the specified latitude, longitude, and delta values.For the map styles, we are using
flex:1, so we can fill the screen with the map.
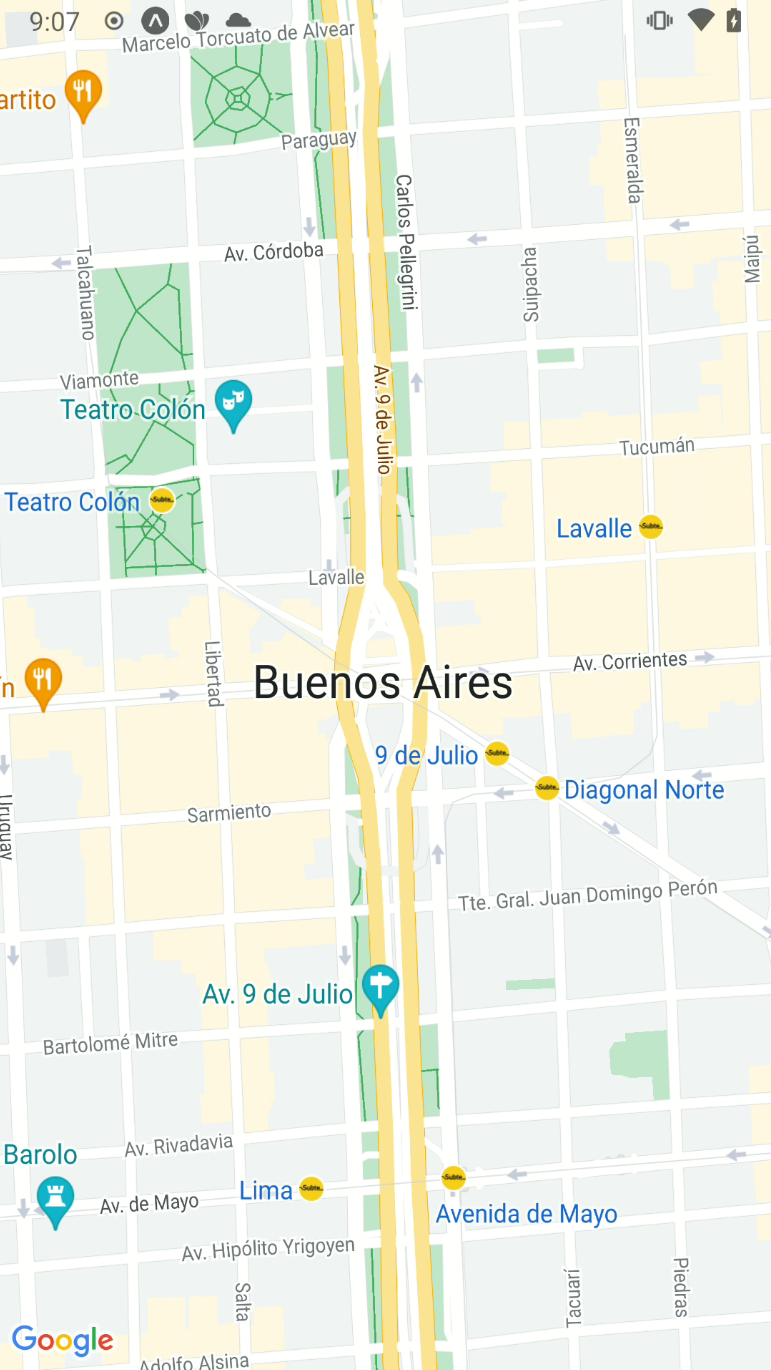
You can now run your app with npm start or yarn start. If everything went as expected, you should see your full-screen map ✨
Congrats! You are done with the boring stuff! Stay tuned for the next article, where we’ll start working with our map to add new features, track user events, and more.
Final thoughts
I saw a few articles that talked about how to use maps in React Native, but I couldn’t find an article focused on the boring but important configurations required to use maps in a secure way, so my goal for this article was to address all those aspects that are usually overlooked.
Please let me know if you find it useful, and if you want me to cover specific topics about react-native-maps or React Native in general.
Happy coding!